
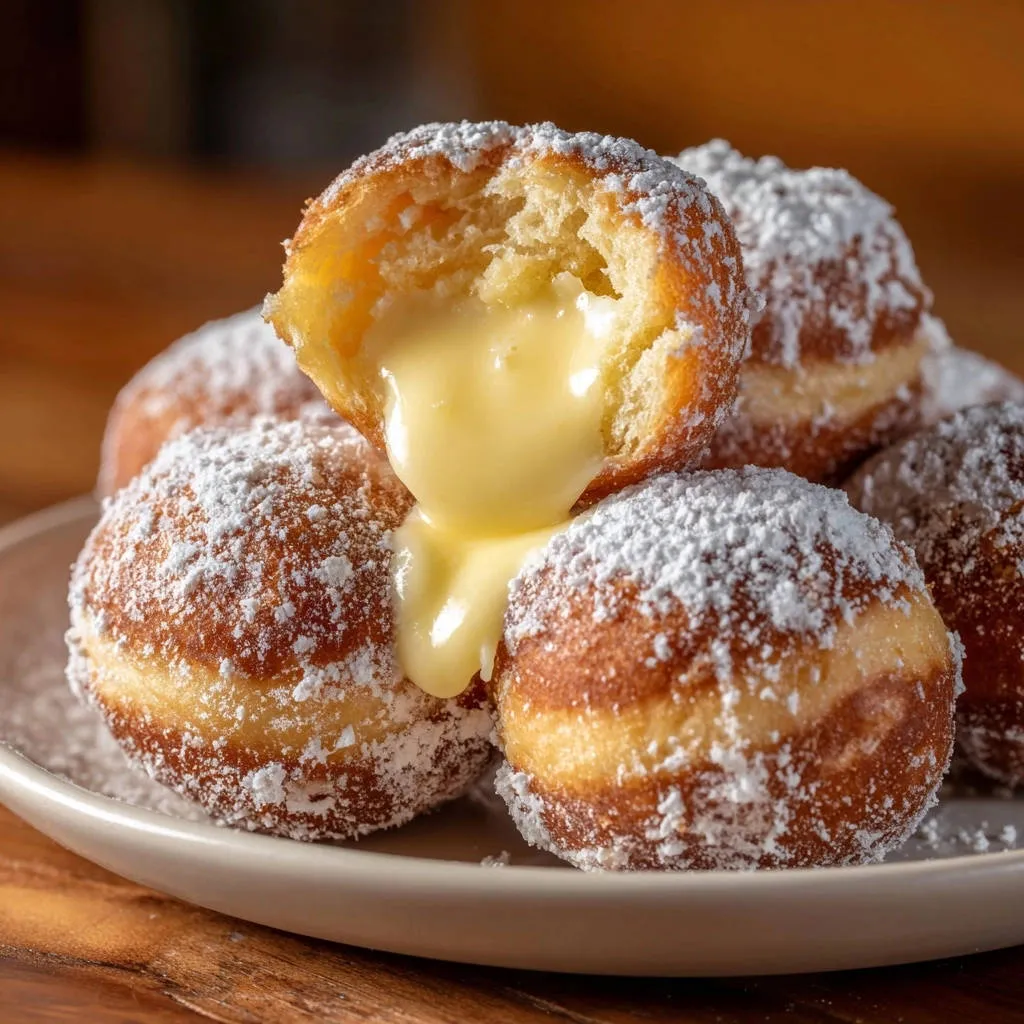
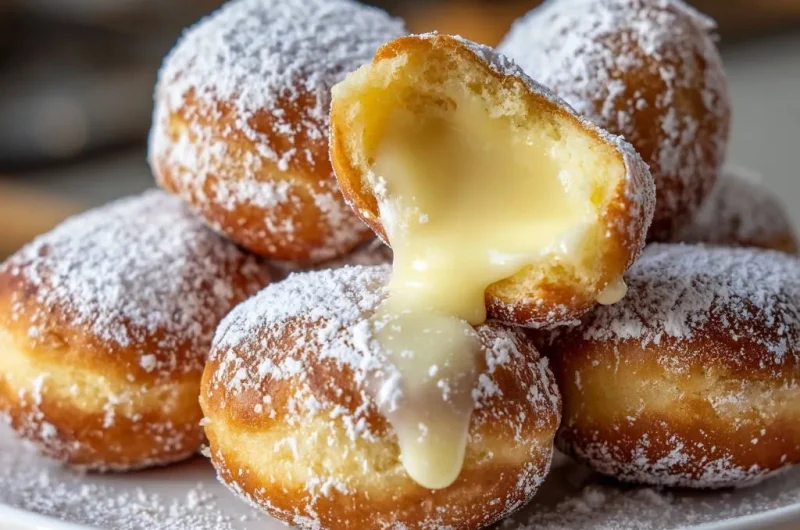
There’s nothing quite like a warm, sugary doughnut hole with a luscious creamy filling. But if you’ve ever tried making them at home, you know it’s easy to end up with something heavy or greasy instead of that dreamy light and fluffy texture.
I struggled with it too, until I cracked the code for truly perfect Custard-Filled Doughnut Holes. This simple technique promises an incredibly airy dough and a rich, velvety custard, ensuring delightful bites every single time.
Why This Custard-Filled Doughnut Holes Recipe is Your New Favorite
The Secret to Effortlessly Light & Fluffy Dough
Achieving a supremely light and airy dough is paramount for doughnut holes. This recipe meticulously guides you through the crucial steps of proper kneading and a double-proofing process.
These techniques develop the gluten structure, allowing the dough to trap air efficiently. The result is a pillowy texture that melts in your mouth, a stark contrast to dense, chewy versions.
That Silky Smooth Custard Filling: A Perfect Match
Beyond the dough, the homemade custard filling sets these treats apart. It’s incredibly rich, smooth, and perfectly balanced in sweetness, complementing the light doughnut without overpowering it.
The best part? You can prepare this luscious custard in advance. This saves time on the day of frying, making the whole process more manageable and enjoyable.
Simple Steps, Stunning Results: A Recipe for Every Baker
Don’t be intimidated by homemade doughnuts; this recipe breaks down each stage into clear, achievable steps. Even if you’re new to yeasted doughs or custards, you’ll find success with our detailed guidance.
The impressive outcome, coupled with the straightforward instructions, makes this an ideal recipe for surprising family and friends with a professional-quality treat.
The Building Blocks of Bliss: Crafting Your Doughnut Holes
Dough Essentials: From Flour to Foam
Active Dry Yeast: This living ingredient is responsible for the incredible rise and airy texture of your doughnut holes. Ensure it’s active by proofing it in warm milk before mixing.
All-Purpose Flour: Provides the fundamental structure for the dough. Proper measurement is crucial; too much can make the doughnuts dense.
Unsalted Butter: Adds richness and tenderness to the dough, contributing to that desirable soft crumb. Melting it helps integrate it smoothly.
Custard’s Core: Rich & Velvety Foundation
Large Egg Yolks: These are the secret to a rich, deeply colored, and luxurious custard. They provide emulsification and body.
Cornstarch: Acts as the primary thickening agent, ensuring your custard is wonderfully smooth and spoonable without being gummy. It’s essential for achieving that perfect consistency.
Vanilla Extract: Infuses the custard with classic, comforting flavor. Use pure vanilla for the best results.
Gear Up for Greatness: Essential Tools You’ll Need
Kitchen Must-Haves for Doughnut Hole Success
Stand Mixer with Dough Hook: While not strictly necessary, a stand mixer makes the kneading process significantly easier and more consistent, ensuring optimal gluten development.
Deep-Frying Thermometer: Absolutely critical for maintaining the precise oil temperature. This prevents greasy doughnuts (if too low) or burnt exteriors with raw centers (if too high).
Piping Bag with Long, Thin Tip: Essential for cleanly injecting the custard filling into each doughnut hole. A clean syringe also works perfectly.
Wire Rack Set Over a Baking Sheet: Allows excess oil to drain off the fried doughnut holes, keeping them light and preventing sogginess.
Mastering Each Step: Your Guide to Doughnut Hole Perfection
Bringing the Dough to Life: Kneading & Rising
Begin by activating your yeast: whisk together warm milk (105-115°F), a teaspoon of sugar, and the active dry yeast in a large bowl. Allow it to sit for 5-10 minutes until a foamy layer appears, indicating the yeast is alive and ready.
Next, incorporate the remaining sugar, egg (at room temperature for better emulsification), melted butter, and salt into the yeast mixture, stirring well. Gradually add the flour, mixing until a shaggy dough forms.
Turn the dough onto a lightly floured surface and knead vigorously for 8-10 minutes. This kneading is crucial for developing the gluten, which creates the stretchy network necessary to trap air, ensuring your doughnut holes are light and fluffy.
Transfer the kneaded dough to a lightly oiled bowl, turning once to coat. Cover it loosely with plastic wrap or a clean kitchen towel and let it rise in a warm, draft-free place for 1 to 1.5 hours, or until it has visibly doubled in size. This first proofing is vital for an airy texture.
Crafting the Luscious Custard: Whisking to Chilling
While your dough proofs, prepare the custard. In a medium saucepan, whisk milk with half the sugar over medium heat until the sugar dissolves and the milk is warm but not boiling. This gentle heating prepares the base.
In a separate bowl, whisk the egg yolks with the remaining sugar and cornstarch until the mixture is pale and smooth. This creates a stable base for the custard and prevents lumps.
To prevent the eggs from scrambling, slowly temper the egg yolk mixture by gradually whisking in about half of the warm milk. Then, pour this tempered mixture back into the saucepan with the remaining milk.
Cook over medium heat, whisking constantly and diligently. The mixture will thicken significantly and come to a boil. Continue boiling for 1 minute while whisking to ensure the cornstarch fully activates and eliminates any starchy taste.
Remove the saucepan from heat and stir in the vanilla extract and softened butter until the custard is perfectly smooth and glossy. Transfer the finished custard to a bowl, cover the surface directly with plastic wrap to prevent a skin from forming, and chill it completely in the refrigerator for at least 2 hours until firm.
The Golden Finish: Frying & Filling Your Delights
Once your dough has risen, gently punch it down and turn it onto a lightly floured surface. Roll the dough evenly to about 1/2 inch thickness. Use a 1.5-2 inch round cutter to cut out your doughnut holes. You can re-roll scraps once to maximize your yield.
Place the cut doughnut holes on parchment-lined baking sheets, ensuring space between them. Cover them loosely and let them proof again for 30-45 minutes, or until noticeably puffy. This second rise is crucial for achieving supreme lightness before frying.
Heat vegetable oil in a large, heavy-bottomed pot or Dutch oven over medium heat. It’s imperative that the oil reaches precisely 350°F (175°C); use a deep-frying thermometer for accuracy. Maintaining this exact temperature prevents greasy or dense doughnuts.
Carefully drop 3-4 doughnut holes into the hot oil. Do not overcrowd the pot, as this will drastically drop the oil temperature and lead to oily, undercooked doughnuts. Fry for 1.5-2 minutes per side, or until they are beautifully golden brown.
Using a slotted spoon, carefully remove the golden doughnut holes from the oil and immediately transfer them to a wire rack set over a baking sheet. This allows any excess oil to drain away, keeping them light and crisp.
Repeat the frying process with the remaining doughnut holes, vigilantly adjusting the heat as needed to maintain that consistent 350°F oil temperature. Once cooled enough to handle but still warm, take your chilled custard.
Fit a piping bag with a long, thin tip (or use a clean syringe). Inject the luscious custard filling into each doughnut hole until it feels pleasantly plump. Finally, dust generously with powdered sugar just before serving for that classic, irresistible finish.
Unlock Pro Secrets: Elevating Your Doughnut Hole Experience
Achieving the Perfect Dough Texture
Resist the urge to add too much flour during kneading or rolling. A slightly sticky dough after initial mixing is normal and will become smooth with proper kneading. Over-flouring leads to a dry, dense final product.
Listen to your dough during kneading; it should feel smooth and elastic, springing back slowly when poked. For optimal proofing, find the warmest spot in your kitchen, or create one using a turned-off oven with the light on.
Frying Smart: Avoiding Greasy or Dense Results
The oil temperature is non-negotiable. Invest in a reliable deep-frying thermometer and monitor it constantly, adjusting heat as necessary. This is the single most important factor for non-greasy doughnuts.
Frying in small batches is key. It ensures the oil temperature doesn’t drop too much and allows each doughnut hole to cook evenly. Always use a wire rack for draining; paper towels can steam the bottom, making them soggy.
Custard Perfection & Flavor Variations
To guarantee a silky-smooth custard, consider sifting your cornstarch before whisking it with the egg yolks. This prevents any tiny lumps from forming. Ensure the custard is completely chilled before filling for the best texture and stability.
Don’t be afraid to experiment with your filling! For a delightful twist, infuse the milk with citrus zest (lemon or orange) before making the custard, or stir in a tablespoon of cocoa powder for a rich chocolate custard. For another creamy, sweet treat, try these delightful easy cream puffs, also featuring a luscious filling.
Solve & Savor: Common Questions & Troubleshooting Tips
Why Aren’t My Doughnut Holes Light and Airy?
Several factors can contribute to dense doughnut holes. Under-proofing, where the dough hasn’t risen enough, is a common culprit. Ensure both rises are complete and the dough is visibly puffy.
For perfectly sealed fruit, try these golden fruit hand pies next.
Over-kneading can also make them tough, while an oil temperature that’s too low will result in greasy, heavy doughnuts. Always double-check your oil temperature with a thermometer.
Can I Prepare Parts of the Recipe in Advance?
Absolutely! The custard filling can be made 2-3 days ahead of time and stored, covered directly with plastic wrap, in the refrigerator. This allows it to chill thoroughly and saves time on your baking day.
You can also prepare the dough, complete the first rise, and then refrigerate it overnight for a slow proof. Just allow it to come to room temperature for about an hour before punching down and shaping.
Best Ways to Store and Reheat Leftovers
Custard-filled doughnut holes are best enjoyed fresh, but they can be stored in an airtight container at room temperature for up to a day, or in the refrigerator for 2-3 days.
For reheating, a quick 10-15 seconds in the microwave can gently warm them, or place them in a preheated oven at 250°F (120°C) for a few minutes until just warm, but be careful not to dry out the custard.
Exploring Alternative Cooking Methods (and Fillings!)
While deep-frying yields the classic texture, you can experiment with an air fryer for a less oily result. Note that air-fried doughnut holes will have a different, chewier texture than their fried counterparts. For another fun fried treat, consider making easy fried dough bites.
Beyond custard, consider filling your doughnut holes with raspberry jam, lemon curd, or even a rich chocolate ganache for variety. A simple whipped cream cheese filling also makes a delightful addition.
Making Them Last: Serving & Storage Suggestions
Creative Ways to Present Your Doughnut Holes
Beyond the classic powdered sugar, consider a light dusting of cinnamon sugar for a warm spice note. You could also drizzle them with melted chocolate or a simple glaze for an extra touch of decadence.
Arrange them on a tiered serving platter for an elegant display at gatherings, or simply pile them high on a rustic board for a casual, inviting presentation.
Keeping Your Treats Fresh: Storage Guidelines
Store your filled doughnut holes in an airtight container to prevent them from drying out. If storing at room temperature, consume within one day for optimal freshness and texture.
For longer storage, keep them refrigerated. They will remain delicious for up to 2-3 days, though the dough may lose a little of its initial crispness. Always ensure the custard is kept cool.
Your Culinary Adventure Begins: Share Your Doughnut Hole Success!
Crafting your own Custard-Filled Doughnut Holes is a truly rewarding experience, transforming simple ingredients into an extraordinary treat. The joy of seeing those perfectly golden, pillowy spheres, bursting with creamy custard, is unmatched.
I encourage you to embrace this recipe and bring a little piece of bakery magic into your home. Don’t forget to share your creations and tag us online! If you’re looking for another delightful baking project, be sure to try our decadent chocolate brownies for a rich, fudgy indulgence.
Doughnut Holes
Course: DessertCuisine: AmericanDifficulty: mediumN/A
1
hour45
minutes450
kcal360
minutesAchieve perfect, airy doughnut holes every time with this simple technique. These warm, sugary treats are filled with a luscious, creamy custard, promising a delightful homemade dessert. Say goodbye to heavy or greasy doughnuts and hello to light, fluffy perfection.
Ingredients
For the Dough:
3 cups all-purpose flour
1/4 cup granulated sugar
2 1/4 teaspoons active dry yeast
1 cup warm milk (about 105 to 115 degrees F)
1 large egg, room temperature
4 tablespoons unsalted butter, melted and cooled
1/2 teaspoon salt
Vegetable oil, for deep frying
Powdered sugar, for dusting
For the Custard Filling:
1 1/2 cups milk
1/2 cup granulated sugar
3 large egg yolks
3 tablespoons cornstarch
1 teaspoon vanilla extract
2 tablespoons unsalted butter, softened
Directions
- For the Dough: In a large bowl, whisk together the warm milk, 1 teaspoon of the sugar, and the active dry yeast. Let stand for 5 to 10 minutes until foamy.
- Add the remaining sugar, egg, melted butter, and salt to the yeast mixture. Stir to combine.
- Gradually add the flour, mixing with a wooden spoon or a stand mixer with a dough hook until a shaggy dough forms.
- Turn the dough out onto a lightly floured surface and knead for 8 to 10 minutes until smooth and elastic. This step is crucial for developing gluten, which traps air and ensures a light texture.
- Place the dough in a lightly oiled bowl, turning once to coat. Cover with plastic wrap or a clean kitchen towel and let rise in a warm place for 1 to 1.5 hours, or until doubled in size. Proper proofing is key to airy dough.
- Gently punch down the risen dough and turn it out onto a lightly floured surface. Roll the dough to about 1/2 inch thickness. Use a round cutter (about 1.5 to 2 inches) to cut out doughnut holes. Re-roll scraps once if desired.
- Place the cut doughnut holes on parchment-lined baking sheets, leaving space between them. Cover loosely with plastic wrap or a towel and let them proof again for 30 to 45 minutes, or until visibly puffy. This second rise ensures lightness before frying.
- For the Custard Filling: While the doughnut holes are proofing, prepare the custard. In a medium saucepan, whisk together the milk and half of the sugar over medium heat until the sugar dissolves and the milk is warm but not boiling.
- In a separate bowl, whisk the egg yolks with the remaining sugar and cornstarch until pale and smooth.
- Slowly temper the egg yolk mixture by gradually whisking in about half of the warm milk. Then pour the tempered mixture back into the saucepan with the remaining milk.
- Cook over medium heat, whisking constantly, until the mixture thickens significantly and comes to a boil. Boil for 1 minute while whisking.
- Remove from heat, stir in the vanilla extract and softened butter until smooth. Transfer the custard to a bowl, cover the surface directly with plastic wrap to prevent a skin from forming, and chill completely in the refrigerator (at least 2 hours).
- Frying the Doughnut Holes: Heat vegetable oil in a large heavy-bottomed pot or Dutch oven over medium heat until it reaches 350 degrees F (175 degrees C). Maintaining this precise temperature is vital to prevent greasy or dense doughnuts. Use a thermometer.
- Carefully drop 3 to 4 doughnut holes into the hot oil, being careful not to overcrowd the pot. Overcrowding drops the oil temperature, leading to greasy doughnuts.
- Fry for 1.5 to 2 minutes per side, or until golden brown.
- Using a slotted spoon, remove the doughnut holes from the oil and transfer them to a wire rack set over a baking sheet to drain any excess oil.
- Repeat with remaining doughnut holes, adjusting heat as needed to keep the oil temperature consistent at 350 degrees F (175 degrees C).
- Once cooled enough to handle, use a piping bag fitted with a long, thin tip (or a clean syringe) to inject the chilled custard filling into each doughnut hole.
- Dust generously with powdered sugar before serving.
Notes
- Proper proofing and maintaining precise oil temperature are crucial for light, airy doughnut holes.