
For years, I envied those perfectly golden, crackly-crusted loaves from artisan bakeries, never quite believing I could achieve that magic at home. Then I discovered the secret to an truly incredible, yet surprisingly Easy Artisan Loaf. This recipe isn’t just simple; it’s a foolproof method that consistently delivers bakery-quality bread with minimal effort.
Why This Easy Artisan Loaf Will Be Your New Favorite
The Magic of “No-Knead”: Less Effort, More Flavor
The beauty of this recipe lies in its no-knead approach. Forget about strenuous kneading or specialized equipment; a simple stir is all it takes. This extended, slow fermentation develops complex flavors and a wonderfully open, airy crumb that rivals professional loaves.
For a simpler approach to shaping, consider this 4-ingredient no-knead artisan bread.
That Unmistakable Crispy Crust: A Simple Secret Revealed
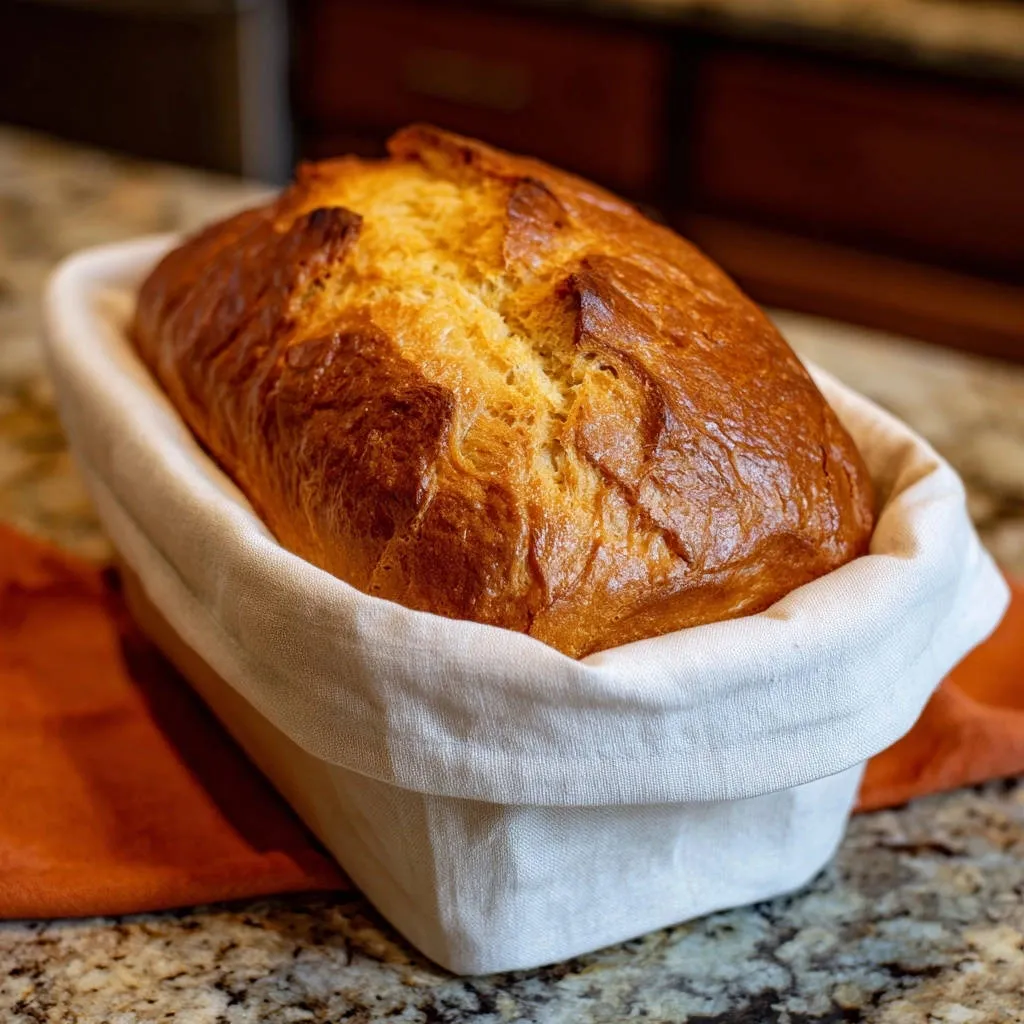
The signature of this Easy Artisan Loaf is its deeply golden, incredibly crispy crust. This remarkable texture is achieved through a specific baking technique involving a preheated Dutch oven, creating the perfect steamy environment for a phenomenal exterior.
Simple Ingredients, Incredible Results
You only need four basic pantry staples to create this impressive bread: flour, salt, yeast, and water. These humble ingredients, combined with the right technique, transform into a loaf so delicious, your family and friends will think you spent hours in the kitchen.
Gather Your Essentials: What You’ll Need for Your Loaf
Flour Power: Choosing the Right Base
All-purpose flour is the ideal foundation for this Easy Artisan Loaf. Its moderate protein content provides a good balance of structure and tenderness. While other flours can be experimented with, all-purpose is recommended for consistent results.
Yeast and Salt: The Leavening & Flavor Duo
Instant yeast works quickly and efficiently, ensuring a reliable rise without extra proofing steps. Salt isn’t just for flavor; it also helps control yeast activity and strengthens the gluten structure, contributing to a better crumb.
Warm Water: The Key to Activation
The precise temperature of your warm water is crucial for activating the instant yeast. Aim for water between 100-110°F (38-43°C) to ensure your yeast thrives, leading to a perfectly risen loaf.
Beyond the Basics: Essential Tools for Artisan Baking
The Indispensable Dutch Oven
A heavy, oven-safe Dutch oven (4 to 6 quart capacity) is the secret weapon for achieving that incredible, crispy crust on your Easy Artisan Loaf. Its heavy lid traps steam during the initial bake, creating a professional-level steamy environment that prevents the crust from setting too quickly and allows the loaf to expand beautifully.
This trapped steam also gelatinizes the starches on the crust, leading to that coveted crispy, chewy exterior once the lid is removed for the final browning.
Other Helpful Gear for Success
Large Mixing Bowl: Essential for combining ingredients and allowing the dough ample space to rise.
Wooden Spoon or Spatula: Perfect for stirring the sticky dough without overworking it.
Plastic Wrap: For tightly covering the bowl during the long fermentation, keeping moisture in.
Clean Kitchen Towel or Proofing Basket: Provides a floured surface for the second proof, preventing sticking and helping the dough hold its shape.
Wire Rack: Crucial for cooling the baked loaf completely, ensuring a crispy bottom crust and preventing sogginess.
Crafting Your Easy Artisan Loaf: A Step-by-Step Journey to Perfection
Phase 1: Mixing the Masterpiece (The No-Knead Method)
Step 1: Combine Dry Ingredients. In a large bowl, whisk together the all-purpose flour, salt, and instant yeast until well combined. This ensures an even distribution of leavening and seasoning throughout your loaf.
Step 2: Add Water and Mix. Pour in the warm water and stir with a wooden spoon or spatula until a shaggy, sticky dough forms. It will look rough, but resist the urge to knead; overhandling will diminish the airy texture of this easy artisan loaf.
Step 3: First Rise. Cover the bowl tightly with plastic wrap to prevent a skin from forming. Let it rest at room temperature for at least 8 hours, or up to 18 hours. This long, slow fermentation is paramount for developing a rich, complex flavor and a beautiful open crumb structure.
Phase 2: Shaping Your Loaf (Gentle Handling is Key)
Step 4: Flour Your Surface. Once the dough is bubbly and has doubled in size, generously flour a clean work surface. This prevents the sticky dough from adhering, making it easier to handle.
Step 5: Fold and Form. Gently scrape the sticky dough out onto the floured surface. Carefully fold the edges of the dough into the center a few times to form a rough ball. Handle the dough lightly; too much manipulation can deflate the air pockets that create that signature open crumb.
Step 6: Second Proof. Lightly flour a clean kitchen towel or a proofing basket, if you have one, and place the dough seam-side up onto it. Loosely cover the dough with another part of the towel or plastic wrap and let it rest for another 30 minutes to 1 hour. This final proof allows the dough to relax and prepare for its oven spring, while you simultaneously preheat your oven.
Phase 3: The Dutch Oven Transformation (Achieving the Golden Crust)
Step 7: Preheat the Dutch Oven. This is the most critical step for that crispy crust: Place your 4 to 6 quart oven-safe Dutch oven with its lid into your cold oven. Preheat the oven to 450°F (232°C) with the Dutch oven inside for at least 30 minutes. The pot must be screaming hot to create the necessary steam for an initial burst of oven spring and a fantastic crust.
Step 8: Transfer Dough. Carefully remove the super hot Dutch oven from the oven using sturdy oven mitts. Gently invert the dough from the towel into the hot Dutch oven; the dough will fall in seam-side down. If desired, you can score the top of the dough with a sharp knife or razor blade to guide where the loaf opens during baking.
Step 9: Covered Bake. Cover the Dutch oven with its lid and carefully place it back into the preheated oven. Bake for 30 minutes with the lid on. This trapped steam ensures the loaf expands fully and prevents the crust from hardening too soon, allowing for maximum rise.
Step 10: Uncovered Bake. After 30 minutes, carefully remove the lid. Continue baking for another 15 to 25 minutes, or until the crust is deeply golden brown and sounds hollow when tapped. Removing the lid allows the steam to escape, enabling the crust to brown and crisp up beautifully, giving you that perfect Easy Artisan Loaf exterior.
Phase 4: The Final Flourish (Cooling for Perfection)
Step 11: Cool Completely. Carefully remove the hot loaf from the Dutch oven and transfer it to a wire rack to cool completely before slicing. This crucial step prevents the bottom crust from becoming soggy by allowing air circulation, ensuring your hard-earned crispy crust remains intact.
Chef’s Secrets for a Truly Spectacular Easy Artisan Loaf
Patience with Proofing: Why Time Matters. Do not rush the initial 8-18 hour proof. This extended resting time is where the yeast truly works its magic, developing incredible depth of flavor and creating the airy, open crumb characteristic of a true artisan loaf. A slow ferment is a flavorful ferment!
The Dutch Oven Advantage: Heat is Your Friend. Always ensure your Dutch oven is screaming hot before carefully adding the dough. This initial burst of intense heat helps the dough spring quickly and forms that coveted crispy crust by creating an instant burst of steam around the loaf.
Lid On, Lid Off: Mastering the Bake. Baking with the lid on traps steam, which keeps the crust soft initially, allowing the loaf to expand fully. Removing the lid later allows the trapped moisture to escape, enabling the crust to brown and crisp beautifully.
The Art of Cooling: Don’t Rush It! Resist the urge to slice your Easy Artisan Loaf while it’s still warm. Cooling completely on a wire rack allows the internal moisture to redistribute, preventing a gummy interior and ensuring the bottom crust remains wonderfully crisp.
Troubleshooting Your Easy Artisan Loaf: Common Questions Answered
Why Is My Crust Not Crispy?
The most common culprit is a Dutch oven that wasn’t hot enough. Ensure it preheats for the full 30 minutes (or even longer if needed) at 450°F. Also, be sure to bake uncovered for the recommended time to allow excess steam to escape and the crust to fully crisp.
Why Is My Dough Too Sticky/Hard to Handle?
Sticky dough is normal for a no-knead bread; embrace it! Generous flouring of your work surface and hands will help immensely. If your dough is too stiff, it might be slightly under-hydrated, or your water wasn’t warm enough. Adjust water quantity slightly in future batches if consistently too dry.
Why Didn’t My Loaf Rise Enough?
Insufficient rise usually points to inactive yeast or incorrect water temperature. Double-check your yeast’s expiration date. Ensure your water is warm (100-110°F) but not hot, which can kill the yeast. Also, make sure your proofing environment is not too cold, as yeast prefers warmer conditions.
Your Easy Artisan Loaf Questions, Answered
Can I Use Different Types of Flour in This Recipe?
While all-purpose flour yields the best results for this specific Easy Artisan Loaf, you can experiment. Bread flour will give a chewier crumb due to its higher protein, and a small percentage of whole wheat flour can add nutty flavor, though it may result in a denser loaf.
How Should I Store Leftover Easy Artisan Loaf?
Store your cooled Easy Artisan Loaf at room temperature, cut-side down, in a paper bag for the first day to maintain crust crispness. For longer storage, wrap it tightly in plastic wrap, then foil, or freeze slices. Freezing is excellent for preserving freshness for up to a month.
Can I Make This Easy Artisan Loaf Ahead of Time?
Absolutely! The initial long fermentation of 8-18 hours is perfect for overnight preparation. You can mix the dough the evening before, let it rise overnight, and then bake it fresh in the morning. This makes fresh bread incredibly convenient.
What Are the Best Serving Suggestions for My Freshly Baked Loaf?
There’s almost no wrong way to enjoy your fresh Easy Artisan Loaf! It’s fantastic with just butter or olive oil. For a delightful appetizer, serve slices alongside our perfect creamy garlic dip. It also pairs wonderfully with hearty soups or stews, like our comforting beef stew, or as a base for a fresh bruschetta featuring a simple summer tomato salad.
Ready to Bake Your Best Easy Artisan Loaf Yet?
You now have all the knowledge and simple techniques to consistently bake a truly spectacular Easy Artisan Loaf right in your own kitchen. There’s nothing quite like the aroma of freshly baked bread filling your home, or the immense satisfaction of pulling a golden, crusty loaf from your oven.
So, gather your ingredients, trust the process, and get ready to impress yourself and everyone around you with this incredible, no-fuss recipe. Happy baking!

Artisan Loaf
Course: BreadCuisine: InternationalDifficulty: medium1
Loaf15
minutes45
minutes600
kcal600
minutesUnlock the secret to a perfect, crackly crust with this incredibly easy no-knead artisan bread recipe. This simple Dutch oven technique guarantees a beautiful golden, crispy loaf every time, eliminating the mystery of home baking.
Ingredients
3 cups all-purpose flour
1 1/2 teaspoons salt
1/2 teaspoon instant yeast
1 1/2 cups warm water (about 100-110 degrees F)
Directions
- In a large bowl, whisk together the flour, salt, and instant yeast. Add the warm water and stir with a wooden spoon or spatula until a shaggy, sticky dough forms. Do not knead.
- Cover the bowl tightly with plastic wrap and let it rest at room temperature for at least 8 hours, or up to 18 hours, until bubbly and doubled in size.
- Once rested, generously flour a clean work surface. Scrape the sticky dough out onto the floured surface. Fold the edges of the dough into the center a few times to form a rough ball. Do not overhandle.
- Lightly flour a clean kitchen towel or proofing basket and place the dough seam-side up onto it. Loosely cover the dough with another part of the towel or plastic wrap and let it rest for another 30 minutes to 1 hour, while you preheat your oven.
- This is the crucial step for that crispy crust: Place a 4 to 6 quart oven-safe Dutch oven with its lid into your cold oven. Preheat the oven to 450 degrees F (232 degrees C) with the Dutch oven inside for at least 30 minutes. This ensures the pot is extremely hot.
- Carefully remove the super hot Dutch oven from the oven using oven mitts. Gently invert the dough from the towel into the hot Dutch oven. If desired, you can score the top of the dough with a sharp knife or razor blade.
- Cover the Dutch oven with its lid and carefully place it back into the preheated oven. Bake for 30 minutes with the lid on.
- After 30 minutes, remove the lid and continue baking for another 15 to 25 minutes, or until the crust is deeply golden brown and sounds hollow when tapped. Removing the lid allows the steam to escape and the crust to brown and crisp up beautifully.
- Carefully remove the hot loaf from the Dutch oven and transfer it to a wire rack to cool completely before slicing. This prevents the bottom crust from becoming soggy.
Notes
- Cool completely on a wire rack to prevent a soggy bottom crust.