I know the disappointment of slicing into what should be a succulent chicken dish, only to find it dry. I’ve refined my technique over countless meals, and I’m thrilled to share the ultimate method for perfectly tender, juicy Honey Garlic Glazed Chicken Thighs.
This recipe transforms simple chicken into a culinary masterpiece, enrobed in a sweet, savory, and richly textured glaze. It’s a game-changer that consistently delivers delicious, moist results every single time, making it a guaranteed family favorite.
For an even more vibrant result, explore how to create perfectly glazed chicken thighs.
Why This Recipe for Tender, Glazed Chicken Thighs is a Game-Changer
This isn’t just another chicken recipe; it’s a promise of culinary success. We’ve meticulously developed each step to tackle common cooking frustrations, ensuring an exceptional dining experience.
The Promise of Never-Dry, Always Juicy Results
Our unique technique ensures every bite of these glazed chicken thighs is incredibly moist. By coating the chicken in cornstarch and then gently simmering it in the glaze, we lock in moisture and prevent any dryness.
This method avoids the common pitfall of overcooked chicken, guaranteeing a tender interior every time.
That Irresistibly Balanced Sweet & Savory Glaze
The star of this dish is the impeccably balanced honey garlic glaze. It marries the sweetness of honey with the umami depth of soy sauce, the tang of rice vinegar, and the aromatic warmth of fresh garlic.
The resulting richly textured glaze clings beautifully to the chicken, creating a harmonious burst of flavor in every mouthful.
Effortless Weeknight Dinner, Impressive Flavor
Despite its sophisticated taste, this recipe for Honey Garlic Glazed Chicken Thighs is surprisingly easy to prepare. It’s perfect for busy weeknights when you want something flavorful without the fuss.
You can achieve restaurant-quality results with minimal effort, making it a reliable and impressive dish for any occasion.
Gather Your Arsenal: Essential Ingredients for Incredible Glazed Thighs
Quality ingredients are the foundation of any great meal. Here’s a closer look at what makes our honey garlic chicken thighs truly shine.
The Star: Boneless, Skinless Chicken Thighs
We opt for boneless, skinless chicken thighs, which are inherently more forgiving and flavorful than breasts. They retain moisture beautifully, leading to a consistently juicy result.
Aim for about 1.5 pounds (roughly 4 thighs) for this recipe, ensuring uniform thickness for even cooking.
The Glaze Foundation: Honey, Soy, Vinegar & Aromatics
Honey: This natural sweetener provides the signature “honey” flavor and helps create a beautiful caramelization.
Low-Sodium Soy Sauce: It delivers essential umami and saltiness without making the dish overly salty.
Rice Vinegar: A splash of rice vinegar brightens the entire glaze, balancing the sweetness and richness.
Fresh Garlic: Minced garlic offers pungent warmth and depth, infusing the sauce with irresistible aroma.
The Thickening Secret: Cornstarch Power
Cornstarch plays a dual critical role in this recipe. First, it lightly coats the chicken thighs, acting as a barrier to lock in juices during searing and enhancing texture.
Second, a cornstarch slurry is added to the simmering sauce at the end, transforming it into a glossy, thick glaze that perfectly coats the chicken.
Flavor Boosters & Finishes: Broth, Spice, and Herbs
Water or Chicken Broth: This thins the sauce slightly, allowing the flavors to meld beautifully and providing liquid for simmering.
Red Pepper Flakes (Optional): For those who enjoy a subtle kick, red pepper flakes add a welcome warmth and complexity.
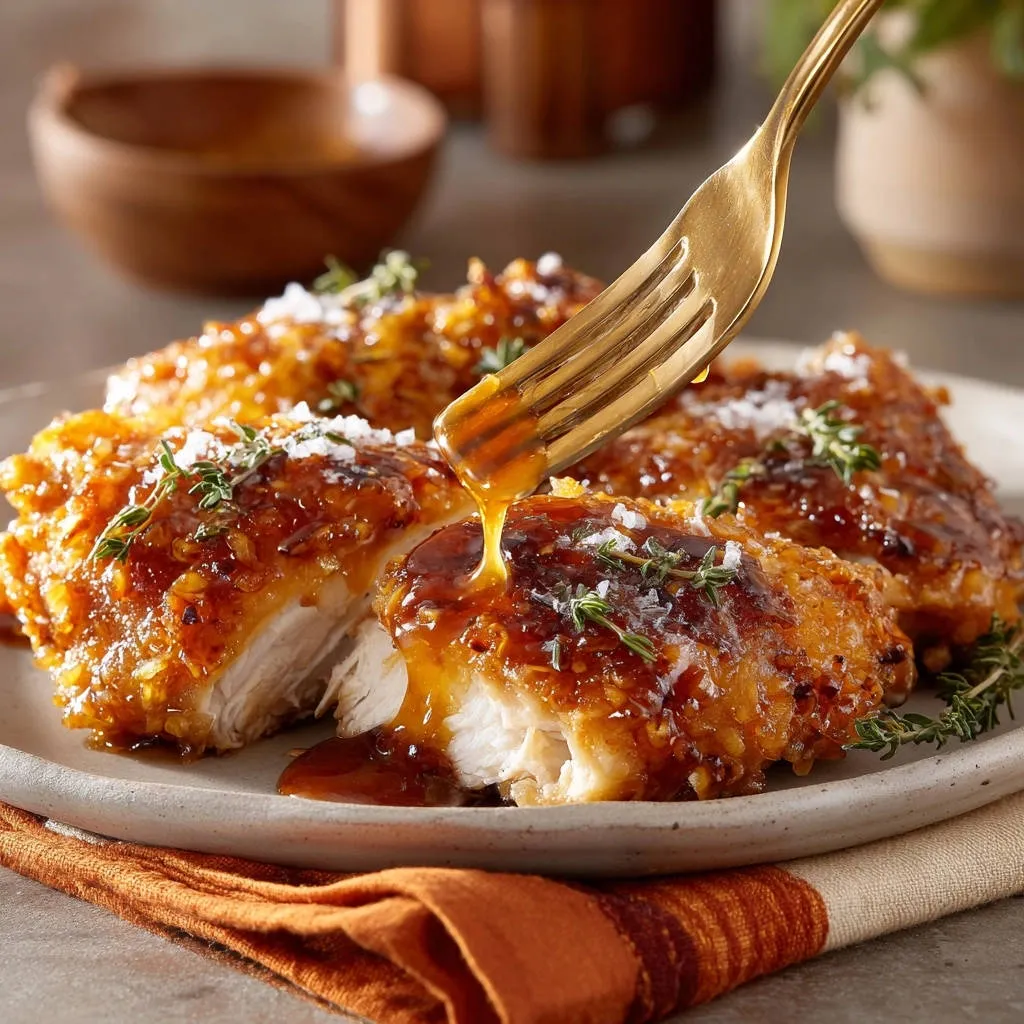
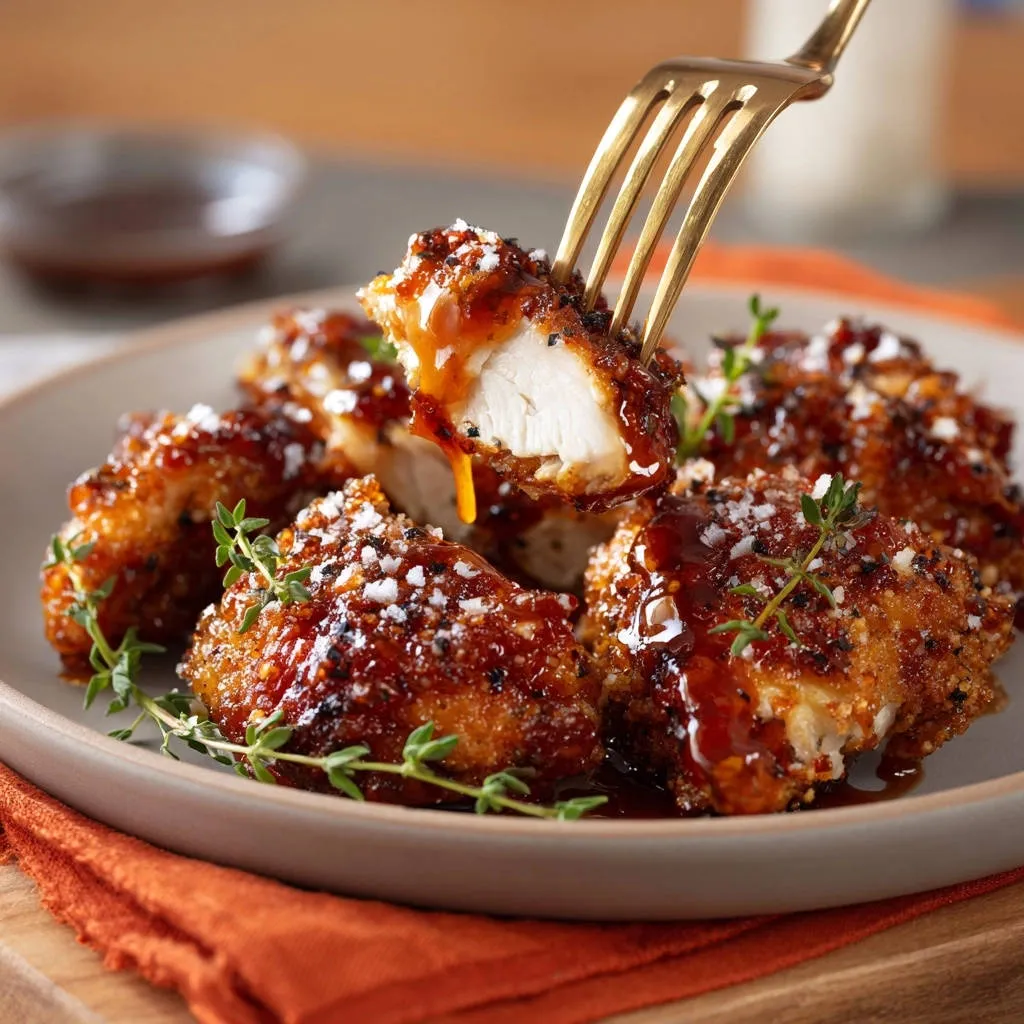
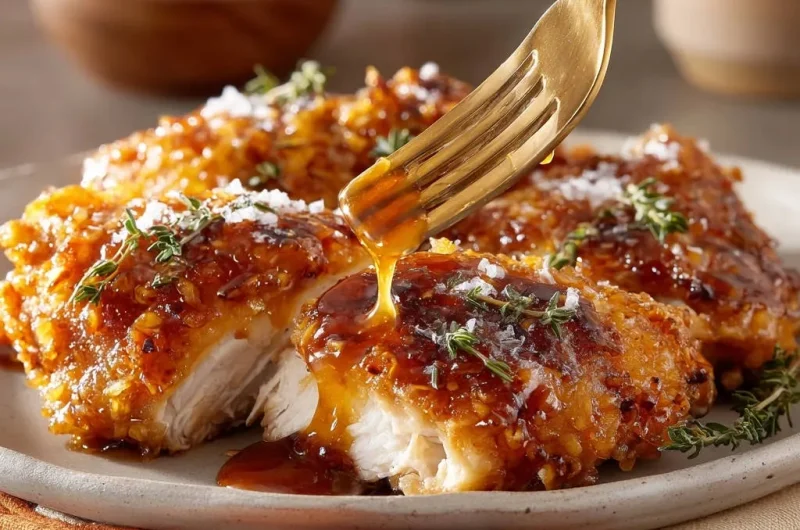
Fresh Thyme Sprigs: A beautiful and aromatic garnish, fresh thyme adds a herbaceous counterpoint to the rich glaze.
Flaky Sea Salt: A final sprinkle of flaky sea salt elevates the flavors, adding a delightful textural contrast and bright finish.
Essential Kitchen Companions: Tools You’ll Need
Having the right tools ready makes the cooking process smooth and enjoyable. These are the key items for mastering your Honey Garlic Glazed Chicken Thighs.
Your Skillet, Whisk, and Thermometer
A large skillet is crucial for searing the chicken evenly without overcrowding, ensuring a beautiful golden crust. A sturdy whisk is essential for creating a perfectly smooth, lump-free glaze.
Finally, a meat thermometer is your best friend for guaranteeing perfectly cooked, juicy chicken thighs every time, reaching the ideal internal temperature for safety and tenderness.
Your Path to Perfectly Glazed Chicken Thighs: A Step-by-Step Guide
Follow these detailed steps to create your own perfectly tender and flavorful honey garlic chicken.
- Prep Like a Pro: Drying & Dredging the Chicken
Pat the chicken thighs thoroughly dry with paper towels; this is crucial for achieving a beautiful golden sear and effective moisture retention.
In a shallow dish, combine 1 tablespoon cornstarch, salt, and pepper, then lightly coat each chicken thigh. This creates a barrier that helps keep the chicken juicy and contributes to a delicious texture.
- The Sizzle Factor: Achieving that Golden Sear
Heat the vegetable oil in a large skillet over medium-high heat until it shimmers. Carefully add the coated chicken thighs to the hot pan, making sure not to overcrowd it, and sear for 4-5 minutes per side until deeply golden brown.
Resist moving the chicken much during this initial searing stage; it is vital for developing rich flavor and sealing in natural juices, preventing any dryness.
- Whisking Up the Magic: Crafting Your Glaze
While the chicken is searing, prepare your delicious glaze. Whisk together the honey, soy sauce, rice vinegar, minced garlic, 1/2 cup water or chicken broth, and optional red pepper flakes in a small bowl until well combined.
- The Flavor Infusion: Simmering in the Glaze
Once the chicken is seared, reduce the heat to medium-low. Pour the prepared honey garlic glaze over the chicken in the skillet and bring the sauce to a gentle simmer.
Cover the skillet and let the chicken cook in the glaze for 8-10 minutes, or until the internal temperature of the chicken reaches 165°F (74°C) when checked with a meat thermometer. This gentle simmering ensures the chicken absorbs maximum flavor while remaining incredibly tender and juicy.
- Transforming the Sauce: The Glossy Glaze Finish
Remove the cooked chicken from the skillet and set it aside on a plate. In a separate small bowl, whisk the remaining 1 teaspoon of cornstarch with 1 tablespoon of cold water to create a smooth slurry.
Pour this cornstarch slurry into the simmering sauce in the skillet, whisking constantly. Continue to simmer for 1-2 minutes until the sauce has thickened to a beautiful, glossy glaze consistency.
- Presentation is Key: Coat, Slice & Garnish
Return the cooked chicken thighs to the skillet, turning them gently to coat thoroughly in the luscious, thickened glaze. If desired, you can slice the chicken before serving to showcase its tender interior.
Garnish with fresh thyme sprigs and a final sprinkle of flaky sea salt. Serve immediately and savor your perfectly juicy and flavorful Honey Garlic Glazed Chicken Thighs.
Beyond the Recipe Card: Expert Tips for Next-Level Results
Elevate your Honey Garlic Glazed Chicken Thighs with these insider tips, ensuring every meal is a triumph.
The Power of Patting Dry: Why It Matters
Patting your chicken thoroughly dry isn’t just a suggestion; it’s a non-negotiable step for superior results. Excess moisture on the surface prevents the chicken from browning properly.
A dry surface allows for direct contact with the hot pan, encouraging the Maillard reaction, which creates that desirable golden crust and deep, complex flavor.
Achieving the Perfect Sear: Don’t Overcrowd!
Resist the urge to overcrowd your skillet, even if it means searing the chicken in batches. Too many pieces will lower the pan’s temperature, steaming the chicken instead of searing it.
Give each thigh ample space to achieve that perfect, even, golden-brown crust, which is crucial for flavor and texture.
Temperature Talk: Ensuring Juicy, Safe Chicken
For truly juicy chicken, a meat thermometer is your best friend. Chicken thighs are safely cooked when they reach an internal temperature of 165°F (74°C).
Cooking to this precise temperature prevents dryness while ensuring food safety. Remember, chicken will continue to cook slightly after removal from heat.
Glaze Control: Getting That Ideal Consistency
The perfect glaze should be thick enough to coat the back of a spoon, yet still pourable. If your glaze is too thin, simmer it for a minute or two longer after adding the cornstarch slurry.
If it becomes too thick, you can whisk in a tablespoon of water or broth at a time until the desired consistency is achieved.
Solving Common Snags: Troubleshooting Your Glazed Chicken
Even seasoned cooks encounter challenges. Here are solutions to common issues you might face when making your honey garlic chicken.
“My Chicken is Dry!”
Dry chicken is often a result of overcooking. Ensure you use a meat thermometer and remove the chicken promptly once it reaches 165°F (74°C).
Additionally, ensure your initial sear is strong, as this helps seal in juices. The cornstarch coating and simmering method are designed to prevent this, so follow those steps closely.
“The Glaze Isn’t Thickening”
If your glaze isn’t thickening, the most likely culprit is insufficient simmering time after adding the cornstarch slurry, or an incorrect cornstarch-to-water ratio. Make sure the water for the slurry is cold.
Continue to whisk and simmer for another minute or two, ensuring the sauce comes to a good bubble, which activates the cornstarch. If it’s still too thin, you can make a small additional slurry (1/2 tsp cornstarch to 1 tsp cold water) and slowly whisk it in.
“My Chicken Isn’t Getting Golden”
A lack of golden color usually points to a few factors: the pan wasn’t hot enough, there wasn’t enough oil, or the pan was overcrowded. Always start with shimmering hot oil and give each piece of chicken plenty of space to ensure proper browning.
Also, ensure your chicken thighs are thoroughly patted dry before dredging, as moisture inhibits browning.
Round Out Your Meal: Serving Suggestions That Shine
These Honey Garlic Glazed Chicken Thighs pair wonderfully with a variety of sides, making them versatile for any dinner table.
Classic Sides: Rice and Simple Greens
Serve your flavorful chicken alongside fluffy steamed white or brown rice to soak up every drop of that delicious glaze. Complement it with simple sautéed green beans, steamed broccoli, or even our crispy roasted cauliflower for a balanced meal.
Fresh & Vibrant Pairings
For a lighter touch, pair the rich chicken with a crisp cucumber salad, a bright coleslaw, or quick-pickled vegetables. These fresh sides offer a refreshing contrast to the sweet and savory glaze.
Unexpected Twists for Creative Dinners
Consider serving the chicken over a bed of al dente noodles for a heartier meal, or with creamy mashed potatoes, perhaps alongside our perfectly crispy skillet potatoes and onions. It also makes a fantastic filling for lettuce wraps, offering a fresh, low-carb option.
Make Ahead & Storage: Enjoying Your Thighs Later
These Honey Garlic Glazed Chicken Thighs are fantastic fresh, but they also hold up beautifully for meal prep.
Refrigerator & Freezer Guidelines
Allow any leftover glazed chicken thighs to cool completely before transferring them to an airtight container. They will keep well in the refrigerator for up to 3-4 days.
For longer storage, freeze individual portions in freezer-safe bags or containers for up to 2-3 months. Thaw overnight in the refrigerator before reheating.
Best Practices for Reheating
To maintain juiciness and flavor, gently reheat leftover Honey Garlic Glazed Chicken Thighs. For best results, reheat them in a preheated oven at 300°F (150°C) for 10-15 minutes, or until warmed through, often with a splash of broth to prevent drying.
You can also reheat them gently on the stovetop over low heat, covered, or briefly in the microwave for convenience, though this method may slightly alter the texture.
Your Top Questions Answered: Honey Garlic Glazed Chicken Thighs FAQ
Can I use other cuts of chicken?
While chicken thighs are recommended for their inherent juiciness, you can use boneless, skinless chicken breasts. Be aware that breasts cook faster and are leaner, so reduce cooking times to prevent dryness. For tips on achieving tender results with breast meat, see our guide to juicy pan-seared chicken breast.
How can I make this recipe spicier?
To add more heat, increase the amount of red pepper flakes in the glaze or add a dash of your favorite hot sauce. You could also introduce a pinch of cayenne pepper for a more intense spice.
Is this recipe gluten-free?
This recipe can easily be made gluten-free by ensuring you use a certified gluten-free low-sodium soy sauce. Cornstarch is naturally gluten-free, making it a suitable thickener.
Can I prepare the glaze ahead of time?
Absolutely! You can whisk together all the glaze ingredients (honey, soy sauce, rice vinegar, garlic, water/broth, red pepper flakes) up to 2 days in advance. Store it in an airtight container in the refrigerator until ready to use.
What if I don’t have rice vinegar?
If you don’t have rice vinegar, you can substitute it with apple cider vinegar or white wine vinegar. Be aware that these alternatives might introduce a slightly different flavor profile to the glaze, but they will still provide the necessary acidity.
Ready to Dazzle? Share Your Honey Garlic Glazed Chicken Thighs Creation!
Now that you have the secret to truly incredible Honey Garlic Glazed Chicken Thighs, it’s your turn to shine. This recipe is designed to impress with its irresistible flavor and guaranteed juicy results.
We can’t wait to see your culinary creations! Share your beautiful dishes on social media and tag us, or leave a comment below to let us know how your perfect chicken thighs turned out.
Honey Garlic Chicken Thighs
Course: Main CourseCuisine: AsianDifficulty: easy4
servings15
minutes20
minutes450
kcal40
minutesDiscover the secret to perfectly tender, juicy chicken thighs, smothered in a sweet, savory, and richly textured honey garlic glaze. This foolproof technique guarantees delicious, moist results every single time, making dry chicken a thing of the past. Enjoy a game-changing meal that’s easy to make and incredibly satisfying.
Ingredients
4 boneless, skinless chicken thighs (about 1.5 pounds total)
1 tablespoon cornstarch, plus 1 teaspoon for sauce
1/2 teaspoon salt
1/4 teaspoon black pepper
2 tablespoons vegetable oil
1/2 cup honey
1/4 cup low-sodium soy sauce
2 tablespoons rice vinegar
4 cloves garlic, minced
1/2 cup water or chicken broth
1/4 teaspoon red pepper flakes (optional)
Fresh thyme sprigs, for garnish
Flaky sea salt, for garnish
Directions
- Prepare the chicken: Pat the chicken thighs thoroughly dry with paper towels. This is a crucial step for achieving a good sear and locking in moisture. In a shallow dish, combine 1 tablespoon cornstarch, salt, and pepper. Dredge each chicken thigh in the cornstarch mixture, ensuring it’s lightly coated on all sides. This coating helps create a barrier that keeps the chicken juicy and gives it a delicious texture.
- Sear the chicken: Heat the vegetable oil in a large skillet over medium-high heat until shimmering. Carefully add the coated chicken thighs to the hot skillet, making sure not to overcrowd the pan. Sear for 4-5 minutes per side, until golden brown and a beautiful crust has formed. Do not move the chicken much during searing. This initial sear is key to developing flavor and sealing in the natural juices, preventing the chicken from becoming dry.
- Make the glaze: While the chicken is searing, whisk together the honey, soy sauce, rice vinegar, minced garlic, 1/2 cup water or chicken broth, and red pepper flakes (if using) in a small bowl.
- Simmer in the glaze: Once the chicken is seared, reduce the heat to medium-low. Pour the prepared glaze over the chicken in the skillet. Bring the sauce to a gentle simmer. Cover the skillet and let the chicken cook in the glaze for 8-10 minutes, or until the internal temperature of the chicken reaches 165°F (74°C) when checked with a meat thermometer. Cooking the chicken gently in the sauce ensures it absorbs flavor while remaining incredibly tender and juicy, preventing any dryness.
- Thicken the sauce: Remove the chicken from the skillet and set aside on a plate. In a small bowl, whisk the remaining 1 teaspoon of cornstarch with 1 tablespoon of cold water to create a slurry. Pour the cornstarch slurry into the simmering sauce in the skillet, whisking constantly. Continue to simmer for 1-2 minutes, until the sauce has thickened to a beautiful, glossy glaze consistency.
- Serve: Return the chicken thighs to the skillet, turning them to coat thoroughly in the thickened glaze. If desired, you can slice the chicken before serving to show off its tender interior. Garnish with fresh thyme sprigs and a sprinkle of flaky sea salt. Serve immediately and enjoy your perfectly juicy chicken!
Notes
- Pat chicken thoroughly dry for best searing results. Do not overcrowd the pan when searing.