We’ve all been there. You order takeout with visions of shatteringly crisp chicken, but by the time the delivery driver arrives, you’re left with a container of soggy, sponge-like nuggets swimming in a thin syrup. It’s a heartbreak that happens far too often in the world of home cooking, too. Most recipes promise a crunch but deliver a breading that dissolves the moment it meets the sauce.
The secret to restaurant-quality results isn’t a commercial deep fryer or a hidden ingredient. It’s actually a matter of structural engineering. By using a specific double-dredge method and a high-heat flash fry, you can create a durable, glass-like crust that stands up to the heaviest glazes. This guide will walk you through the “Anti-Soggy Coating Secret” so you can finally enjoy that perfect, noisy crunch in your own kitchen.
I’ve found that the biggest mistake people make is rushing the drying process. If your chicken is even slightly damp before it hits the starch, the coating will steam from the inside out and slide right off in the pan. Always pat your chicken chunks with paper towels until they’re bone-dry. That simple step is the difference between a coating that sticks and one that fails.
The Science of the Shatter-Crisp Coating
To get that specific “shatter” when you bite down, we have to move away from traditional all-purpose flour. Flour contains protein that develops gluten when mixed with moisture, resulting in a chewy, bread-like texture. While great for a sandwich roll, gluten is the enemy of a crisp sweet and sour coating.
Cornstarch is the hero here because it’s a pure starch with no protein. When it hits hot oil, it creates a rigid, brittle structure that doesn’t soften as easily as flour. The double-dredge method—going from starch to egg and back to starch—builds a thick, protective wall that locks juices inside while keeping the sauce on the outside.
Why Cornstarch Outperforms All-Purpose Flour
Cornstarch is packed with amylose, a type of starch molecule that aligns into a tight, firm grid when fried. This creates a much harder surface than flour ever could. Because there’s no gluten, you don’t have to worry about overworking the coating and making it tough.
Furthermore, cornstarch absorbs less oil than flour. This means your chicken comes out feeling light and clean rather than heavy and greasy. It provides that signature translucent, golden look that defines high-end Chinese-American cuisine.
The Role of the Egg Wash Binder
Think of the beaten eggs as the high-strength glue for your crust. The first layer of cornstarch sticks to the chicken’s natural moisture, but the second layer needs the egg to stay put. As the chicken fries, the proteins in the egg white coagulate instantly.
This coagulation creates a reinforced “mesh” that holds the outer starch layer in place. Without the egg, the starch would likely puff up and flake away into the oil. With it, you get a rugged, craggy surface that’s perfect for trapping pockets of sauce.
Essential Components for the Perfect Glaze
A great sweet and sour sauce should be a balanced tightrope walk of flavors. You want the sharp zing of acidity, the deep mellow sweetness of sugar, and a hit of savory umami. If one dominates, the whole dish feels flat or cloying.
The texture of the sauce is just as important as the taste. It needs to be thick enough to coat the back of a spoon but glossy enough to look like liquid silk. We achieve this by using a cornstarch slurry, which acts as a thickening agent that turns a watery liquid into a heavy, professional glaze.
Fresh vs. Canned Pineapple: The Enzyme Factor
I always reach for fresh pineapple when I can. Fresh chunks have a firm texture that holds up to high-heat stir-frying, and the natural sugars caramelize beautifully against the hot pan. It adds a bright, tropical pop that canned versions often lack.
However, if you choose canned pineapple, make sure it’s packed in juice, not heavy syrup. You must drain the chunks thoroughly and pat them dry. Any excess liquid from the can will thin out your carefully balanced sauce and ruin the consistency.
Balancing Acidity with Brown Sugar and Ketchup
Apple cider vinegar is my secret weapon for the “sour” element. It has a fruity, complex acidity that is much smoother than the harsh bite of plain white vinegar. It pairs perfectly with the molasses notes in brown sugar.
Ketchup might seem like a shortcut, but it’s essential for that classic flavor profile. It provides the vibrant red color and a base of tomato umami. This savory foundation rounds out the sharp vinegar, ensuring the sauce tastes like a meal rather than a dessert.
Sourcing and Preparing Your Ingredients
Success starts at the grocery store. You’ll need 1.5 pounds of chicken breast, two large bell peppers (red and green for color), a red onion, and fresh ginger. Don’t forget a neutral oil with a high smoke point, like vegetable or canola oil, for the frying phase.
Preparation is everything in stir-fry cooking. Once the heat is on, things move fast. You won’t have time to chop a pepper while the chicken is frying. Have every ingredient sliced, measured, and ready to go in small bowls before you even touch the stove.
Selecting the Right Chicken Cut
While many people love chicken thighs for their fat content, chicken breast is actually the superior choice for this specific dish. The lean, firm texture of the breast provides a solid “nugget” structure that supports the heavy double-coating.
When you cut the breast into 1-inch chunks, try to keep them as uniform as possible. This ensures that every piece of chicken finishes cooking at the exact same time. No one wants a plate where half the chicken is overcooked and the other half is still raw in the middle.
Vegetable Prep: The Importance of Uniformity
Cut your peppers and onions into 1-inch squares to match the size of the chicken. This isn’t just for looks; it’s about the “snap.” Large chunks of vegetables stay crisp-tender in the high heat of the pan.
If you cut the vegetables too small, they’ll turn into mush before the sauce has a chance to thicken. You want that vibrant, fresh crunch to contrast with the soft pineapple and the crispy chicken. This “Mise en Place” philosophy keeps the cooking process stress-free.
Step-by-Step: Achieving the Ultimate Crunch
Now we get to the technical part. We’re going to move through three distinct phases: the dredge, the flash fry, and the glaze emulsion. Each step requires your full attention to ensure the texture remains perfect.
Remember, the goal is to keep the chicken as dry as possible until the very last second. Keep your wire rack nearby and make sure your kitchen is well-ventilated. Let’s get that oil heating up!
Phase 1: The Double-Dredge Technique
Start by tossing your dried chicken chunks in a bowl with half of the cornstarch. Once they’re lightly coated, dip them into the beaten eggs. Finally, drop them back into the remaining cornstarch for the second coat.
Don’t just toss them; use your palms to firmly press the starch into the egg-coated chicken. Let the coated pieces rest on a plate for about 2 to 3 minutes. This allows the starch to hydrate slightly, which prevents it from falling off and burning in the oil.
Phase 2: Temperature Control and Shallow Frying
Heat your oil to 350°F. If you don’t have a thermometer, dip the end of a wooden spoon into the oil; if it bubbles steadily, you’re ready. Fry the chicken in batches to avoid crowding the pan.
If you put too much chicken in at once, the oil temperature will plummet. Instead of searing the outside, the chicken will soak up the oil like a sponge, leaving you with greasy, limp breading. Aim for a deep golden brown color and a hard exterior.
Phase 3: The Wire Rack Cooling Secret
This is the most important tip I can give you: never drain fried chicken on paper towels. While it seems logical to soak up the grease, the paper towel traps steam underneath the chicken. That steam immediately softens the bottom of your crispy crust.
Instead, use a wire cooling rack set over a baking sheet. This allows air to circulate around the entire piece of chicken, keeping it dry and crunchy on all sides. It’s a small change that makes a massive difference in the final result.
The High-Heat Stir-Fry and Sauce Emulsion
Once the chicken is resting safely on the rack, wipe out your pan and crank up the heat. We want the vegetables to sear quickly. You’re looking for slightly charred edges while the centers remain raw and crunchy.
When you pour in the sauce mixture, it will look thin at first. Don’t panic. As it comes to a simmer, the cornstarch slurry will “bloom,” turning the liquid from a cloudy brown to a clear, thick, and glossy glaze. This is the “spoon-back” test: if you can draw a line through the sauce on the back of a spoon and it stays, it’s ready.
Wok Hei: Mimicking Restaurant Heat at Home
To get that “breath of the wok” flavor at home, let your pan get screaming hot before adding the oil and vegetables. You should see a tiny wisp of smoke. This high heat sears the natural sugars in the peppers and onions instantly.
Keep the vegetables moving constantly. They only need about 2 or 3 minutes in the pan. You want them to retain their vibrant colors. If they start to look dull or limp, you’ve gone too far. Speed is your friend here.
The Final Toss: Timing is Everything
The final trick to the “Anti-Soggy” method is the timing of the toss. Turn off the heat completely before you add the chicken back into the pan. This prevents the sauce from boiling and breaking down the crust you worked so hard to build.
Use a folding motion to quickly coat every piece of chicken in the thick glaze. This should take no more than 30 seconds. Serve it immediately. The longer the chicken sits in the sauce, the more moisture it absorbs, so get it to the table fast!
Troubleshooting Common Texture Issues
If your coating is falling off, it usually means the chicken wasn’t dry enough before the first dredge, or the oil wasn’t hot enough. Moisture creates steam, and steam pushes the breading away from the meat. Next time, double-check your oil temp with a thermometer.
If your sauce feels gritty, the cornstarch slurry might not have been mixed well enough. Always whisk the cornstarch and water together right before adding it to the pan, as it settles quickly. Ensure the sauce reaches a full simmer to activate the thickening power.
Why is my chicken coating soggy?
Soggy coating is almost always caused by low oil temperature or improper draining. If the oil isn’t at 350°F, the starch won’t crisp up instantly, allowing oil to seep in. Additionally, if you skip the wire rack and use paper towels, the trapped steam will ruin the crunch in minutes.
Another culprit is letting the chicken sit in the sauce for too long. This recipe is designed to stay crisp longer than most, but it isn’t invincible. The “Final Toss” should happen right before the plates are on the table.
Fixing a Cloudy or Thin Sauce
A cloudy sauce means the cornstarch hasn’t cooked through yet. Keep the sauce at a simmer until it clears up and looks like a shiny glaze. If it’s still too thin after simmering, mix another teaspoon of cornstarch with a teaspoon of water and stir it in.
If the sauce is too thick, simply add a tablespoon of water or pineapple juice to thin it out. The consistency can change quickly depending on your stove’s heat, so don’t be afraid to adjust it on the fly until it looks perfect.
Optimal Pairings and Serving Suggestions
Because the sweet and sour sauce is so bold and flavorful, you want side dishes that are relatively neutral. You need something to soak up that extra glaze without fighting for attention. Simple is always better when the main dish is this vibrant.
I love adding a fresh garnish at the end. A handful of chopped cilantro and some thinly sliced green onions add a hit of freshness that cuts through the richness of the fried chicken. It also makes the dish look like it came straight from a professional kitchen.
The Best Rice Varieties for Sweet and Sour
Jasmine rice is the gold standard here. It has a slightly floral aroma and a fluffy texture that separates easily. The grains are sturdy enough to hold up under the heavy sauce without turning into a mushy pile.
If you prefer something with more bite, a medium-grain white rice also works well. Avoid Basmati for this specific dish, as its nutty flavor can sometimes clash with the fruity notes of the pineapple and apple cider vinegar.
Vegetable Side Dishes to Round Out the Meal
To balance the fried element of the chicken, I usually serve a light vegetable side. Steamed bok choy with a tiny drop of sesame oil is a fantastic choice. It provides a clean, bitter contrast to the sweet sauce.
For a simple, flavorful meal, try these sheet pan glazed chicken thighs.
A smashed cucumber salad with garlic and a splash of rice vinegar is another winner. The cold, refreshing crunch of the cucumbers cleanses the palate between bites of the rich, crispy chicken. It keeps the meal feeling balanced and light.
For another vegetable side that pairs well, check out this glazed chicken broccoli stir-fry.
Storage and Reheating for Maximum Retention
Let’s be honest: fried food is never quite the same the next day. However, you can get pretty close if you avoid the microwave. The microwave will turn your crispy chicken into a rubbery mess in seconds. Avoid it at all costs!
What to Try Next
Round out your meal with these complementary dishes.
- For added crunch alongside your sweet and sour chicken, consider making crispy fried onion strings using an anti-soggy method.
- If you enjoy sweet and savory combinations, the balsamic glazed pearl onions offer a similar flavor profile.
To reheat, use an air fryer at 375°F for about 3 to 5 minutes. This will dry out the sauce slightly and recrisp the coating. If you don’t have an air fryer, a toaster oven or a standard oven set to “broil” for a couple of minutes will also do the trick. Just keep a close eye on it so the sugar in the sauce doesn’t burn.
Expert Tips for Scaling and Variations
If you’re cooking for a crowd, don’t try to double the recipe in one small pan. Fry the chicken in several small batches and keep the finished pieces warm on a wire rack in a 200°F oven. This ensures the first batch stays just as crispy as the last.
You can also use this same coating technique for other proteins. It works beautifully with firm white fish or even cauliflower florets for a vegetarian option. The double-dredge method is a universal tool for anyone who loves a serious crunch.
Adjusting the Heat: Adding a Spicy Kick
If you like a “Sweet and Spicy” profile, it’s easy to tweak the sauce. Add a teaspoon of red pepper flakes to the vinegar and sugar mixture. The heat will infuse into the sauce as it simmers, providing a nice back-of-the-throat glow.
For a more intense heat, stir in a tablespoon of Sriracha or chili-garlic sauce. This adds another layer of garlic and vinegar that complements the existing flavors perfectly. It’s a great way to customize the dish for those who find traditional sweet and sour a bit too mild.
Make-Ahead Prep: What Can You Do Early?
You can turn this into a lightning-fast weeknight meal with a little prep. Chop the peppers, onions, and pineapple up to 24 hours in advance and store them in an airtight container. You can also whisk the vinegar, sugar, ketchup, and soy sauce together ahead of time.
When you’re ready to eat, all you have to do is the chicken dredge and the actual cooking. With the prep out of the way, the whole dish comes together in about 15 minutes. It’s faster, cheaper, and significantly tastier than calling for takeout.
How do I store leftovers?
Store any leftovers in an airtight container in the refrigerator for up to 3 days. Keep in mind that the sauce will naturally soften the coating over time. For the best results, store the rice and chicken in separate containers so the rice doesn’t absorb all the moisture from the sauce. I do not recommend freezing this dish, as the peppers and onions will become mushy and the chicken coating will lose its structural integrity upon thawing.
Why did my coating fall off the chicken?
The most common reason for the coating peeling off is moisture. If the chicken isn’t patted completely dry before the first layer of cornstarch, a layer of steam forms between the meat and the breading during frying. This steam literally pushes the crust away. Another reason is not letting the coated chicken “rest” for a few minutes before frying; that rest period helps the starch hydrate and bond to the egg wash.
Can I use something other than apple cider vinegar?
Yes, you can use white vinegar or rice vinegar. White vinegar has a much sharper, more aggressive “bite,” so you might want to add an extra tablespoon of sugar to balance it out. Rice vinegar is milder and slightly sweeter, making it a great alternative if you want a more delicate flavor. Avoid balsamic or red wine vinegar, as their strong flavors will overpower the other ingredients.
What if I don’t have cornstarch?
While cornstarch is the key to the “shatter-crisp” texture, you can substitute it with potato starch or arrowroot powder for similar results. Both of these are pure starches that will provide a great crunch. I do not recommend using all-purpose flour as a 1:1 substitute if you want that specific restaurant-style crispness, as flour will result in a much softer, doughier coating.
How do I make the sauce thicker?
The thickness of the sauce is controlled by the cornstarch slurry. If your sauce is too thin after it has come to a simmer, mix another teaspoon of cornstarch with a teaspoon of cold water and stir it into the bubbling sauce. It must reach a simmer to “activate” the starch. Conversely, if it’s too thick (like a paste), simply whisk in a tablespoon of water at a time until it reaches a glossy, pourable consistency.
Is it possible to make this without deep frying?
This recipe uses a “shallow fry” method, which only requires about an inch of oil in a skillet, making it much easier than traditional deep frying. If you want to use an air fryer for the chicken, you can, but the texture will be different. For the air fryer, spray the coated chicken pieces generously with oil and cook at 400°F for 10-12 minutes, flipping halfway through, until golden and firm before tossing in the stovetop sauce.
Crispy Chicken
Course: Main CourseCuisine: Chinese-AmericanDifficulty: easy4
servings20
minutes15
minutes485
kcal35
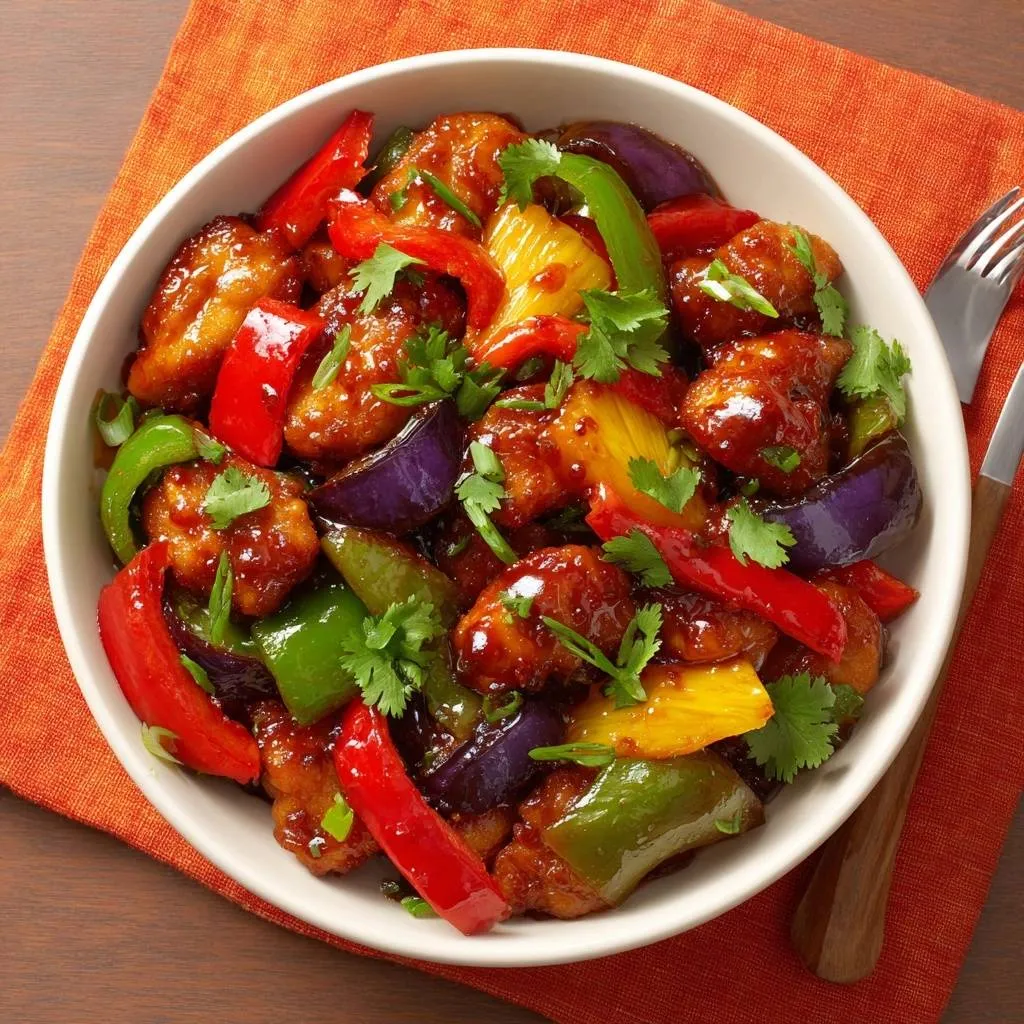
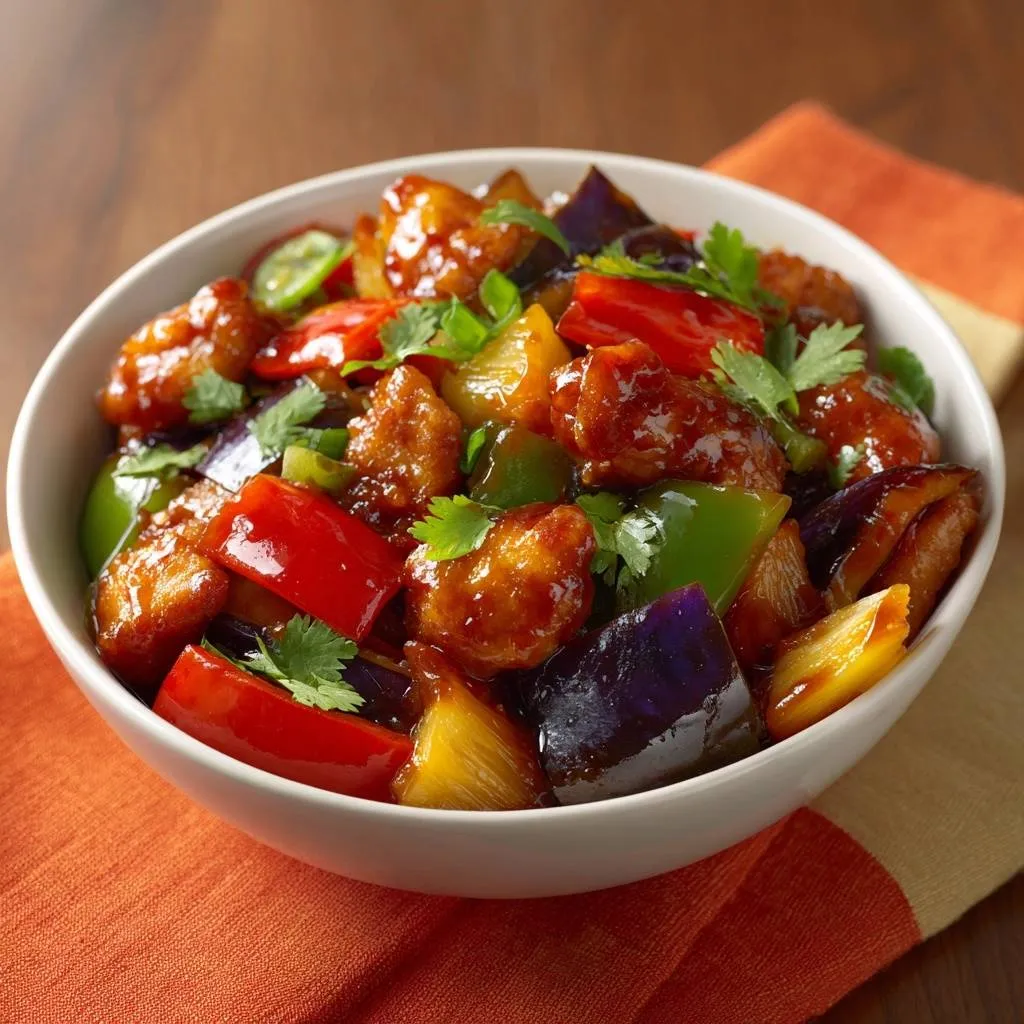
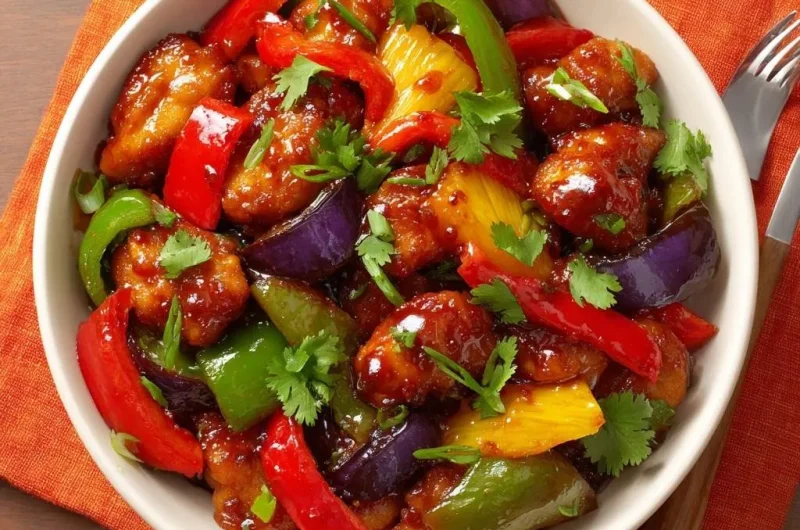
MinutesA high-heat, double-dredged chicken recipe designed to solve the problem of soggy breading. This dish features a thick, glossy glaze with fresh pineapple, peppers, and onions.
Ingredients
1.5 lbs chicken breast, cut into 1-inch chunks
1 cup cornstarch
2 large eggs, beaten
1 red bell pepper, sliced into large chunks
1 green bell pepper, sliced into large chunks
1 red onion, cut into large wedges
1 cup fresh pineapple chunks
1 cup vegetable oil for shallow frying
Fresh cilantro and green onions for garnish
For the Sauce:
1/2 cup apple cider vinegar
1/2 cup brown sugar
1/4 cup ketchup
1 tablespoon soy sauce
1 teaspoon garlic powder
1 teaspoon ginger, grated
1 tablespoon cornstarch (mixed with 1 tablespoon water for a slurry)
Directions
- The secret to the crunch is the cornstarch barrier. Pat your chicken completely dry with paper towels. Toss the chicken chunks in a bowl with half of the cornstarch until fully coated.
- Dip the floured chicken into the beaten eggs, then back into the remaining cornstarch. Press the starch firmly onto the chicken. This double-layer creates a thick, durable shell that resists moisture.
- Heat the oil in a large skillet or wok over medium-high heat until it reaches 350°F (175°C). Fry the chicken in batches for 3 to 4 minutes per side until deep golden brown and crispy. Remove and drain on a wire rack, not paper towels, to keep air circulating and prevent steaming.
- Wipe the pan, leaving about 1 tablespoon of oil. Stir-fry the peppers and onions over high heat for 2-3 minutes until the edges are slightly charred but the vegetables remain crisp. Add the pineapple chunks for the last 30 seconds.
- Whisk the vinegar, sugar, ketchup, soy sauce, garlic, and ginger in a small bowl. Pour the mixture into the pan with the vegetables. Bring to a simmer, then whisk in the cornstarch slurry. Stir constantly until the sauce thickens into a heavy, glossy glaze that coats the back of a spoon.
- The final trick: Turn off the heat before adding the chicken back in. Quickly toss the crispy chicken in the thick sauce just to coat every piece. Serving immediately ensures the coating stays firm. Garnish generously with fresh cilantro and sliced green onions as shown in the image.
Notes
- Drain the fried chicken on a wire rack instead of paper towels to prevent steaming and maintain the structural crust. Turn off the heat before tossing the chicken in the sauce to ensure maximum crunch.