There’s nothing quite like biting into a homemade bar, expecting gooey caramel, only to find it either rock hard or a sticky, runny mess. I’ve been there too, and it’s so frustrating! But with this recipe, those days are over: these Salted Caramel Chocolate Crunch Bars deliver absolute perfection, featuring a truly luscious caramel layer every single time.
This recipe transforms a classic treat into an effortless masterpiece, ensuring a soft, pliable caramel that harmonizes beautifully with crisp shortbread and rich chocolate. Get ready to bake a batch of pure bliss that will impress everyone.
Why These Salted Caramel Chocolate Crunch Bars Are Your New Favorite Treat
The Secret to Silky, Never-Hard Caramel
The true genius of this recipe lies in its caramel technique. We meticulously guide you through achieving that deep amber color and incorporating the right balance of warmed cream and butter.
This method ensures your caramel remains incredibly soft and luscious, melting in your mouth without sticking to your teeth.
Beyond Basic: A Harmony of Textures and Flavors
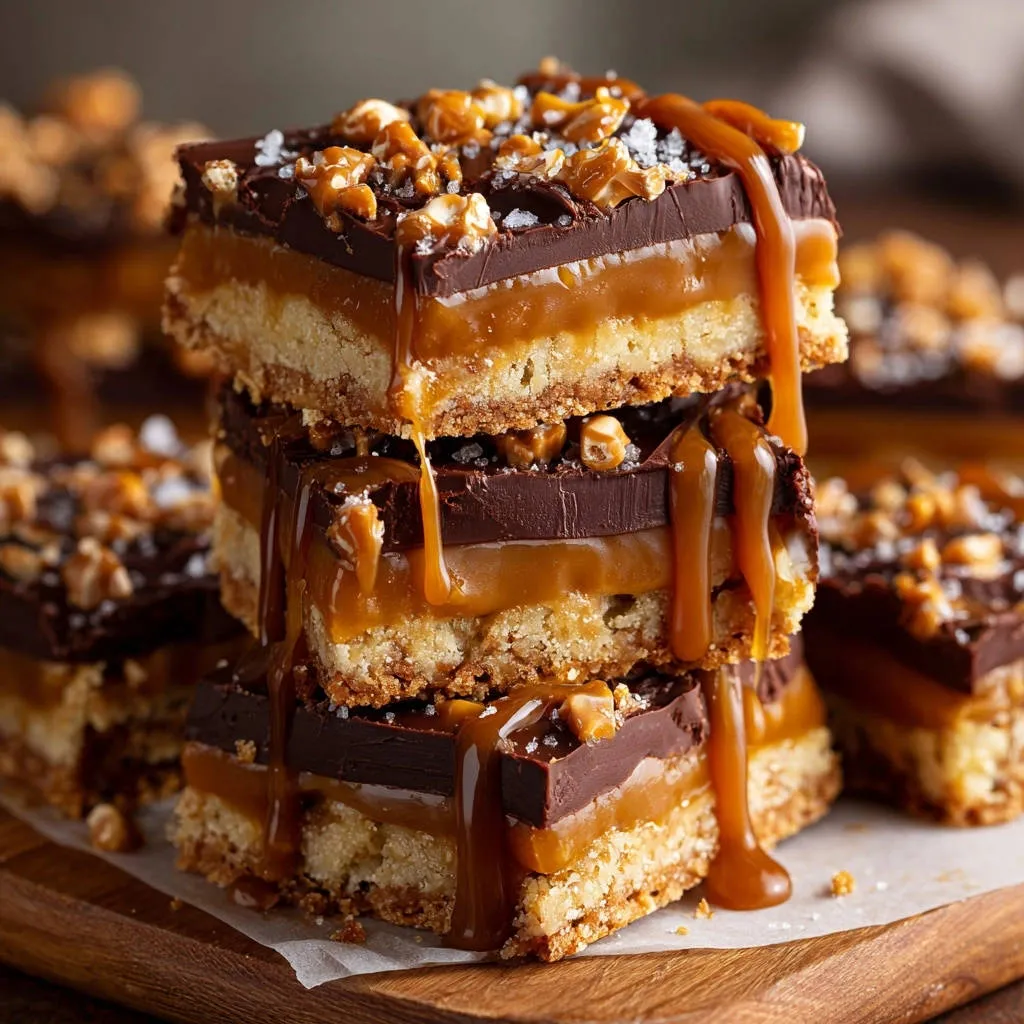
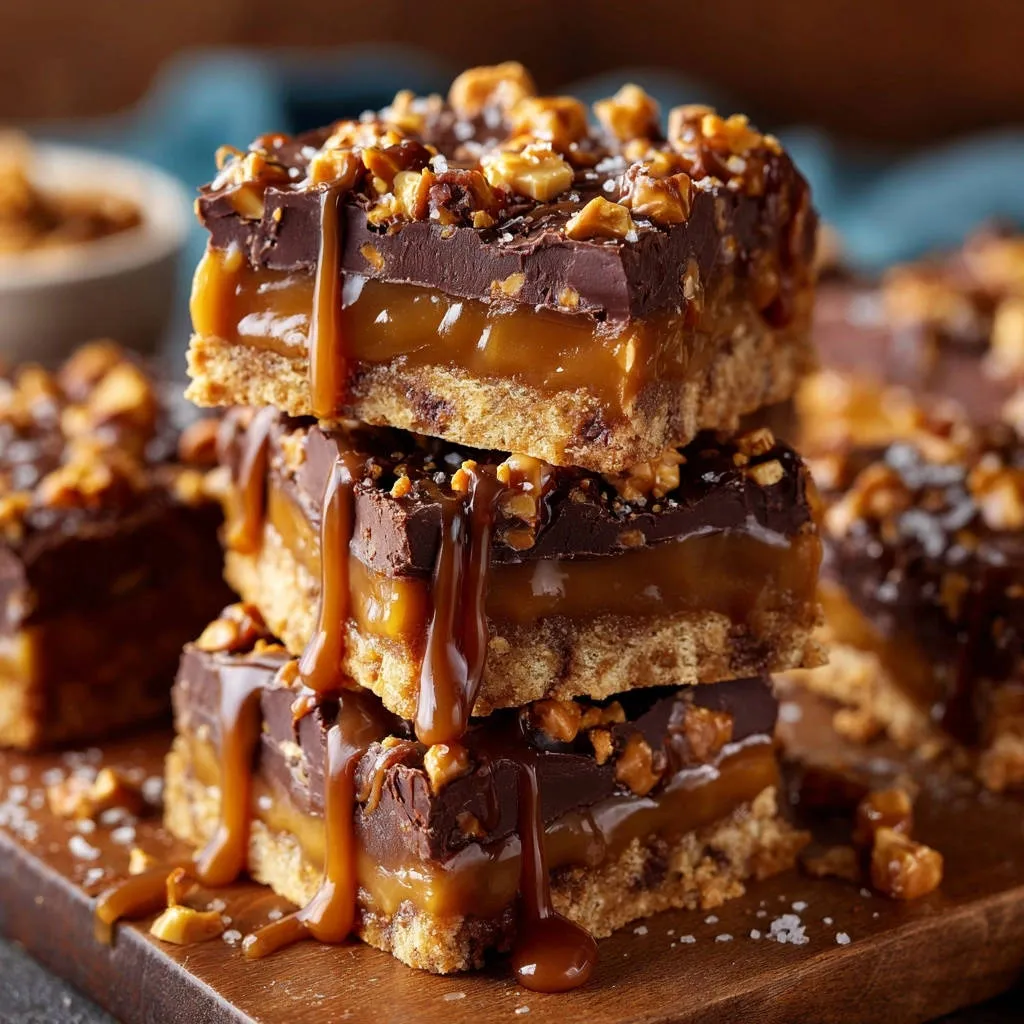
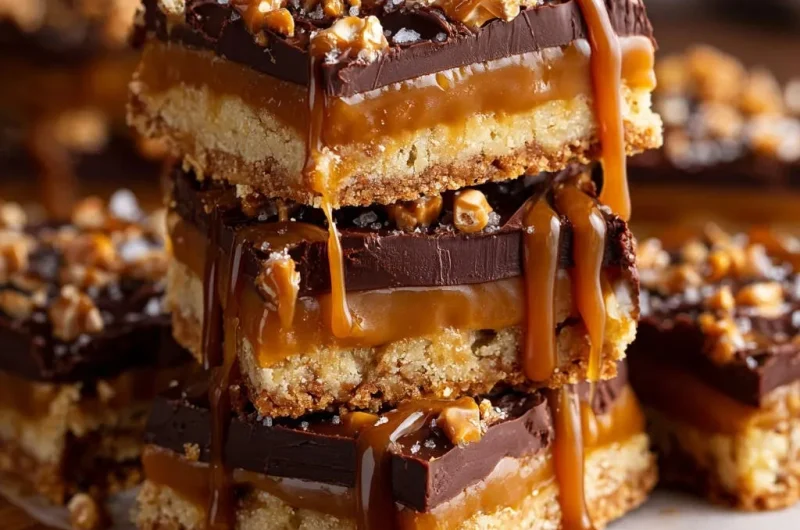
Each layer of these Salted Caramel Chocolate Crunch Bars contributes to an exquisite sensory experience. You get the delicate crispness of the buttery shortbread, the rich chewiness of the perfect caramel, and the decadent snap of the chocolate topping.
The addition of crunchy nuts and flaky sea salt elevates every bite, creating a symphony of sweet, salty, and satisfying textures.
Effortless Elegance: Impress Without the Stress
Despite their gourmet appearance and incredible flavor, these bars are surprisingly straightforward to make. Our clear, step-by-step instructions break down the process, making it accessible for home bakers of all skill levels.
You’ll create a dessert that looks like it came from a high-end bakery, leaving your guests wondering about your secret.
Crafting Flavor: Inside Your Salted Caramel Chocolate Crunch Bars
For the Buttery Shortbread Crust
All-purpose flour provides the essential structure for our sturdy yet tender base.
Cold unsalted butter, cut into cubes and worked quickly into the flour, is paramount for a delicate, flaky texture, preventing a tough crust.
Granulated sugar adds subtle sweetness, while a pinch of salt balances the flavors, enhancing the overall richness of the shortbread.
The Heart of the Bar: Perfect Salted Caramel
Granulated sugar and water are the foundation for our caramel, undergoing a precise caramelization process that develops deep, complex flavors.
Warmed heavy cream is crucial; adding it warm prevents the sugar from seizing, ensuring a smooth, uniform consistency that makes the caramel pliable and never hard.
Unsalted butter, stirred in at the right moment, lends a luxurious creaminess and richness, further contributing to that desired soft, melt-in-your-mouth texture.
Vanilla extract adds a comforting warmth, and sea salt introduces that irresistible sweet-and-salty contrast, highlighting the caramel’s depth.
The Decadent Chocolate Crunch Topping
Semi-sweet chocolate chips or chopped dark chocolate combine with a touch of heavy cream to create a smooth, glossy ganache-like topping that sets beautifully.
Chopped walnuts or pecans provide a delightful crunch, contrasting the softer layers below. This adds an important textural dimension.
A final sprinkle of flaky sea salt not only adds visual appeal but also delivers bursts of salinity that perfectly cut through the sweetness, enhancing the overall flavor profile.
Gear Up: Essential Tools for Crunch Bar Success
Baking & Prep Essentials
8×8 Inch Baking Pan: This size is crucial for achieving the correct bar thickness, ensuring each layer is perfectly proportioned. A metal pan often offers the most even baking.
Parchment Paper: Lining your pan with parchment, leaving an overhang on two sides, is your secret weapon for effortlessly lifting the entire slab of bars out for clean slicing.
Pastry Blender or Fork: These tools are essential for cutting cold butter into the flour for the shortbread crust, creating the desired coarse, crumbly texture without overworking the dough.
Caramel Making Mastery
Heavy-Bottomed Saucepan: This type of pan is a must-have for caramel making, as its even heat distribution prevents scorching and ensures your sugar caramelizes uniformly.
Whisk: A whisk is invaluable for gently stirring the sugar and water to dissolve it initially, and then for smoothing the caramel after adding the cream.
Heat-Resistant Spatula: Perfect for stirring the hot caramel and scraping down the sides of the pan, ensuring all ingredients are fully incorporated without waste.
Finishing & Serving Aids
Microwave-Safe Bowl: For quick and efficient melting of the chocolate topping, a microwave-safe bowl simplifies the process and cleanup.
Sharp Knife: A truly sharp knife is non-negotiable for clean, precise cuts through all the layers. Wiping the blade clean between cuts ensures professional-looking edges.
From Scratch to Sweet Perfection: A Detailed Guide to Salted Caramel Chocolate Crunch Bars
-
Prepare the Buttery Shortbread Crust:
Preheat your oven to 350°F (175°C). Line an 8×8 inch baking pan with parchment paper, ensuring an overhang on two sides for easy removal later.
In a medium bowl, combine the flour, granulated sugar, and a pinch of salt. Add the cold, cubed butter and cut it in using a pastry blender or your fingertips until the mixture resembles coarse crumbs. This method creates a tender, flaky crust, akin to a perfect shortbread base, much like those in classic shortbread fingers.
Press the crumb mixture evenly into the prepared pan, ensuring it’s compact. Bake for 18 to 20 minutes, or until the edges are lightly golden. Let it cool slightly on a wire rack while you prepare the caramel.
-
Master the Perfect Salted Caramel Layer:
In a heavy-bottomed saucepan, combine 1 cup granulated sugar and 1/4 cup water. Stir gently over medium heat until the sugar completely dissolves. This initial stirring prevents crystallization, leading to a smooth caramel.
Increase the heat to medium-high and bring the mixture to a boil WITHOUT stirring. Continue to boil until the sugar syrup turns a deep amber color, typically 8 to 12 minutes. This deep color is crucial for a rich flavor and the right firm-but-pliable texture that won’t pull out your teeth.
Carefully and immediately pour the warmed heavy cream into the hot sugar mixture. Be very cautious as it will bubble up vigorously. Stir constantly until the mixture is smooth. Remove the saucepan from the heat and stir in the cubed unsalted butter and vanilla extract until fully incorporated and the caramel is uniformly smooth. The butter is key to creating that creamy, pliable texture that is never hard. Finally, stir in the 1/2 teaspoon sea salt.
-
Assemble the Decadent Layers:
Pour the warm, luscious caramel evenly over the slightly cooled shortbread crust. Ensure it coats the entire surface, creating an even middle layer.
Allow the bars to cool at room temperature for about 30 minutes, then transfer them to the refrigerator for another 30 minutes. This chilling period allows the caramel to set slightly, maintaining its soft and luscious consistency for slicing.
-
Add the Rich Chocolate Topping:
In a microwave-safe bowl, combine the chocolate chips (or chopped dark chocolate) and 2 tablespoons heavy cream. Microwave in 30-second intervals, stirring well after each, until the chocolate is completely smooth and melted. Be careful not to overheat it, which can cause it to seize.
Spread the melted chocolate evenly over the slightly set caramel layer, using an offset spatula for a smooth, professional finish.
-
Finish and Chill to Perfection:
While the chocolate is still wet and glossy, generously sprinkle the chopped walnuts or pecans and the flaky sea salt over the top. The flaky sea salt adds a beautiful visual and a burst of salty contrast, elevating the Salted Caramel Chocolate Crunch Bars.
Refrigerate the bars for at least 2 hours, or until the chocolate layer is completely firm. This chilling is essential for clean cutting and setting all layers, similar to setting other bar-style desserts like no-bake peanut caramel bars.
-
Cut and Serve Your Masterpiece:
Once firm, carefully lift the bars out of the pan using the parchment paper overhang. Place them on a cutting board, ready for slicing.
Using a sharp knife, slice the slab into desired squares or rectangles. For neat edges, wipe the knife clean with a warm, damp cloth between each cut. This prevents dragging chocolate and caramel, ensuring a pristine presentation.
Serve the bars at room temperature for the best soft, chewy, and melt-in-your-mouth texture. Enjoy your homemade Salted Caramel Chocolate Crunch Bars!
Beyond the Recipe: Expert Tips for Next-Level Crunch Bars
Achieving That Signature Caramel Perfection
Don’t Stir the Caramel Once Boiling: Once your sugar-water mixture comes to a boil, resist the urge to stir. Stirring can cause sugar crystals to form, leading to grainy caramel. Swirl the pan gently if you need to encourage even cooking, but keep that spoon out!
Warm Your Cream: Always warm your heavy cream before adding it to the hot sugar. Cold cream can cause the hot sugar to seize up and harden, making it difficult to achieve a smooth, pliable caramel. A quick microwave or stovetop warm-up is all it takes.
Watch the Color, Not Just the Timer: Caramelization times can vary significantly based on your stovetop and pan. Focus on achieving that deep amber color, which indicates a rich, complex flavor. Too light, and it might lack depth; too dark, and it can taste burnt.
Crust and Topping Techniques
Keep Crust Butter Cold: Ensure your butter for the shortbread crust is very cold and cubed. This creates pockets of butter that release steam during baking, resulting in a tender, flaky crust rather than a tough one.
Evenly Press the Crust: A well-pressed crust ensures an even thickness and prevents crumbly edges, giving your bars a solid foundation. Use the bottom of a flat glass or measuring cup to compact it firmly and uniformly across the pan.
Temper Your Chocolate (Optional): For an extra shiny, snap-resistant chocolate topping that’s less prone to melting at room temperature, consider tempering your chocolate. While not strictly necessary for this recipe, it elevates the professional finish and mouthfeel.
Common Questions & Solutions for Perfect Salted Caramel Chocolate Crunch Bars
My Caramel Turned Hard and Chewy (Like a Toffee)
This often happens if the caramel was cooked for too long or to too high a temperature. Ensure you’re pulling it off the heat as soon as it reaches the deep amber color, not darker. Adding warm cream and sufficient butter also helps keep it pliable.
My Caramel is Too Runny
If your caramel is too runny, it likely wasn’t cooked long enough, or the heat was too low. The sugar needs to reach a specific temperature (around 320-335°F or 160-168°C if using a thermometer) to properly thicken. Ensure your sugar-water mixture boils steadily to a deep amber hue.
My Shortbread Crust is Crumbly or Tough
A crumbly crust can be due to not enough butter or not pressing it firmly enough into the pan. A tough crust usually means the butter was overworked or allowed to warm too much. Ensure butter is very cold and you work quickly to combine ingredients, avoiding excessive handling.
My Chocolate Topping Isn’t Setting Firmly
This could be due to too much cream in the chocolate mixture or not chilling the bars long enough. Ensure you use the exact measurements for cream and allow at least 2 hours (or more) of refrigeration time for the chocolate to set completely, especially for thicker applications like these decadent chocolate brownies.
Preserving Sweetness: Storage & Make-Ahead Tips
Optimal Storage for Freshness
For the best texture and to prevent the chocolate from blooming (developing a white film), store your Salted Caramel Chocolate Crunch Bars in an airtight container in the refrigerator for up to 5-7 days. Allow them to come to room temperature for about 15-20 minutes before serving for that perfect soft and chewy experience.
Can You Freeze Salted Caramel Chocolate Crunch Bars?
Yes, these bars freeze beautifully! Once fully set and cut into squares, arrange them in a single layer on a parchment-lined baking sheet and freeze until solid. Then, transfer them to an airtight, freezer-safe container or bag, separating layers with parchment paper, for up to 2-3 months. Thaw in the refrigerator overnight or at room temperature for a few hours before serving.
Make-Ahead Marvels: Preparing in Advance
These Salted Caramel Chocolate Crunch Bars are an excellent make-ahead dessert, perfect for entertaining or meal prep. You can prepare them entirely a day or two in advance and store them in the refrigerator, ready to slice and serve. The flavors deepen overnight, often making them even more delicious!
Unleash Your Creativity: Variations and Serving Inspirations
Delightful Flavor Twists
Nut Swaps: Experiment with different nuts like toasted almonds, pecans, or even a sprinkle of toasted coconut for varied crunch and flavor profiles. Each offers a unique aroma and texture.
Chocolate Choices: Instead of semi-sweet, try dark chocolate for a more intense flavor, or milk chocolate for a sweeter, creamier topping. White chocolate can also be used, perhaps with a hint of food coloring for a festive touch.
Spice it Up: Add a pinch of cinnamon or a tiny dash of cayenne pepper to the caramel layer for a subtle warmth and complexity. These spices beautifully complement the rich caramel notes.
Serving Suggestions & Pairings
These bars are perfect on their own as a satisfying sweet treat, offering a complete flavor and texture experience. For an extra indulgent experience, serve them alongside a scoop of vanilla bean ice cream or a dollop of fresh whipped cream.
They also pair wonderfully with a hot cup of coffee, a rich espresso, or a glass of cold milk, providing a delightful contrast. Consider cutting them into smaller, bite-sized pieces for an elegant addition to any dessert platter at gatherings.
Salted Caramel Chocolate Crunch Bars: Your FAQs Answered
Can I make these Salted Caramel Chocolate Crunch Bars gluten-free?
Yes, you can! Simply substitute the all-purpose flour in the shortbread crust with a 1:1 gluten-free baking flour blend. Ensure your blend contains xanthan gum for best results, or add a tiny pinch if it doesn’t, to help with structure.
Is it possible to make a dairy-free version of this recipe?
Making these bars dairy-free is challenging, especially for the caramel layer, as heavy cream and butter are integral to its texture and consistency. However, you could experiment with full-fat coconut cream and dairy-free butter alternatives. For the chocolate topping, use dairy-free chocolate chips and plant-based cream, but results may vary.
What if I don’t have a pastry blender for the crust?
No problem! You can use two knives to cut the butter into the flour, or use your fingertips. Just work quickly to prevent the butter from warming too much, which will affect the crust’s tender texture.
How long does the caramel making process typically take?
The caramel process, from sugar dissolving to reaching the deep amber stage, usually takes about 8-12 minutes on medium-high heat. However, it’s crucial to watch the color closely rather than relying solely on the clock, as stove temperatures and pan types vary significantly.
Share the Sweetness: Your Salted Caramel Chocolate Crunch Bar Adventure Begins!
You’ve now unlocked the secrets to creating truly irresistible Salted Caramel Chocolate Crunch Bars, complete with that perfectly pliable, never-hard caramel. This recipe isn’t just about baking; it’s about mastering a classic and sharing pure joy with every decadent bite.
Whether you’re treating yourself, surprising loved ones, or looking for that standout potluck dessert, these bars are guaranteed to impress. Don’t be shy about experimenting with variations – your kitchen is your canvas for delicious creativity!
We’d love to see your creations! Share your Salted Caramel Chocolate Crunch Bars on social media and tag us, or leave a comment below with your favorite part of this recipe. Happy baking!
Salted Caramel Chocolate Crunch Bars
Course: DessertCuisine: AmericanDifficulty: medium4
16 bars30
minutes35
minutes450
kcal240
minutesSay goodbye to frustrating caramel! These Salted Caramel Chocolate Crunch Bars feature a perfect, pliable caramel layer that’s never too hard or too runny. A delightful treat with a buttery shortbread crust and crunchy chocolate topping.
Ingredients
For the Shortbread Crust:
1 cup all-purpose flour
1/2 cup cold unsalted butter, cut into cubes
1/4 cup granulated sugar
Pinch of salt
For the Caramel Layer:
1 cup granulated sugar
1/4 cup water
1/2 cup heavy cream, warmed
1/4 cup unsalted butter, cut into cubes
1 teaspoon vanilla extract
1/2 teaspoon sea salt
For the Chocolate Topping:
1 cup semi-sweet chocolate chips or chopped dark chocolate
2 tablespoons heavy cream
1/2 cup chopped walnuts or pecans
1/2 teaspoon flaky sea salt, for sprinkling
Directions
- Prepare Crust: Preheat oven to 350°F (175°C). Line an 8×8 inch baking pan with parchment paper, leaving an overhang on two sides. In a medium bowl, combine flour, granulated sugar, and salt. Cut in the cold butter with a pastry blender or your fingertips until the mixture resembles coarse crumbs. Press the mixture evenly into the prepared pan. Bake for 18 to 20 minutes, until the crust is lightly golden. Let it cool slightly on a wire rack.
- Make the Caramel (The Secret to Perfect Consistency!): In a heavy-bottomed saucepan, combine 1 cup granulated sugar and 1/4 cup water. Stir gently over medium heat until the sugar completely dissolves. Increase the heat to medium-high and bring the mixture to a boil without stirring. Continue to boil until the sugar syrup turns a deep amber color. This usually takes 8 to 12 minutes. This deep color ensures rich flavor and the right firmness. Carefully and immediately pour the warmed heavy cream into the hot sugar mixture. Be cautious as it will bubble up vigorously. Stir constantly until the mixture is smooth. Remove the saucepan from the heat and stir in the cubed unsalted butter and vanilla extract until fully incorporated and the caramel is uniformly smooth. The butter helps create a creamy, pliable texture that is never hard. Stir in the 1/2 teaspoon sea salt.
- Assemble Layers: Pour the warm caramel evenly over the cooled shortbread crust. Allow it to cool at room temperature for about 30 minutes, then refrigerate for another 30 minutes to allow the caramel to set slightly but remain soft and luscious.
- Add Chocolate Topping: In a microwave-safe bowl, combine the chocolate chips and 2 tablespoons heavy cream. Microwave in 30-second intervals, stirring well after each, until the chocolate is smooth and melted. Spread the melted chocolate evenly over the set caramel layer.
- Finish and Chill: While the chocolate is still wet, sprinkle the chopped nuts and flaky sea salt over the top. Refrigerate the bars for at least 2 hours, or until the chocolate layer is completely firm.
- Cut and Serve: Once firm, lift the bars out of the pan using the parchment paper overhang. Using a sharp knife, slice into squares. For neat edges, wipe the knife clean between cuts. Serve at room temperature for the best soft and chewy texture.
Notes
- For best soft and chewy texture, serve at room temperature.