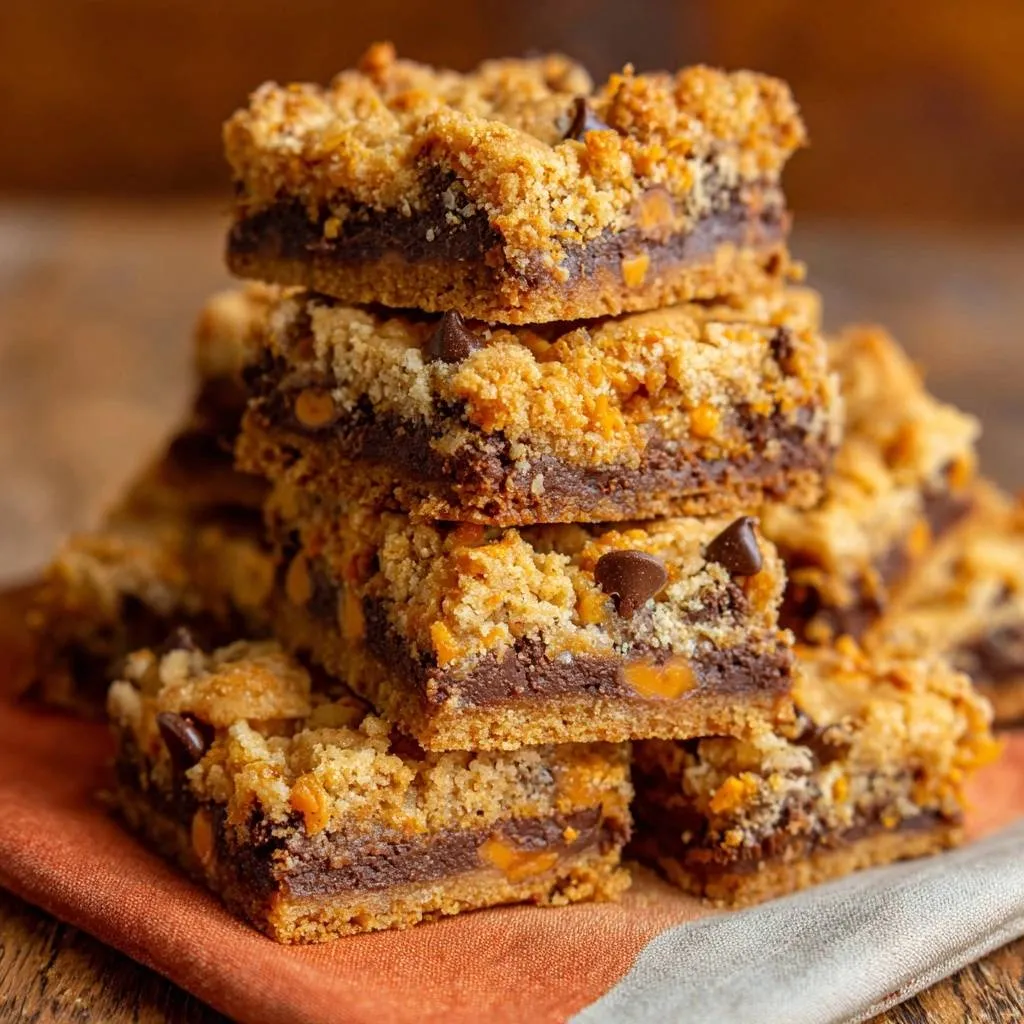
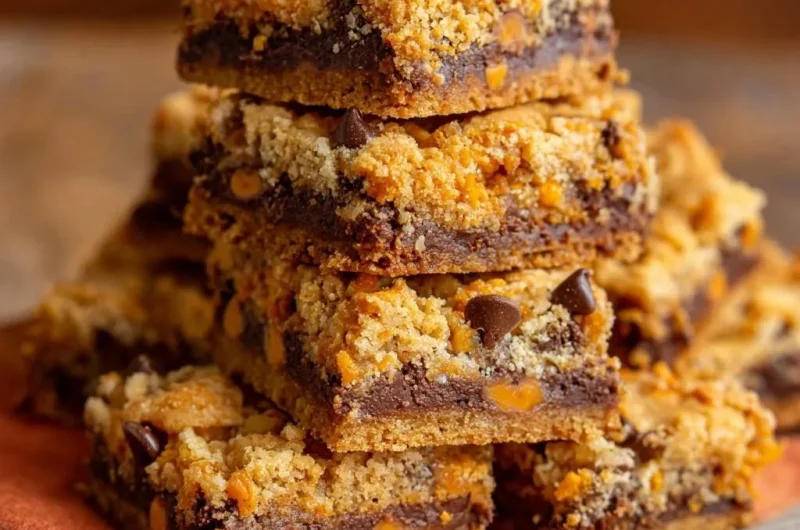
Ever bitten into crumble bars only to get a mushy, soggy mess on top? Those disappointments end here. This recipe delivers a crunchy Butterfinger-studded crumble over a gooey chocolate caramel heart, thanks to the cold butter cut-in method. No more soggy fails.
Therefore, you get unbeatable texture contrast every time. The crisp top stays separate from the filling, while Butterfinger crunch amps up the fun. Perfect for parties or midnight cravings, it yields 24 bars with 15 minutes prep, 35 minutes bake, and 2+ hours chill.
Here’s the expertise kicker: keep those butter pieces pea-sized during cut-in. They create steam pockets that crisp up in the oven, locking in crunch without absorbing filling moisture. You’ll taste the difference immediately.
For perfectly shaped cookies, explore the no-spread method in glazed raspberry thumbprint cookies.
Crisp Crumble Science
The cold butter cut-in method transforms basic crumbs into crunchy perfection. Room-temperature butter mixes too smoothly and soaks up filling moisture, leading to sogginess. However, cold cubes stay chunky, forming pea-sized bits that melt into steam pockets during baking.
In addition, baking powder gives the crumble lift for extra airiness. Parbaking the base seals it against the gooey filling. Finally, the Maillard reaction browns the top golden, boosting that irresistible nutty flavor.
Cold Butter Cut-In Technique
Grab a pastry blender for the best results; it cuts butter evenly without warming it. Forks work too, or use your fingers if you’re quick, but avoid excess heat. Stop when you see coarse crumbs with visible pea-sized butter pieces, as they ensure air pockets and crunch.
Overmixing turns it doughy, killing texture. Therefore, err on underdone; the oven finishes the job.
Parbaking Prevents Soggy Base
Parbake the pressed base 10 minutes until edges turn lightly golden. This step sets the structure and blocks filling moisture. However, don’t go longer, or it overbrowns and toughens.
Key Ingredients for Ultimate Butterfinger Chocolate Crumble Bars
All-purpose flour provides sturdy structure that holds up to the filling. Packed light brown sugar adds chew and moisture without clumping like dark sugar might. Therefore, use unsalted butter so you control the salt level perfectly.
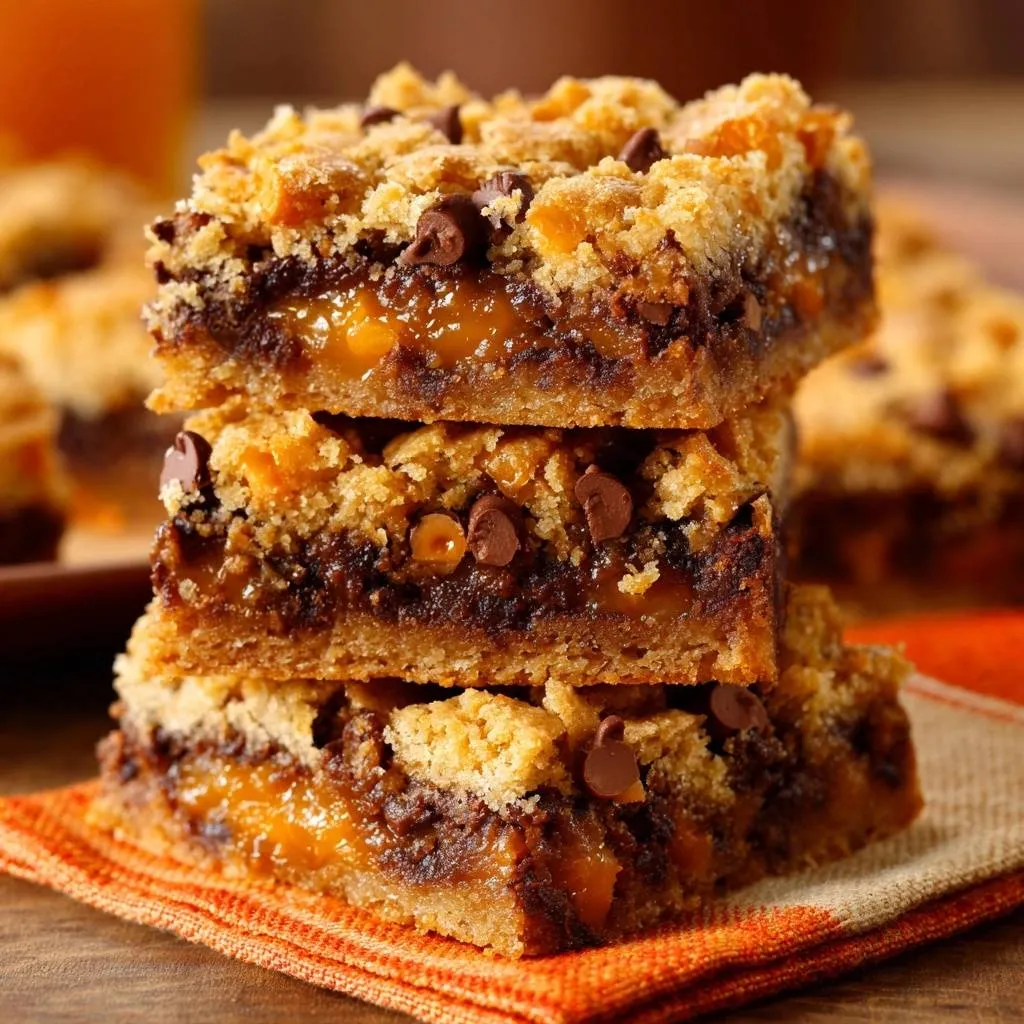
In addition, 2 1/2 cups flour, 1 cup brown sugar, 1 teaspoon baking powder, and 1/2 teaspoon salt form the base. Then, 1 cup cold unsalted butter (cubed), 1 1/2 cups crushed Butterfinger (from 6 fun-size bars, divided), 1/2 cup semisweet chips for crumble, 2 cups for filling, and 1/2 cup caramel sauce complete it. Semisweet chips melt smoothly without overpowering sweetness.
Caramel sauce’s viscosity creates that perfect gooey pull. Freshly crushed Butterfinger keeps snap alive.
Butterfinger and Chocolate Ratios
Crush 6 fun-size bars for 1 1/2 cups total: 1 cup in base crumble, 1/2 cup in filling. This balances crunch throughout. Meanwhile, 1/2 cup chips stud the top crumble, while 2 cups melt into rich filling for gooey contrast.
Equipment for Perfect Crumble Bars
A 9×13-inch pan with parchment overhang lets you lift bars cleanly. Pastry blender shines for uniform crumbs; without it, two forks do fine. Use a microwave-safe bowl for controlled melting.
Therefore, cool on a wire rack to prevent steaming sogginess. Sharp knife ensures clean slices post-chill. No fancy gear needed otherwise.
Step-by-Step: Building Crunchy Butterfinger Chocolate Crumble Bars
Phase 1: Dry Mix and Butter Cut-In
Preheat oven to 350°F. Line 9×13 pan with parchment overhang. Whisk flour, brown sugar, baking powder, and salt in a large bowl until even.
Add cold butter cubes. Cut in with pastry blender until coarse crumbs form with pea-sized butter bits. Don’t overmix; that’s your crunch ticket.
Phase 2: Add-Ins and Base Press
Stir in 1 cup crushed Butterfinger and 1/2 cup chocolate chips. Press 2/3 firmly into pan bottom. Parbake 10 minutes for light golden edges.
Phase 3: Gooey Chocolate Caramel Filling
Melt 2 cups chocolate chips in microwave, 30 seconds at a time, stirring smooth. Mix in 1/2 cup caramel sauce and 1/2 cup crushed Butterfinger. Pour evenly over hot base; it spreads silky.
Phase 4: Loose Top Crumble and Final Bake
Sprinkle remaining 1/3 crumb mix loosely over filling; no pressing. Bake 20-25 minutes until top turns golden and firm. Cool 30 minutes on rack, then chill 2 hours minimum for set cuts.
Lift out, slice into 24 bars with sharp knife. Pro tip: wipe blade between cuts for neat edges.
More Sweet Treats
Round out your chocolate dessert with these other sweet options.
- For a different take on chocolate bars, consider making homemade chocolate chip granola bars that promise a satisfying texture.
- If you’re craving something fluffy and comforting, whip up a batch of fluffy diner-style pancakes to enjoy alongside your crumble bars.
Avoiding Soggy Ultimate Butterfinger Chocolate Crumble Bars
Soggy bars happen from five main pitfalls. First, overmixing butter creates dough, not crumbs. Second, skipping parbake lets filling soak the base. Third, pressing the top crumble packs it tight, trapping moisture.
Fourth, cutting warm leads to smears and mush. Fifth, insufficient chill keeps filling runny. However, follow the cold butter rule, parbake, sprinkle loosely, cool properly, and you win every time.
Overmixing Crumble Fixes
If it doughs up, add 1-2 tablespoons flour and gently mix back to crumbs. Signs include smooth paste instead of pebbles. Prevention beats salvage, so check often.
Improper Cooling Errors
Room cool 30 minutes first to avoid shocking the structure, then fridge. Straight-to-fridge risks condensation sogginess. Full 2-hour chill firms everything for clean slices.
Flavor Twists on Butterfinger Chocolate Crumble Bars
Swap peanut butter chips for the semisweet in crumble to amp nuttiness. Dark chocolate chips intensify the filling’s depth. Use salted caramel sauce for sweet-savory pop.
In addition, toss crushed pretzels or toasted nuts into top crumbs for extra crunch. For vegan, plant-based butter and dairy-free chips work seamlessly; keep cold cut-in key.
Make-Ahead Guide for Butterfinger Chocolate Crumble Bars
Prep the base crumble up to 2 days ahead; store airtight at room temp. Assemble and bake full bars, then freeze slices up to 3 months wrapped tightly. Thaw overnight in fridge.
Therefore, store at room temp up to 5 days airtight. For parties, bake ahead and slice just before serving.
Pairing Ideas for Ultimate Butterfinger Chocolate Crumble Bars
Cold milk cuts through the richness perfectly. Black coffee’s bitterness balances the sweet caramel chocolate layers. Vanilla ice cream adds creamy contrast on top.
Fresh berries bring tart acidity. Ideal for potlucks or movie nights; they disappear fast.
For a delightful tart counterpart, explore creamy lemon crumble bars with a crisp crust.
Ultimate Butterfinger Chocolate Crumble Bars FAQ
Can I Use Regular Butterfinger Bars?
Yes, regular bars crush fine, but fun-size are easier for even 1/4-inch bits. Pulse in food processor briefly; avoid big chunks that disrupt texture.
Why Is My Crumble Soggy?
Usually overmixed butter or skipped parbake lets moisture seep in. Fix next time with pea-sized cold butter and 10-minute base bake for sealed crunch.
How to Cut Clean Bars?
Chill fully 2+ hours, use sharp knife, and wipe clean between cuts. Run hot water over blade first for smoother slices through gooey filling.
Gluten-Free Butterfinger Crumble Adaptation?
Swap all-purpose for 1:1 gluten-free flour blend. Add 1/4 teaspoon xanthan gum if your blend lacks it, for binding without toughness.
Can I Double the Recipe?
Yes, use half-sheet pan. Parbake base 12 minutes, final bake 25-30; watch for even golden top without overbrowning edges.
Butterfinger Chocolate Crumble Bars
Course: DessertCuisine: AmericanDifficulty: medium24
bars20
minutes35
minutes280
kcal180
MinutesSay goodbye to mushy toppings that ruin your bars. This recipe nails a perfectly crunchy crumble top over gooey chocolate caramel filling using a foolproof cold butter cut-in method. It keeps crumbs coarse and crisp, no sogginess ever.
Ingredients
2 1/2 cups all-purpose flour
1 cup packed light brown sugar
1 teaspoon baking powder
1/2 teaspoon salt
1 cup cold unsalted butter, cut into small cubes
1 1/2 cups crushed Butterfinger bars (about 6 fun-size bars, divided)
1/2 cup semisweet chocolate chips (for crumble)
2 cups semisweet chocolate chips (for filling)
1/2 cup caramel sauce
Directions
- Preheat oven to 350 degrees F. Line a 9×13-inch baking pan with parchment paper, leaving overhang for easy removal.
- In a large bowl, whisk together flour, brown sugar, baking powder, and salt.
- Add cold butter cubes to the dry ingredients. Using a pastry blender, two forks, or your fingers, cut the butter in until the mixture forms coarse crumbs with visible pea-sized butter pieces. Do not overmix; this cold butter technique is the key to no soggy crumble, as it creates steam pockets that crisp up during baking while staying separate from the filling.
- Stir 1 cup crushed Butterfinger and 1/2 cup chocolate chips into the crumb mixture.
- Firmly press 2/3 of the crumb mixture into the bottom of the prepared pan to form the base.
- Parbake the base for 10 minutes until edges are lightly golden. This step seals the base and prevents moisture from the filling from making it soggy.
- Meanwhile, prepare the filling: In a microwave-safe bowl, melt 2 cups chocolate chips in 30-second intervals, stirring until smooth. Stir in caramel sauce and remaining 1/2 cup crushed Butterfinger until combined.
- Pour the chocolate caramel filling evenly over the hot parbaked base.
- Sprinkle the remaining 1/3 crumb mixture loosely and evenly over the filling. Do not press down; keep it light and pebbly to lock in that crunchy texture.
- Bake for 20 to 25 minutes, until the crumble top is golden brown and firm.
- Cool in the pan on a wire rack for 30 minutes, then refrigerate for at least 2 hours to set the filling for clean cuts. Lift out using parchment and slice into bars. Store in an airtight container.
Notes
- Use cold butter and avoid overmixing for coarse crumbs. Parbake the base to prevent sogginess. Refrigerate for clean cuts.