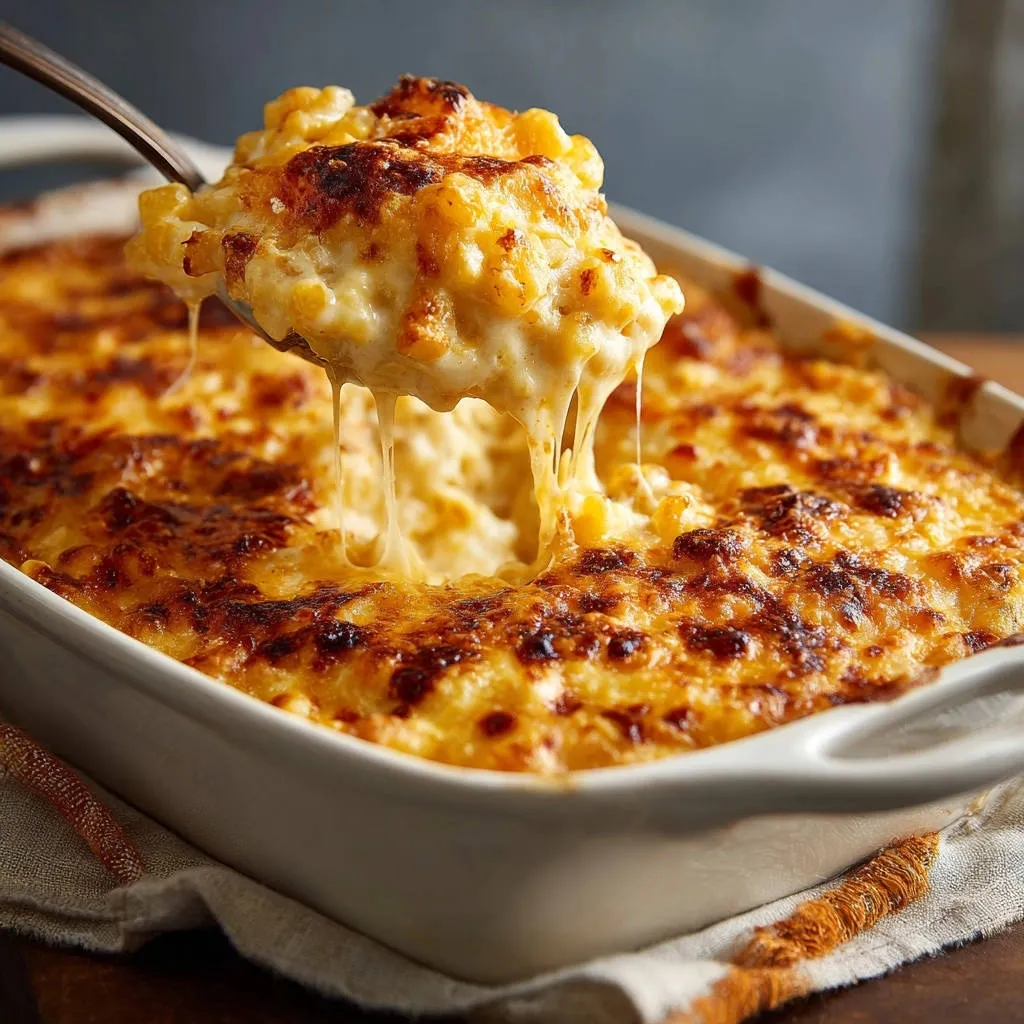
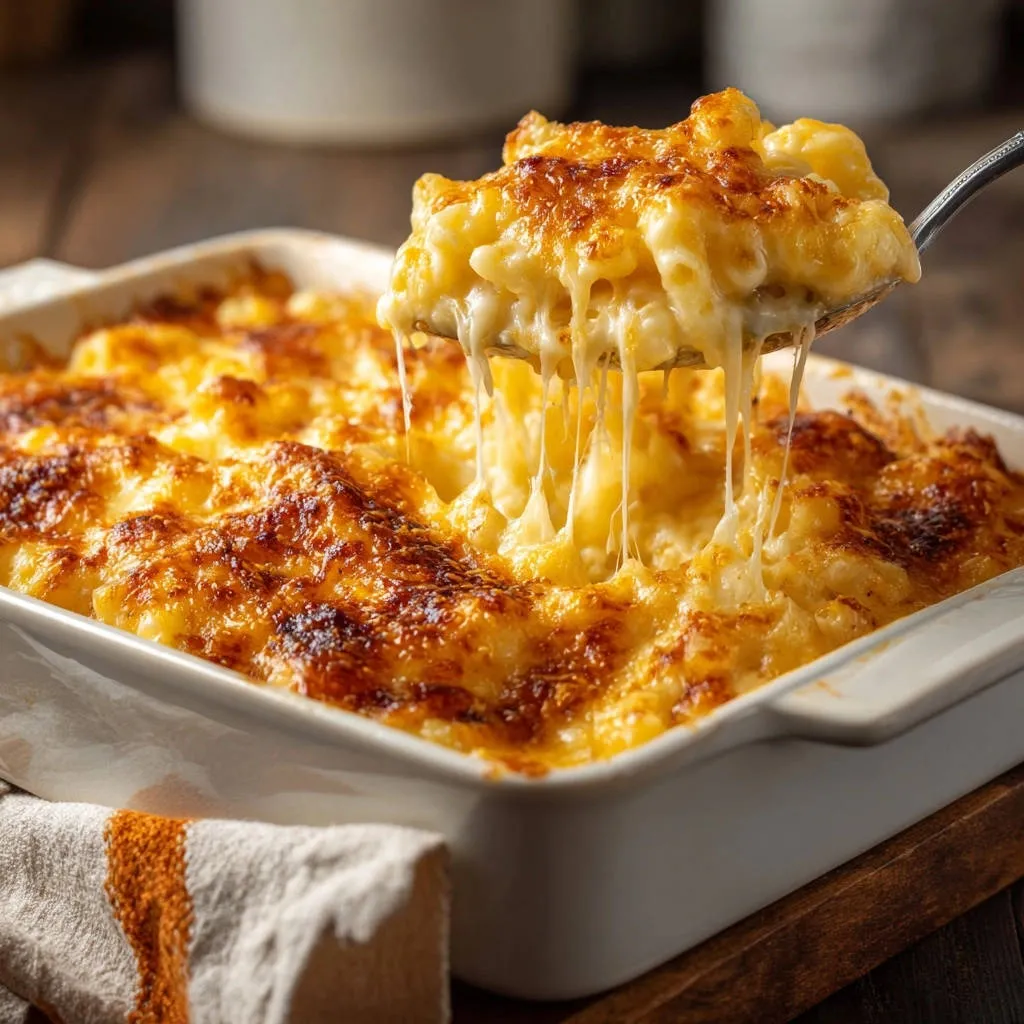
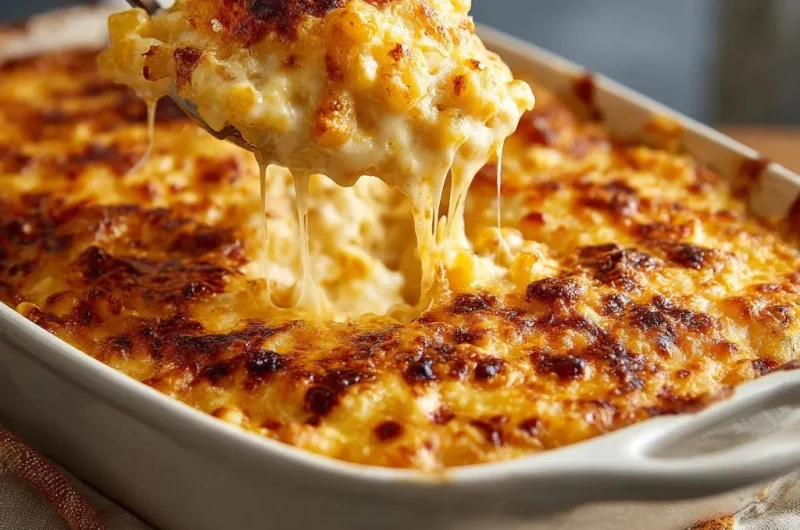
There’s nothing quite like a truly exceptional Cheesy Baked Mac and Cheese, yet many home cooks wrestle with dryness or a grainy sauce. I’ve perfected a method that guarantees a consistently smooth, luscious cheese sauce and an irresistible crispy top every time.
This recipe transforms a classic comfort food into a reliable masterpiece, ensuring your homemade baked mac and cheese is always a triumph of creamy texture and rich flavor.
For a similar comforting meal, explore this amazing creamy cheesy chicken and rice bake.
The “Secret Sauce” to Unforgettable Cheesy Baked Mac and Cheese
Say Goodbye to Dry, Lumpy Mac and Cheese
This recipe tackles common mac and cheese woes head-on, delivering a dish that is consistently creamy, never dry, and always free of lumps. We focus on precise techniques that lock in moisture and create a uniformly smooth sauce.
For more ideas on achieving that perfect baked texture, explore Southern baked mac and cheese.
The Off-Heat Cheese Melting Method: Why It Works Wonders
The secret to a velvety smooth cheese sauce lies in adding the cheese off the heat. This prevents the delicate cheese proteins from seizing or becoming oily and grainy, ensuring a perfectly emulsified and luxurious texture.
Achieving That Irresistible Crispy Top with a Moist Interior
Our two-stage baking approach is key to textural perfection. An initial covered bake locks in moisture, while a final uncovered bake creates that coveted golden-brown, bubbly, and slightly crispy crust everyone craves.
The Role of Al Dente Macaroni for Optimal Texture
Starting with very al dente macaroni is crucial. This slight undercooking allows the pasta to finish cooking in the oven, absorbing the rich sauce without turning mushy, resulting in a firm, satisfying bite.
Equipping Your Kitchen for Mac and Cheese Mastery
A Sturdy Dutch Oven or Large Saucepan
A heavy-bottomed Dutch oven or large saucepan is essential for consistent heat distribution, preventing your roux from scorching and ensuring your cheese sauce cooks evenly without sticking.
Reliable Whisk and Spatula
A good whisk is indispensable for creating a lump-free roux and smoothly incorporating milk. A heat-resistant spatula ensures every bit of that delicious sauce gets scraped into your baking dish.
The Perfect Baking Dish
A standard 9×13 inch baking dish provides the ideal surface area for even baking. Lightly greasing it ensures your Cheesy Baked Mac and Cheese comes out cleanly and easily.
Measuring Cups and Spoons
Accurate measurements are fundamental for the balanced flavors and perfect consistency of this creamy mac and cheese. They ensure the ratios of butter, flour, and milk are spot on for the roux.
Crafting the Creamy Base: Essential Ingredients
The Heart of the Dish: Elbow Macaroni
Elbow macaroni is the quintessential choice for homemade baked mac and cheese, its small curves perfectly cradling the rich cheese sauce. Cooking it very al dente is paramount, as it will continue to cook during baking.
Building the Béchamel: Butter, Flour, and Whole Milk
Unsalted butter and all-purpose flour form the roux, providing the crucial thickening agent for our smooth cheese sauce. Whole milk, with its higher fat content, contributes significantly to the sauce’s luxurious creaminess and richness.
The Quintessential Cheese Blend: Sharp Cheddar and Monterey Jack
Sharp cheddar cheese delivers that bold, classic mac and cheese tang and depth of flavor. Monterey Jack, a mild, excellent melting cheese, ensures an incredibly smooth and gooey texture that beautifully complements the cheddar’s sharpness.
Our Secret Spice: Dry Mustard Powder and Seasonings
Dry mustard powder is a subtle but powerful secret ingredient; it doesn’t make the dish taste like mustard, but rather amplifies the savory notes of the cheese, making the overall flavor more robust. A touch of salt and black pepper balances the richness.
The Topping: A Cheesy Crown
An extra cup of shredded cheese, usually cheddar or a blend, is reserved for the topping. This creates that irresistible golden, bubbly crust that everyone loves, adding a final layer of cheesy goodness and texture.
From Pantry to Plate: Your Guide to Baked Mac and Cheese Perfection
Prepare Your Oven and Baking Dish
Preheating ensures an even bake from the start, while greasing prevents sticking for easy serving. Set your oven to 375°F (190°C) and lightly grease a 9×13 inch baking dish.
Cook the Macaroni to Al Dente
Cooking pasta slightly undercooked prevents it from becoming mushy when baked, ensuring a perfect bite. Cook 1 pound of elbow macaroni according to package directions until very al dente, then drain it thoroughly.
Mastering the Roux: Your Sauce Foundation
A well-made roux is the secret to a lump-free, thick sauce. In a large saucepan, melt 1/2 cup unsalted butter over medium heat. Add 1/2 cup all-purpose flour and whisk constantly for 1 to 2 minutes until smooth, creating a pale golden paste.
Gradually Whisk in the Milk
Adding milk gradually helps incorporate it smoothly into the roux, preventing lumps and creating a silky béchamel. Gradually whisk in 4 cups of whole milk, a little at a time, until smooth. Continue whisking and cooking over medium heat until the sauce thickens and begins to simmer, about 5 to 7 minutes.
Seasoning the Sauce
Adding seasonings at this stage allows their flavors to meld perfectly into the creamy sauce. Remove the saucepan from the heat and stir in 1 teaspoon salt, 1/2 teaspoon black pepper, and 1/2 teaspoon dry mustard powder.
The Off-Heat Cheese Integration
This critical technique uses the residual heat to melt the cheese gently, resulting in an incredibly smooth and un-grainy sauce. Add 4 cups shredded sharp cheddar and 1 cup shredded Monterey Jack cheeses to the sauce in three batches, stirring until each batch is fully melted and smooth before adding the next.
Combine Macaroni and Cheese Sauce
Ensure every piece of macaroni is lovingly coated in the rich cheese sauce for consistent flavor. Add the drained, al dente macaroni to the cheese sauce and stir until evenly coated.
Transfer to Baking Dish and Top
Even distribution ensures every serving gets a share of that delightful cheesy topping. Pour the Cheesy Baked Mac and Cheese mixture into the prepared baking dish. Sprinkle the remaining 1 cup of shredded cheese evenly over the top.
The Covered Bake for Creaminess
The initial covered bake traps moisture, keeping your mac and cheese wonderfully creamy on the inside. To prevent dryness, cover the baking dish tightly with aluminum foil and bake for 20 minutes.
The Uncovered Bake for Golden Perfection
The final uncovered bake creates that irresistible golden-brown, bubbly top layer, adding a delightful textural contrast. Remove the foil and continue baking for another 20 to 25 minutes, or until the top is golden brown and bubbly.
The All-Important Resting Period
Allowing the mac and cheese to rest briefly helps the sauce set slightly, ensuring the best cheesy pull and preventing it from being too loose. Let stand for 5 minutes before serving for the best cheesy pull and ultimate comfort.
Beyond the Recipe: Chef’s Tips for Ultimate Comfort
Elevate Your Cheese Blend: Beyond Cheddar and Monterey Jack
Complementary Recipes
To round out your cheesy baked mac and cheese meal, consider these other cheese-focused dishes.
- For a smooth, dippable starter, try this smooth & creamy cheese dip, offering a similar rich cheese experience.
- If you’re craving more baked goodness, this cheesy bacon corn casserole brings together comforting flavors complementary to mac and cheese.
Experiment with other excellent melting cheeses like Gruyere for nutty depth, Fontina for extra stretch, or Colby Jack for a milder profile. A touch of smoked gouda can also add a delightful complexity to your homemade baked mac and cheese.
Spice It Up: Adding a Hint of Heat
For those who love a little warmth, consider adding a pinch of cayenne pepper, a dash of smoked paprika, or a few drops of your favorite hot sauce to the cheese sauce. This subtly elevates the flavor without overpowering the cheesiness.
The Breadcrumb Topping Debate: Crispy vs. Pure Cheesy
If you crave an extra layer of crunch, sprinkle a cup of panko breadcrumbs, tossed with a tablespoon of melted butter, over the cheese topping before the uncovered bake. This creates a wonderfully crispy, golden crown.
Preventing a Dry Finish: The Milk Splash Secret
If your sauce seems too thick after combining with the macaroni, or if you’re making it ahead, stir in an extra tablespoon or two of whole milk. This ensures maximum creaminess after baking and helps prevent dryness.
Don’t Rush the Roux: Patience is a Virtue
Taking the full 1-2 minutes to cook the flour in the butter for the roux is essential. This crucial step eliminates any raw flour taste and ensures your smooth cheese sauce has a rich, nutty flavor foundation.
Conquering Common Mac and Cheese Challenges
Why is My Mac and Cheese Sauce Lumpy?
Lumps usually form from not whisking the roux constantly or adding milk too quickly. Ensure a smooth paste before gradually incorporating cold milk while vigorously whisking. This gradual addition and continuous motion creates a silky smooth béchamel.
My Baked Mac and Cheese is Dry!
Overbaking or insufficient sauce can lead to dryness. Always cover your Cheesy Baked Mac and Cheese for the initial bake to trap moisture. Also, ensure there’s a generous amount of smooth cheese sauce to thoroughly coat all the pasta, preventing it from drying out.
Cheese Sauce is Oily or Grainy
Oily or grainy cheese sauce typically happens when cheese is added to excessively hot liquid or boiled, causing the fats to separate. The off-heat method in this recipe prevents cheese from breaking and releasing its oils, ensuring a perfectly emulsified, creamy texture.
My Macaroni is Mushy After Baking
Mushy pasta is a result of overcooking before baking. Always cook your macaroni to a very al dente stage, as it will continue to cook and absorb moisture in the oven. This ensures your homemade baked mac and cheese retains a pleasing bite.
Serving, Storing, and Savouring Your Creation
Perfect Pairings for Your Cheesy Baked Mac and Cheese
Pair this rich Cheesy Baked Mac and Cheese with lighter, fresh sides like a crisp green salad with a bright vinaigrette or steamed asparagus to balance its indulgent qualities.
For a heartier meal, it makes an excellent accompaniment to grilled chicken, barbecued ribs, or a simple roasted pork loin, turning any dinner into an ultimate comfort food experience.
Making Ahead for Effortless Entertaining
To make ahead, assemble the Cheesy Baked Mac and Cheese up to the point of baking. Cover tightly with plastic wrap and aluminum foil, then refrigerate for up to 2 days.
Before baking, let it sit at room temperature for 30 minutes, then bake as directed. You may need to add 5-10 minutes to the covered baking time to ensure it’s heated through.
Storing Leftovers Like a Pro
Store any leftover Cheesy Baked Mac and Cheese in an airtight container in the refrigerator for up to 3-4 days.
Reheat gently in the microwave or oven until warmed through. Add a splash of milk or cream if needed to restore its original creaminess and prevent it from drying out during reheating.
Your Top Baked Mac and Cheese Questions Answered
Can I Use Different Types of Cheese?
Absolutely! While sharp cheddar and Monterey Jack are classic, feel free to experiment. Good melting cheeses like Gruyere, Fontina, Colby Jack, or even a touch of smoked gouda can add wonderful complexity. Avoid overly dry or crumbly cheeses unless balanced with good melting varieties, as they may not integrate smoothly into the sauce.
How Do I Make This Cheesy Baked Mac and Cheese Gluten-Free?
To make it gluten-free, simply substitute the all-purpose flour with a 1:1 gluten-free flour blend for the roux. Ensure your chosen gluten-free pasta is cooked to a firm al dente, as some varieties can become mushy more easily than traditional pasta. Adjust cooking times as necessary for your specific brand.
Can I Freeze Leftover Baked Mac and Cheese?
Yes, you can! For best results, freeze individual portions in airtight, freezer-safe containers. Thaw overnight in the refrigerator and reheat gently in the oven or microwave, adding a splash of milk to rehydrate the sauce if necessary. Textural changes may occur, but it will still be a delicious ultimate comfort food.
What’s the Best Pasta Shape for Baked Mac and Cheese?
Elbow macaroni is traditional and excellent for capturing the cheesy sauce due to its small, hollow shape. However, ditalini, medium shells, or rotini also work exceptionally well, offering different textures and plenty of nooks and crannies for the rich sauce to cling to. The key is to cook any shape al dente.
Indulge in the Ultimate Comfort: Your Mac and Cheese Awaits!
There you have it – the definitive guide to crafting a Cheesy Baked Mac and Cheese that consistently delivers on its promise of unparalleled comfort. No more dry, no more lumpy, just pure, creamy, cheesy perfection every single time.
We encourage you to try this recipe, trust in its simple secrets, and share your masterpiece with loved ones. It’s more than just a meal; it’s a hug in a baking dish, a truly satisfying homemade baked mac and cheese experience. Enjoy every delicious bite!
Mac and Cheese
Course: Main CourseCuisine: AmericanDifficulty: medium8
servings25
minutes45
minutes550
kcal60
minutesAchieve the ultimate comfort food experience with this perfect baked mac and cheese. Say goodbye to dry or lumpy sauces; this recipe reveals the simple secrets to consistently creamy, cheesy, and irresistible results. Get ready for that perfect cheesy pull!
Ingredients
1 pound elbow macaroni
1/2 cup unsalted butter
1/2 cup all purpose flour
4 cups whole milk
1 teaspoon salt
1/2 teaspoon black pepper
1/2 teaspoon dry mustard powder
4 cups shredded sharp cheddar cheese
1 cup shredded Monterey Jack cheese
1 cup shredded cheese for topping (cheddar or a blend)
Directions
- Preheat oven to 375 degrees F (190 degrees C). Lightly grease a 9×13 inch baking dish.
- Cook elbow macaroni according to package directions until very al dente (slightly undercooked). Drain well and set aside.
- In a large saucepan or Dutch oven, melt the butter over medium heat. Add the flour and whisk constantly for 1 to 2 minutes to create a smooth roux.
- Gradually whisk in the milk, a little at a time, until smooth. Continue to whisk and cook over medium heat until the sauce thickens and begins to simmer, about 5 to 7 minutes. This careful whisking prevents lumps and ensures a silky base.
- Remove the saucepan from the heat. Stir in the salt, black pepper, and dry mustard powder.
- Add the shredded cheddar and Monterey Jack cheeses to the sauce in three batches, stirring until each batch is fully melted and smooth before adding the next. This off-heat method is key to preventing the cheese from seizing or becoming grainy. The residual heat of the sauce is enough to melt the cheese perfectly, locking in that creamy texture.
- Add the drained, al dente macaroni to the cheese sauce and stir until evenly coated.
- Pour the macaroni and cheese mixture into the prepared baking dish. Sprinkle the remaining 1 cup of shredded cheese evenly over the top.
- To prevent dryness during baking, cover the baking dish tightly with aluminum foil. Bake for 20 minutes.
- Remove the foil and continue baking for another 20 to 25 minutes, or until the top is golden brown and bubbly. This final uncovered bake gives you that irresistible crispy crust while keeping the interior perfectly moist and creamy.
- Let stand for 5 minutes before serving for the best cheesy pull.
Notes
- The secret to preventing dry mac and cheese is covering it during the initial bake. Adding cheese off-heat ensures a smooth sauce.