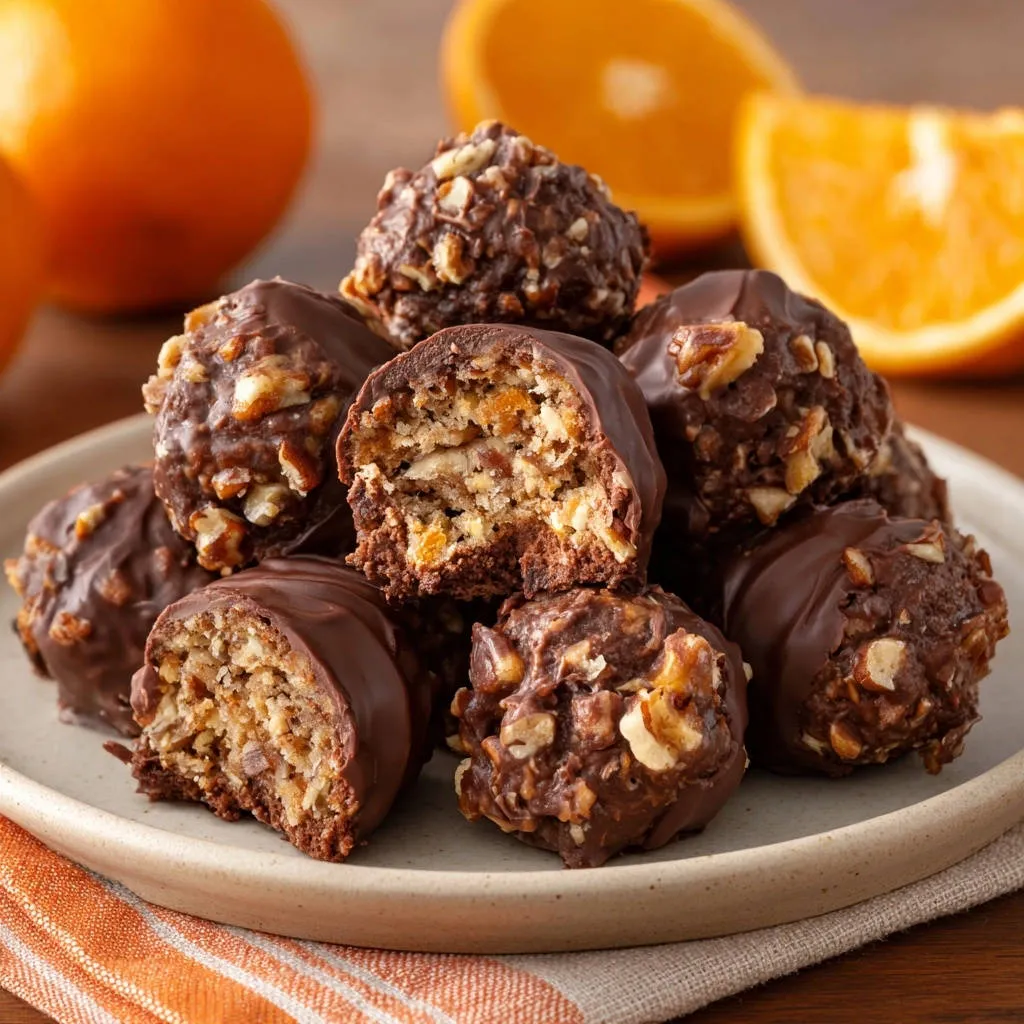
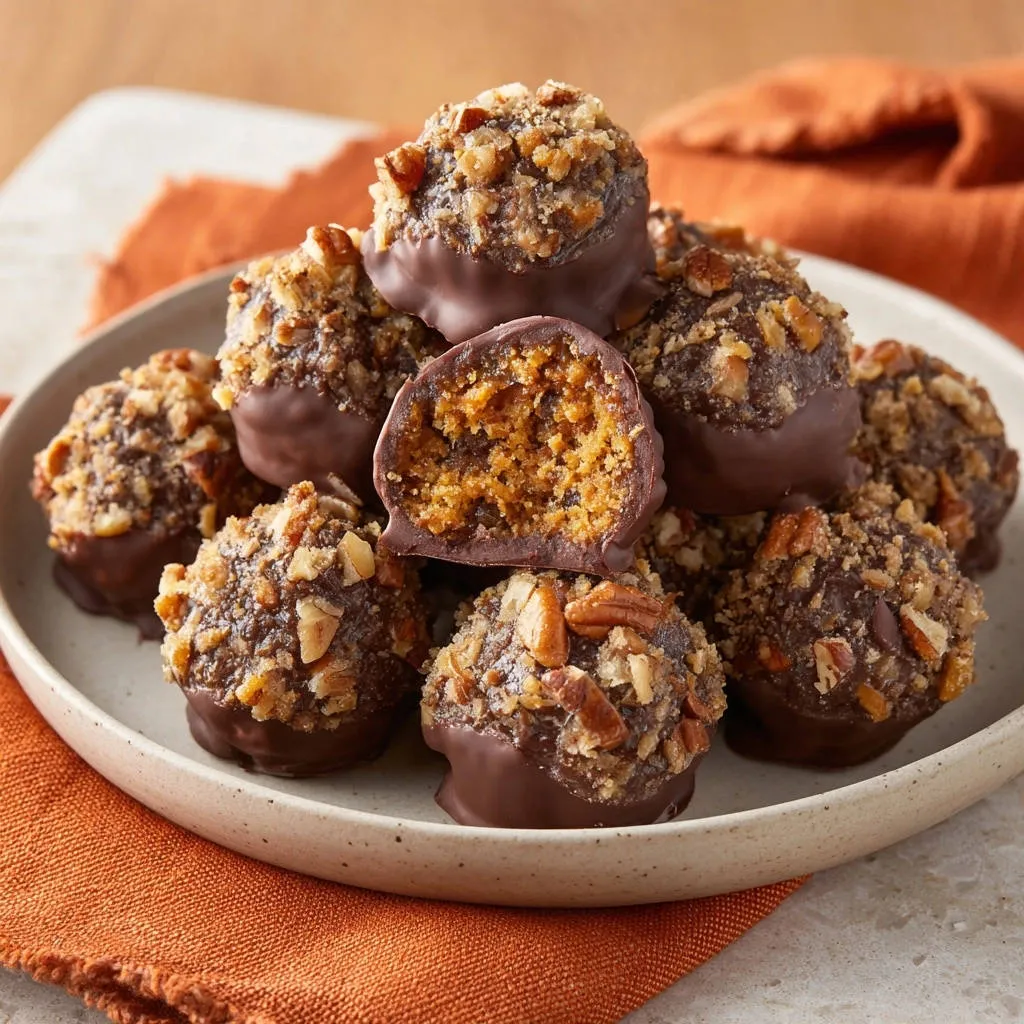
There’s nothing quite as frustrating as crafting what you hope will be beautiful homemade truffles, only for them to crumble when you roll them or fall apart with the first bite. After years of kitchen experiments, I’ve finally cracked the code, and I’m thrilled to share my secret for perfectly firm, yet delightfully chewy Chocolate Orange Crunch Truffles that hold their shape every single time. Get ready for a reliable recipe that delivers vibrant citrus, rich chocolate, and a satisfying crunch in every bite.
Why These Chocolate Orange Crunch Truffles Won’t Let You Down
The Secret to Truffles That Truly Hold Their Shape
The key to truffles that resist crumbling lies in two crucial steps. First, meticulous mixing of the dry ingredients with softened butter and condensed milk creates a strong, cohesive base. Second, a vital chilling period allows this mixture to firm up, ensuring each truffle maintains its perfect spherical form.
That Perfect Chewy-Yet-Firm Texture Every Time
Achieving that coveted texture – firm enough to hold, yet wonderfully chewy – is a hallmark of this recipe. Condensed milk provides a subtle sweetness and critical elasticity, while crushed shortbread cookies add structural integrity. The result is a delightful contrast that makes each bite irresistible.
A Burst of Bright Orange & Satisfying Crunch
These Chocolate Orange Crunch Truffles are a symphony of flavors and textures. Fresh orange zest infuses the entire treat with an exhilarating citrus note that perfectly balances the rich chocolate. Coupled with the satisfying crunch from toasted walnuts and buttery shortbread, every truffle offers a vibrant, multi-sensory experience.
Gather Your Gear: Essential Tools for Truffle Success
Basic Kitchen Essentials
Medium Mixing Bowl: Essential for combining all your ingredients without making a mess.
Sturdy Spoon or Spatula: For thoroughly mixing the truffle base until cohesive. Your hands work wonders too!
Plastic Wrap: Crucial for tightly covering the truffle mixture during chilling, preventing it from drying out.
Parchment Paper & Baking Sheet: For neatly setting your finished truffles without sticking, ensuring an easy cleanup.
Microwave-Safe Bowl: For safely melting your chocolate and coconut oil to a silky smooth consistency.
Specialty Items for Dipping & Coating
Shallow Dish: Perfect for holding your chopped walnuts, making it easy to roll and coat each truffle evenly.
Dipping Fork or Tool: A small fork or dedicated dipping tool simplifies the process of coating truffles, allowing excess chocolate to drip off cleanly.
Small Tongs: Can also be handy for gently transferring truffles without smudging the delicate chocolate coating.
Building Blocks of Bliss: Decoding Your Chocolate Orange Crunch Truffles Ingredients
The Crunchy Core: Shortbread & Walnuts
Crushed Shortbread Cookies: These form the foundational crunch and a rich, buttery base for your truffles. Their finely crushed texture helps bind the mixture beautifully.
If you enjoy the satisfying crunch here, you’ll appreciate the white chocolate chip popcorn clusters method.
Finely Chopped Walnuts: Incorporated into the truffle base and used as a coating, walnuts provide a satisfying nutty flavor and an extra layer of delightful crunch. Toasting them lightly enhances their aroma.
Sweet & Tangy Accents: Apricots & Orange Zest
Finely Chopped Dried Apricots: These gems add a lovely chewiness and a subtle, natural sweetness that complements the other flavors. Their texture contributes to the overall delightful bite.
Fresh Orange Zest: The star of the ‘orange’ in Chocolate Orange Crunch Truffles, fresh zest provides an incredibly bright, aromatic citrus note. It cuts through the richness of the chocolate for a balanced flavor.
For a similar citrusy cookie experience, check out these glazed orange creamsicle cookies.
The Binding Agents: Butter, Condensed Milk & Cocoa
Softened Unsalted Butter: This contributes to the richness and helps achieve the desired creamy texture in the truffle base, making it pliable and easy to work with.
Condensed Milk: A vital ingredient, condensed milk acts as a powerful binder, ensuring your truffles hold together perfectly. It also adds sweetness and contributes significantly to their signature chewy texture.
Unsweetened Cocoa Powder: For a deeper, more intense chocolate flavor within the truffle base. It provides a lovely contrast to the sweetness of the other ingredients.
Velvety Coating: Semi-Sweet Chocolate & Coconut Oil
Semi-Sweet Chocolate: This forms the decadent outer shell of your truffles. Choosing a good quality chocolate will elevate the overall taste experience.
Coconut Oil: A secret weapon for melting chocolate, coconut oil ensures a beautifully smooth, glossy, and easily dippable consistency. It helps prevent the chocolate from seizing and makes for an even coating.
Full Ingredient List (Printable)
1 cup crushed shortbread cookies
1/2 cup finely chopped walnuts (for the truffle base)
1/4 cup finely chopped dried apricots
2 tablespoons unsweetened cocoa powder
1/4 cup softened unsalted butter
1/4 cup condensed milk
1 tablespoon fresh orange zest
1/2 teaspoon vanilla extract
8 ounces semi-sweet chocolate, chopped
1 tablespoon coconut oil
1/2 cup finely chopped walnuts (for coating)
Your Path to Perfect Truffles: A Detailed How-To Guide
Mixing the Base: Flavor Fusion First
In a medium bowl, combine the crushed cookies, 1/2 cup finely chopped walnuts, dried apricots, cocoa powder, and orange zest. Mix well until everything is evenly distributed.
Binding Magic: Achieving That Cohesive Dough
Add the softened butter, condensed milk, and vanilla extract to the dry ingredients. Mix thoroughly with a sturdy spoon or your hands until a cohesive, slightly sticky dough forms.
This thorough mixing is key to ensuring the ingredients bind together properly and prevent crumbling later on.
The Critical Chill: Firming Up for Flawless Rolling
Cover the bowl tightly with plastic wrap and refrigerate for at least 30 minutes. This crucial chilling step allows the mixture to firm up, making it much easier to roll into balls that hold their shape without crumbling.
Shaping Perfection: Rolling Your Truffles
Once chilled, remove the mixture from the refrigerator. Scoop out small portions (about 1 tablespoon each) and roll them firmly between your palms to form smooth, round balls.
If the mixture starts to get too warm and soft, pop it back into the fridge for a few minutes.
Preparing Your Coating Station
Place the remaining 1/2 cup of finely chopped walnuts in a shallow dish, ready for coating.
Melting Moments: Crafting Your Chocolate Dip
In a microwave-safe bowl, combine the chopped semi-sweet chocolate and coconut oil. Microwave in 30-second intervals, stirring well after each, until the chocolate is completely melted and smooth.
Be careful not to overheat the chocolate, as this can cause it to seize.
The Grand Finale: Dipping & Coating
Using a fork or a dipping tool, dip each truffle ball into the melted chocolate, allowing any excess to drip off.
Immediately roll the chocolate-coated truffle in the finely chopped walnuts until fully covered.
Setting the Stage: Final Chill for a Perfect Finish
Place the finished truffles on a parchment paper-lined baking sheet.
Refrigerate the truffles for another 15-20 minutes, or until the chocolate coating is completely set. Store in an airtight container in the refrigerator.
Chef’s Secrets for Irresistible Chocolate Orange Crunch Truffles
Achieving the Ideal Dough Consistency
If your truffle mixture feels too dry, add another teaspoon of condensed milk and mix well. If it seems too wet or sticky, a tablespoon of extra crushed shortbread cookies can help absorb excess moisture. The ideal consistency is firm enough to roll but slightly tacky.
The Importance of Chilling: Don’t Skip This Step!
Chilling isn’t just a suggestion; it is absolutely vital for making truffles that hold their shape. A well-chilled mixture means easier handling, prevents crumbling, and results in a perfectly firm, delightful bite. Patience here truly pays off!
Melting Chocolate Like a Pro: Preventing Seizing
Always microwave chocolate in short bursts (30 seconds at a time) and stir vigorously after each. The residual heat will continue to melt the chocolate, preventing it from overheating and seizing. Coconut oil helps ensure a beautifully smooth, glossy, and easily dippable consistency every time.
Creative Coatings & Flavor Variations
Beyond walnuts, consider toasted shredded coconut, finely crushed pistachios, cocoa powder, or even a drizzle of white chocolate for a different look and taste. For an intensified orange flavor in the truffle base, a tiny drop of orange extract can be added, but use sparingly as extracts are potent.
Solving Sweet Snags: Troubleshooting Your Truffle Journey
Why Are My Truffles Crumbly?
This is a common issue that typically points to insufficient binding or chilling. Ensure you thoroughly mix the wet and dry ingredients in Step 2 to create a truly cohesive dough. Also, never shorten the initial chilling time in Step 3; it’s essential for structural integrity.
My Chocolate Coating Is Too Thick/Thin!
If your chocolate coating feels too thick, simply add another half teaspoon of coconut oil and stir until smooth and pliable. If it’s too thin, it might be overheated, or you may need to add a few more chocolate chips to thicken it slightly. Always melt slowly and stir well.
The Truffles Are Too Sticky to Roll
This indicates your truffle mixture is either too warm or hasn’t chilled enough. Pop the bowl back into the refrigerator for another 15-20 minutes until it firms up. Lightly dampening your palms with water can also provide some relief when rolling sticky mixtures.
Enjoying & Storing Your Homemade Delights
Elegant Serving Suggestions
Arrange your Chocolate Orange Crunch Truffles on a decorative plate or in mini paper liners for an elegant touch. Garnish with a few fresh orange slices or a dusting of cocoa powder to highlight their flavor profile. They make exquisite edible gifts or a sophisticated after-dinner treat.
How to Store Chocolate Orange Crunch Truffles for Freshness
To maintain their optimal freshness and texture, store these delicious truffles in an airtight container in the refrigerator. They will remain wonderfully fresh and flavorful for up to one week. You might find their flavors deepen and meld beautifully after a day or two!
Making Truffles Ahead: Perfect for Gifting & Parties
Chocolate Orange Crunch Truffles are an ideal make-ahead dessert, perfect for busy hosts or thoughtful gifting. You can prepare them fully up to 2-3 days in advance, keeping them chilled in the refrigerator. For the very best texture and flavor, allow them to come to room temperature for 10-15 minutes before serving.
Your Top Questions About Chocolate Orange Crunch Truffles, Answered!
Can I use different types of cookies?
Yes, absolutely! While shortbread provides a classic buttery base and lovely crunch, digestive biscuits, graham crackers, or even vanilla wafers are excellent alternatives. Each will impart a slightly different nuance to the final texture and flavor of your Chocolate Orange Crunch Truffles.
What if I don’t have fresh orange zest?
Fresh orange zest offers the brightest, most vibrant citrus flavor, which is highly recommended. If it’s truly unavailable, you can substitute with about 1/4 teaspoon of orange extract in the truffle mixture. Remember that extracts are potent, so start with less and add more if needed.
Are these truffles gluten-free?
As the recipe stands, these Chocolate Orange Crunch Truffles are not gluten-free due to the shortbread cookies. However, it’s very easy to make them gluten-free by simply substituting with your favorite brand of gluten-free shortbread, digestive biscuits, or even gluten-free graham crackers.
How long do these truffles last?
When properly stored in an airtight container in the refrigerator, these delightful Chocolate Orange Crunch Truffles will remain fresh and delicious for up to 7 days. They are a perfect treat to savor throughout the week!
Can I freeze Chocolate Orange Crunch Truffles?
Absolutely! These truffles freeze exceptionally well. Place them in a single layer on a parchment-lined baking tray until they are solid, then transfer them to a freezer-safe airtight container or bag. They can be stored for up to 2 months. Thaw them in the refrigerator before serving for the best results.
Ready to Create Your Own Chocolate Orange Crunch Truffles Masterpiece?
Now that you’re armed with all the secrets to crafting perfectly chewy, non-crumbling Chocolate Orange Crunch Truffles, it’s time to get rolling! These delightful bites are sure to impress at any gathering or make for a decadent personal treat. The blend of vibrant citrus, rich chocolate, and satisfying crunch is truly unbeatable.
More Sweet and Savory Ideas
If you’re craving more chocolate and orange delights or seeking something with a different texture, consider these recipes.
- For a bright and refreshing start to your day, try this Green Mango Tango Smoothie Bowl, offering a fruity contrast to your chocolate truffles.
- If you’re looking for a savory counterpoint to your sweet treats, this Spinach and Mushroom Frittata provides a satisfying and flavorful option.
We’d absolutely love to hear about your truffle-making adventures! Please share your beautiful creations in the comments below or tag us on social media. Happy truffle-making!

Chocolate Orange Crunch Truffles
Course: DessertCuisine: InternationalDifficulty: medium4
about 20-24 truffles1
hour5
minutes350
kcal120
minutesSay goodbye to crumbly truffles! This recipe guides you to create perfectly firm yet delightfully chewy chocolate orange truffles that hold their shape. With a combination of crunchy shortbread, walnuts, and a hint of orange, these truffles are a delightful homemade treat. The key is in proper mixing and crucial chilling steps for an unmatchable texture.
Ingredients
1 cup crushed shortbread cookies
1/2 cup finely chopped walnuts
1/4 cup finely chopped dried apricots
2 tablespoons unsweetened cocoa powder
1/4 cup softened unsalted butter
1/4 cup condensed milk
1 tablespoon fresh orange zest
1/2 teaspoon vanilla extract
8 ounces semi-sweet chocolate, chopped
1 tablespoon coconut oil
1/2 cup finely chopped walnuts (for coating)
Directions
- In a medium bowl, combine the crushed cookies, 1/2 cup finely chopped walnuts, dried apricots, cocoa powder, and orange zest. Mix well until everything is evenly distributed.
- Add the softened butter, condensed milk, and vanilla extract to the dry ingredients. Mix thoroughly with a sturdy spoon or your hands until a cohesive, slightly sticky dough forms. This thorough mixing is key to ensuring the ingredients bind together properly and prevent crumbling later on.
- Cover the bowl tightly with plastic wrap and refrigerate for at least 30 minutes. This crucial chilling step allows the mixture to firm up, making it much easier to roll into balls that hold their shape without crumbling.
- Once chilled, remove the mixture from the refrigerator. Scoop out small portions (about 1 tablespoon each) and roll them firmly between your palms to form smooth, round balls. If the mixture starts to get too warm and soft, pop it back into the fridge for a few minutes.
- Place the remaining 1/2 cup of finely chopped walnuts in a shallow dish.
- In a microwave-safe bowl, combine the chopped semi-sweet chocolate and coconut oil. Microwave in 30-second intervals, stirring well after each, until the chocolate is completely melted and smooth. Be careful not to overheat.
- Using a fork or a dipping tool, dip each truffle ball into the melted chocolate, allowing any excess to drip off. Immediately roll the chocolate-coated truffle in the finely chopped walnuts until fully covered.
- Place the finished truffles on a parchment paper-lined baking sheet.
- Refrigerate the truffles for another 15-20 minutes, or until the chocolate coating is completely set. Store in an airtight container in the refrigerator.
Notes
- The two chilling steps are crucial for the truffles to hold their shape and prevent crumbling. Do not skip them!