
There’s nothing quite like a homemade frozen treat, but who hasn’t been disappointed by an icy, rock-hard dessert straight from the freezer? After countless attempts, I discovered the simple trick that makes this Creamy Chocolate Peanut Butter Dream perfectly smooth and velvety every single time.
This recipe isn’t just about combining flavors; it’s about achieving that irresistible texture that makes each spoonful a pure delight, proving dessert perfection is indeed possible without an ice cream maker.
Why This Creamy Chocolate Peanut Butter Dream Will Be Your New Favorite
This no-churn dessert stands out, transforming simple pantry staples into a luxurious experience. It’s the ultimate answer for those yearning for a rich, satisfying treat that genuinely melts in your mouth.
For more chocolate goodness, check out these red velvet cheesecake stuffed cookies.
Forget the compromises; this recipe delivers on flavor, texture, and ease, making it a staple in any dessert lover’s repertoire.
Complementary Bites
Extend your chocolate and peanut butter enjoyment with these other treats.
- For a sweet, no-bake treat with similar caramel notes, try these Coconut Caramel Energy Balls.
- If you enjoy the creamy peanut flavor, explore the savory side with Creamy Peanut Noodles featuring a smooth sauce.
The Secret to a Perfectly Smooth, Velvety Texture
The magic lies in how the ingredients are combined and, crucially, in the absence of traditional ice cream churning. This method prevents the formation of large ice crystals, guaranteeing a consistently creamy, scoopable texture right from the freezer.
The secret is primarily the sweetened condensed milk, which lowers the freezing point, and the gentle folding technique that incorporates air without overworking the mixture.
Effortless Elegance: Simple Steps for Stunning Results
You don’t need specialized equipment or advanced culinary skills to create this impressive dessert. With just a few basic kitchen tools, you can achieve a stunning outcome that tastes like it came from a gourmet shop.
The straightforward process ensures anyone can whip up this luxurious treat, making it ideal for busy weekdays or impromptu entertaining.
Beyond Basic: The Irresistible Flavor Fusion
Chocolate and peanut butter are a timeless pairing for a reason, and this recipe elevates their classic synergy. Each bite delivers a harmonious balance of deep cocoa and nutty richness, enhanced by thoughtful toppings.
The combination is undeniably comforting, indulgent, and satisfying, appealing to nearly every palate with its balanced sweetness and decadent profile.
Essential Ingredients for Your Creamy Chocolate Peanut Butter Dream
Each ingredient in this recipe plays a vital role in achieving the desired taste and texture. Understanding their function helps ensure success and even inspires confident experimentation.
Quality ingredients are important, but even standard pantry items shine when utilized correctly in this straightforward preparation.
The Foundation: Heavy Cream and Sweetened Condensed Milk
Heavy cream, when very cold, whips into a stable, airy base, providing the essential richness and volume for our no-churn dessert. Its high-fat content is crucial for trapping air and creating that melt-in-your-mouth feel.
Sweetened condensed milk is the true hero, offering concentrated sweetness and preventing large ice crystals from forming, ensuring a silky-smooth, creamy texture without an ice cream maker.
Deep Chocolate Notes: Unsweetened Cocoa Powder & Vanilla
Unsweetened cocoa powder provides an intense, authentic chocolate flavor that isn’t overly sweet, balancing the richness of the condensed milk. Always choose a good quality cocoa for the best depth of flavor.
Vanilla extract enhances all the other flavors, adding a subtle warmth and aromatic complexity that elevates the overall taste profile.
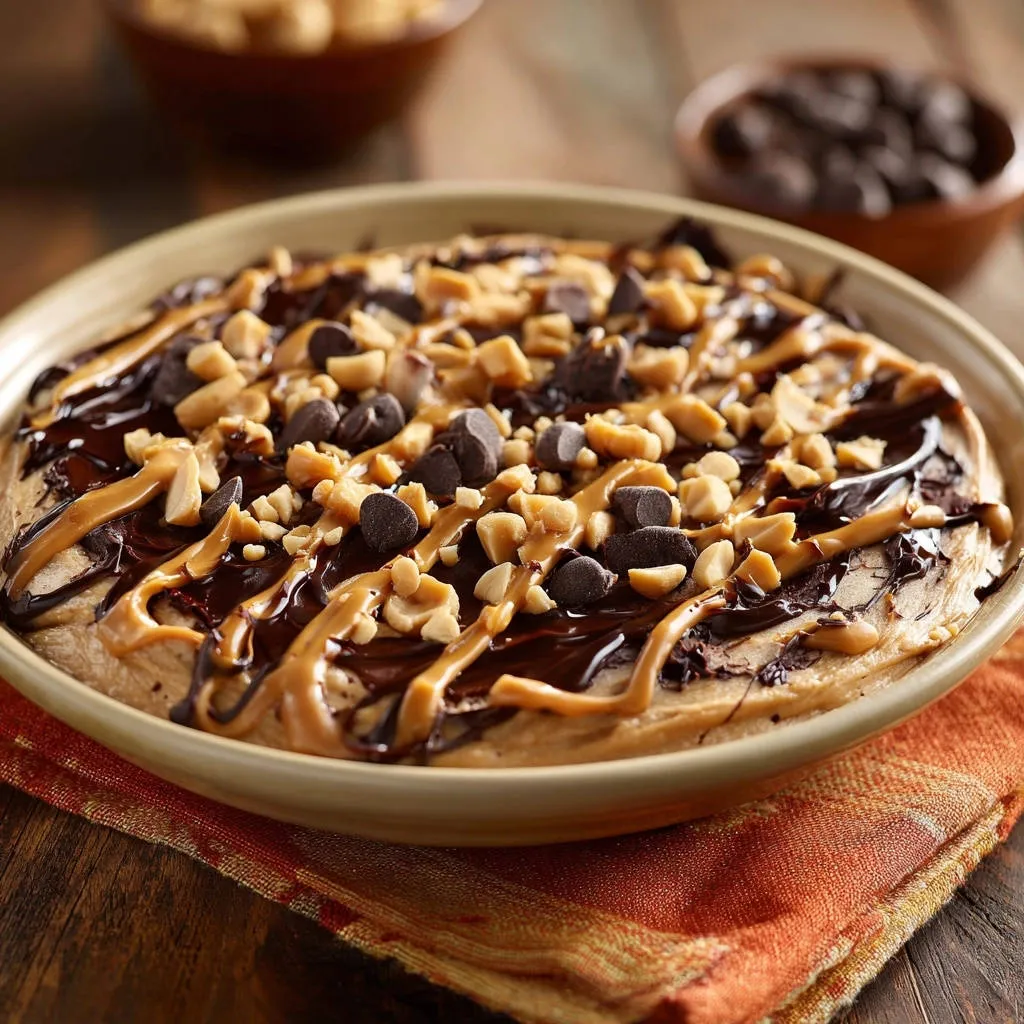
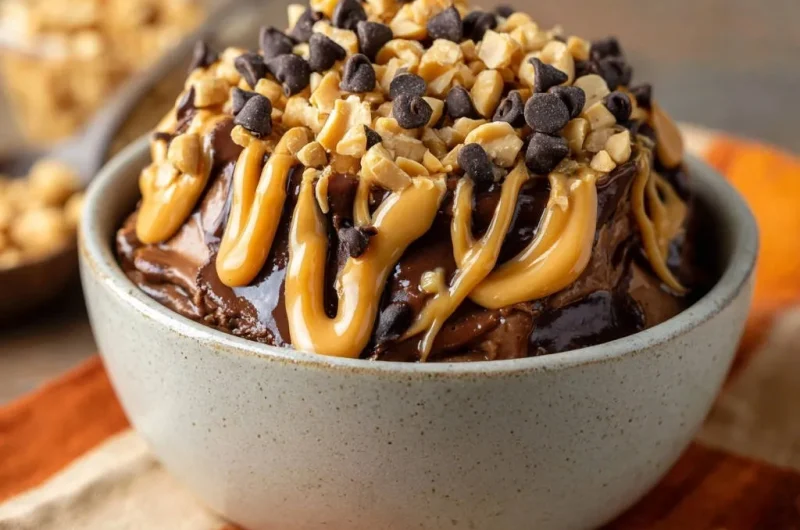
Signature Toppings: Creamy Peanut Butter, Mini Chips, and Roasted Peanuts
Warmed creamy peanut butter, when drizzled, creates beautiful swirls and a delightful, flowing texture that contrasts with the frozen base. Its inherent saltiness perfectly complements the sweet chocolate.
For a similar rich, flowing texture, check out this molten lava cookie pie.
Mini chocolate chips add bursts of chocolate flavor and a slight textural variation. Chopped roasted peanuts contribute a satisfying crunch and a deeper, more pronounced nutty aroma that rounds out the experience.
Tools for Frozen Dessert Success
While the process is simple, having the right tools prepared can make all the difference in achieving that ultimate creamy consistency. Proper preparation ensures your ingredients work their magic effectively.
You likely already own most of these, highlighting the accessibility of this truly decadent dessert.
The Power of a Chilled Bowl & Whisk
Chilling your mixing bowl and whisk attachment for 10-15 minutes in the freezer is a crucial step. This cold environment helps the heavy cream whip up faster and achieve much firmer, more stable peaks.
A properly chilled bowl ensures the cream stays cold throughout the whipping process, preventing it from warming and making it difficult to achieve the desired airy volume.
Mixing Bowls, Spatulas, and Freezer-Safe Containers: Your Folding & Freezing Friends
You’ll need a large bowl for whipping the cream and a medium bowl for preparing the chocolate base. A good quality rubber spatula is indispensable for gently folding the mixtures together without deflating the whipped cream.
For freezing, choose a freezer-safe container like a loaf pan or an airtight plastic container. Covering it tightly prevents freezer burn and maintains the dessert’s creamy texture, ensuring your amazing no-bake peanut butter bars also stay fresh.
Your Path to Velvety Perfection: Making Creamy Chocolate Peanut Butter Dream
Creating this irresistible frozen treat is a straightforward process, built on a few key techniques. Follow these steps carefully to ensure a perfectly smooth and flavorful outcome.
Each action contributes to the final, luxurious texture that defines this Creamy Chocolate Peanut Butter Dream.
- Preparing for Peak Performance: Chill Out!
Start by placing a large mixing bowl and your electric mixer’s whisk attachment into the freezer for 10-15 minutes. This vital step ensures your heavy cream whips efficiently and holds its shape beautifully.
The colder the equipment, the better your cream will perform, creating a more stable and voluminous base for your dessert.
- Whipping Magic: Achieving Medium-Stiff Peaks
Pour your very cold heavy cream into the chilled bowl. Beat it on medium-high speed until it forms medium-stiff peaks, which means the cream holds its shape when the whisk is lifted but still looks light and airy.
Be vigilant and avoid overbeating, as this can cause the cream to become grainy or even turn into butter, compromising the smooth texture of your Creamy Chocolate Peanut Butter Dream.
- The Chocolate Base: Sweet Harmony
In a separate medium bowl, combine the sweetened condensed milk, unsweetened cocoa powder, vanilla extract, and salt. Whisk these ingredients together until the mixture is completely smooth and lump-free.
Ensure all the cocoa powder is fully incorporated to prevent any powdery spots in your finished dessert, creating a rich and even chocolate flavor.
- The Gentle Fold: Key to Non-Icy Texture
Carefully fold the chocolate mixture into the whipped cream in three equal additions. Use a rubber spatula to gently scoop from the bottom of the bowl and fold the whipped cream over the chocolate mixture.
This gentle technique is absolutely critical for maintaining the airiness of the whipped cream, which in turn ensures your dessert stays wonderfully creamy and non-icy when frozen. For another delicious chocolate treat, consider making delicious raspberry chocolate coconut truffles.
- Freeze for Firmness: The Waiting Game
Pour the entire mixture into your chosen freezer-safe container. Smooth the top with your spatula, then cover it tightly with a lid or plastic wrap to prevent any ice crystals from forming on the surface.
Freeze the dessert for at least 6 hours, or ideally overnight, until it’s firm enough to scoop but still retains that wonderfully creamy consistency.
Expert Tips for the Ultimate Creamy Chocolate Peanut Butter Dream
Achieving truly exceptional results often comes down to a few insider tricks. These tips will help you elevate your Creamy Chocolate Peanut Butter Dream from good to absolutely unforgettable.
Applying these simple techniques will guarantee a dessert that consistently impresses with its perfect texture and flavor.
Mastering the Whip: Cold Cream is King
Always ensure your heavy cream is as cold as possible before whipping. Storing it in the coldest part of your refrigerator until just before use, and chilling your bowl and whisk, significantly aids in achieving stiff peaks.
The Art of Folding: Preserving Lightness
When folding, think “lightness” and “air.” Use a broad, gentle motion with your spatula, incorporating the chocolate mixture without compressing the whipped cream. This is crucial for the signature smooth, airy texture.
Perfecting the Freeze: Patience is a Virtue
While 6 hours is a minimum, overnight freezing often yields the best results for optimal firmness and creaminess. Avoid peeking too often, as fluctuating temperatures can affect the texture.
Flavor Variations: Unleash Your Creativity
Don’t stop at the suggested toppings! Consider adding crushed pretzels for a salty crunch, a swirl of caramel sauce, or even a sprinkle of espresso powder to deepen the chocolate flavor. The possibilities are endless for customizing your Creamy Chocolate Peanut Butter Dream.
Saving Your Scoop: Troubleshooting Common Creamy Chocolate Peanut Butter Dream Fails
Even expert recipe writers encounter minor hiccups now and then. Here’s how to tackle common issues you might face while making your Creamy Chocolate Peanut Butter Dream, ensuring a perfect outcome.
Knowing how to troubleshoot helps build confidence and ensures you get that velvety texture every time.
Why Is My Dessert Icy or Rock-Hard?
Icy texture often results from not properly folding the whipped cream into the condensed milk mixture, which introduces too much water or doesn’t incorporate enough air. Ensure your cream is whipped to medium-stiff peaks, providing the necessary volume.
Another culprit can be improper covering during freezing; always seal your container tightly to prevent freezer burn and ice crystal formation.
My Whipped Cream Won’t Hold Its Shape!
The most common reason for limp whipped cream is insufficient chilling of the cream itself, or the bowl and whisk. Ensure all components are very cold before you begin whipping.
Humidity can also be a factor; on humid days, cream may take longer to whip. Be patient and keep everything as cold as possible.
The Mixture Feels Too Dense or Heavy
A dense mixture usually indicates that the whipped cream was deflated during the folding process. It’s crucial to be gentle and use a light hand, folding just until the ingredients are combined.
Over-mixing or vigorous stirring will push out the air that makes this Creamy Chocolate Peanut Butter Dream so light and velvety, so always prioritize a delicate touch.
Presenting and Preserving Your Creamy Chocolate Peanut Butter Dream
Once perfected, how you serve and store your Creamy Chocolate Peanut Butter Dream can significantly enhance the enjoyment. These tips ensure every experience is as delightful as the first.
From elegant presentations to smart storage, maximize the potential of your homemade frozen treat.
Creative Serving Suggestions: Beyond the Bowl
While a simple scoop in a bowl is delicious, consider serving this dessert in mini tart shells for individual portions or layered in parfaits with crushed cookies. A sprinkle of flaky sea salt on top can also beautifully enhance the flavors.
For an extra indulgent touch, serve alongside a warm brownie or even as a filling for chocolate crepes.
Storage Secrets: Keeping it Fresh and Creamy
Always store your Creamy Chocolate Peanut Butter Dream in an airtight, freezer-safe container. This prevents freezer burn and helps maintain its smooth, creamy texture for as long as possible.
For best results, press a piece of plastic wrap directly onto the surface of the dessert before sealing the container. This creates an extra barrier against ice crystal formation.
Make-Ahead Magic: Prepare for Any Occasion
This dessert is a dream for meal prep and entertaining, as it can be made entirely ahead of time. Prepare it a day or two in advance, freeing up your time when guests arrive.
Simply remove it from the freezer about 10-15 minutes before serving to allow it to soften slightly, making it easier to scoop.
Your Top Questions Answered About Creamy Chocolate Peanut Butter Dream
Here are some of the most common questions I receive about this no-churn chocolate peanut butter masterpiece. Hopefully, these answers will help clarify any lingering doubts.
These insights will empower you to customize and confidently prepare your own batch of Creamy Chocolate Peanut Butter Dream.
Can I Make This Dairy-Free?
Making this dairy-free can be challenging due to the heavy cream and sweetened condensed milk. While coconut cream and dairy-free condensed milk can be substituted, the texture may be slightly different and could carry a subtle coconut flavor.
Always ensure your chosen dairy-free alternatives are very cold and have high-fat content for the best whipping results.
What If I Don’t Have an Electric Mixer?
You can still achieve whipped cream without an electric mixer, though it requires more effort. A hand whisk and strong arm can certainly get the job done, especially if your bowl and cream are thoroughly chilled.
Alternatively, some manual rotary egg beaters can also work efficiently if you don’t have an electric mixer.
How Long Does It Last in the Freezer?
When properly stored in an airtight container, your Creamy Chocolate Peanut Butter Dream will maintain its best quality for up to 2-3 weeks in the freezer. Beyond that, the texture may start to degrade slightly, though it will still be safe to eat.
For optimal enjoyment, aim to consume it within the first two weeks to experience its peak creaminess.
Can I Add Other Mix-ins or Toppings?
Absolutely! This recipe is incredibly versatile. Feel free to fold in other mix-ins like crushed cookies, chopped candies, or different types of nuts during the final folding step.
As for toppings, hot fudge, caramel sauce, a sprinkle of sea salt, or even a dollop of fresh whipped cream can elevate your serving experience. Unleash your creativity!
Ready to Indulge? Share Your Creamy Chocolate Peanut Butter Dream!
Now that you have all the secrets to crafting the ultimate Creamy Chocolate Peanut Butter Dream, it’s time to gather your ingredients and get started. This recipe is more than just a dessert; it’s an experience of pure, velvety bliss.
I can’t wait to hear how your homemade frozen masterpiece turns out! Be sure to share your creations and any creative twists you add in the comments below.
Chocolate Peanut Butter
Course: DessertCuisine: AmericanDifficulty: easy8
servings30
minutes550
kcal30
minutesSay goodbye to icy frozen desserts! This simple no-churn recipe reveals the secret to perfectly smooth, velvety chocolate goodness every time. Topped with peanut butter, chocolate chips, and roasted peanuts, it’s a dream come true.
Ingredients
2 cups heavy cream, very cold
1 (14 ounce) can sweetened condensed milk
1/2 cup unsweetened cocoa powder
1 teaspoon vanilla extract
1/4 teaspoon salt
1/4 cup creamy peanut butter, warmed slightly for drizzling
1/4 cup mini chocolate chips
1/4 cup chopped roasted peanuts
Directions
- Chill a large mixing bowl and the whisk attachment of your electric mixer in the freezer for 10-15 minutes. This helps the cream whip up better.
- Pour the very cold heavy cream into the chilled bowl. Beat on medium-high speed until medium-stiff peaks form. The cream should hold its shape but still be light and airy. Be careful not to overbeat, or it will become grainy.
- In a separate medium bowl, combine the sweetened condensed milk, unsweetened cocoa powder, vanilla extract, and salt. Whisk until the mixture is smooth and well combined, ensuring there are no lumps of cocoa powder.
- Gently fold the chocolate mixture into the whipped cream in three additions. Use a rubber spatula to carefully scoop from the bottom of the bowl and fold over, working to incorporate without deflating the whipped cream. The goal is a light, airy, and uniform chocolate mixture. This gentle folding is key to maintaining the creamy, non-icy texture.
- Pour the mixture into a freezer-safe container, such as a loaf pan or an airtight plastic container. Cover tightly with a lid or plastic wrap.
- Freeze for at least 6 hours, or preferably overnight, until firm enough to scoop but still wonderfully creamy.
- To serve, scoop the creamy chocolate dessert into bowls. Drizzle generously with warmed peanut butter, then sprinkle with mini chocolate chips and chopped roasted peanuts. Enjoy immediately!
Notes
- Ensure your heavy cream is truly cold; this is key for achieving perfect whipped peaks. When folding, be patient and gentle to keep that airy texture intact.