
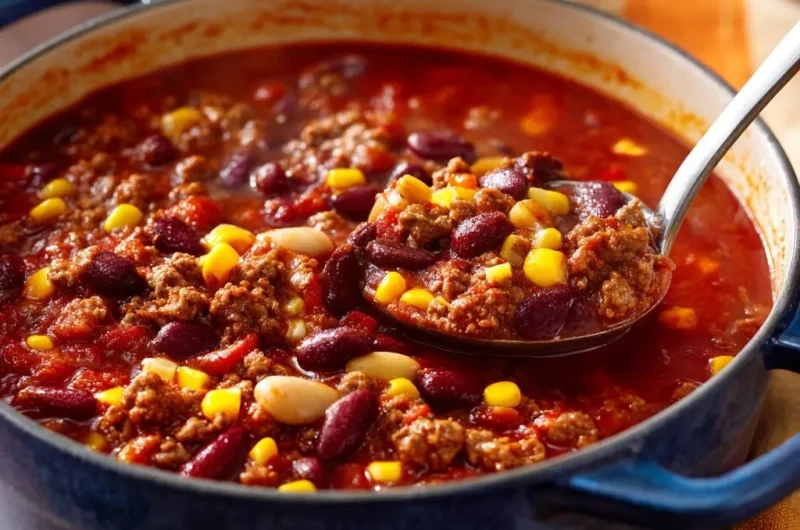
There’s nothing quite like a steaming bowl of homemade chili, especially when it boasts that ideal, spoon-coating thickness and an explosion of rich flavor. I used to face the common frustration of watery chili, never quite achieving that deeply satisfying consistency. This recipe for Hearty Beef & Bean Chili eliminates that struggle, offering a guaranteed path to a perfectly thick and incredibly flavorful pot of comfort.
It’s the ultimate solution for anyone craving a truly robust and satisfying chili experience, transforming a good meal into an unforgettable one for family and friends alike.
Why This Hearty Beef & Bean Chili Will Be Your New Favorite
Solving the Watery Chili Dilemma: Our Secret to Perfect Thickness
The secret to avoiding watery chili lies in two key steps: thoroughly cooking down the tomato paste and a long, patient simmer. By caramelizing the tomato paste early on, we develop an intense flavor base and introduce a natural thickener that prevents a thin consistency.
For chili that truly stands up, learn how to achieve spoon-standing thickness with this technique.
Coupled with a slow, gentle simmer, this method allows flavors to concentrate and liquids to naturally reduce, creating that coveted hearty texture without relying on starchy thickeners.
Beyond Basic: Richness and Depth You Can Truly Taste
This Hearty Beef & Bean Chili goes beyond basic, building layers of flavor from the ground up. Blooming the spices in hot oil awakens their full aromatic potential, while the cooked-down tomato paste adds a profound umami depth that’s often missed in quicker recipes.
The blend of quality beef, aromatic vegetables, and a thoughtful selection of spices harmonizes perfectly during the slow cooking process, resulting in a complex and deeply satisfying taste profile.

A Crowd-Pleaser for Any Occasion (or a Cozy Night In)
Whether you’re hosting a game day, feeding a hungry family, or simply seeking a comforting meal on a chilly evening, this chili is a guaranteed hit. Its robust flavors and satisfying texture appeal to almost everyone.
This versatile homemade chili is also fantastic for meal prep, tasting even better the next day as the flavors continue to meld and deepen.
Gather Your Gear: Essential Tools for Perfect Chili
The Mighty Dutch Oven: Your Best Friend for Simmering
A heavy-bottomed Dutch oven or a large, sturdy pot is indispensable for this recipe. Its excellent heat retention and even heat distribution are crucial for effectively browning the beef and achieving that long, slow simmer.
This ensures your chili cooks evenly, developing deep flavors without scorching at the bottom.
Sturdy Utensils: For Stirring and Searing Success
You’ll need a robust spoon or spatula for breaking up ground beef and stirring vigorously during the crucial spice-blooming and tomato paste-cooking steps. A wooden spoon is ideal as it won’t scratch your pot and is sturdy enough for the task.
A slotted spoon will also come in handy for draining excess fat after browning the beef.
Measuring Up: Precision for Flavor Balance
Accurate measuring cups and spoons are essential for balancing the chili’s robust flavors. While cooking can be intuitive, precise spice measurements ensure your thick chili achieves its signature taste without being overpowering.
This attention to detail guarantees a consistent and delicious result every time you make this favorite recipe.
The Heart of the Dish: Key Ingredients for This Chili
Premium Proteins: The Ground Beef Foundation
Opt for good quality ground beef, ideally 80/20 lean-to-fat ratio, for the best flavor. The fat renders during browning, contributing richness and a savory depth that forms the backbone of this hearty meal.
If you prefer a leaner option, 90/10 works well, but you might need a touch more olive oil for browning.
Aromatic Foundation: Onions, Bell Peppers, and Garlic
These vegetables are the aromatic trinity of nearly every great savory dish, including this ground beef chili. Diced onion and bell pepper soften and sweeten, creating a foundational layer of flavor.
Freshly minced garlic adds a pungent warmth that ties all the savory elements together, releasing its best aroma when briefly cooked.
The Dynamic Duo: Chili Powder & Ground Cumin
These two spices are non-negotiable for authentic chili flavor. Chili powder provides a warm, earthy base, while ground cumin adds a distinctive, smoky depth.
Blooming them in hot oil intensifies their individual characteristics, making them truly sing in the finished dish.
Herbal Notes: Dried Oregano for Depth
Dried oregano offers a subtle, herbaceous note that complements the other bold flavors. It adds an earthy, slightly peppery undertone, enhancing the overall complexity without overpowering the dish.
A small amount makes a significant difference in rounding out the chili’s profile.
Tomato Power: Crushed Tomatoes and Flavor-Boosting Tomato Paste
Crushed tomatoes provide the essential tangy liquid base and a rich tomato flavor that’s crucial for chili. Tomato paste, however, is the real game-changer in achieving thickness and depth.
Cooking down the tomato paste caramelizes its sugars, deepening its flavor and acting as a natural thickener, ensuring your chili is never watery.
Bean Boost: Kidney, Cannellini, and Corn for Texture and Substance
A combination of kidney and cannellini beans offers varied textures and added plant-based protein, making this chili truly substantial. Rinsing them well removes excess sodium and starch.
Drained corn adds a welcome pop of sweetness and vibrant color, balancing the savory notes beautifully.
Broth Base: Beef Broth for Unlocking Full Flavor
Beef broth serves as the primary liquid for simmering, infusing the chili with even more savory beef flavor. It helps create the perfect consistency as it slowly reduces.
Using a good quality beef broth is key for a truly rich and flavorful base, similar to how it forms the foundation of a comforting hearty beef stew.
Crafting Perfection: A Step-by-Step Chili Journey
- Searing the Beef: Building Flavor from the Start
Heat 1 tablespoon of olive oil in a large Dutch oven or a heavy-bottomed pot over medium-high heat. Add 1.5 pounds of ground beef and cook, breaking it up with a spoon, until it is fully browned and no pink remains.
Draining any excess fat at this stage is crucial for a cleaner, less greasy chili base, allowing the subsequent flavors to shine through.
- Softening the Aromatics: Building the Flavor Base
Add the diced large onion and 1 diced bell pepper to the pot with the browned beef. Cook for approximately 5-7 minutes, stirring occasionally, until these vegetables become tender and translucent.
Stir in the 2 cloves of minced garlic and cook for just 1 more minute until it becomes wonderfully fragrant, taking care not to burn it as burnt garlic can taste bitter.
- The Flavor Awakening: Blooming Spices & Cooking Tomato Paste
This is a critical step for a rich, thick chili: Stir in 2 tablespoons of chili powder, 1 tablespoon of ground cumin, 1 teaspoon of dried oregano, 1 teaspoon of salt, and 0.5 teaspoon of black pepper.
Cook for 1 minute, stirring constantly, to ‘bloom’ the spices. This gentle toasting releases their essential oils and intensifies their flavor and aroma significantly.
Next, add the 6-ounce can of tomato paste and continue to cook it down for 2-3 minutes, stirring regularly. Allow it to deepen in color and stick slightly to the bottom of the pot; this caramelization process adds incredible depth and actively prevents a watery consistency later.
- Combining the Wonders: Bringing It All Together
Pour in the 28-ounce can of crushed tomatoes and 1 cup of beef broth. Add the rinsed and drained 15-ounce can of kidney beans, the rinsed and drained 15-ounce can of cannellini beans, and the drained 15-ounce can of corn.
Stir everything together thoroughly, making sure to scrape up any browned bits from the bottom of the pot. These ‘fond’ bits are packed with concentrated flavor and should be incorporated into the chili.
- The Slow Simmer: Unlocking Richness and Thickness
Bring the chili to a gentle simmer. Once simmering, reduce the heat to low, cover the pot partially (leaving a small gap for steam to escape), and let it cook for at least 1.5 to 2 hours.
This long, slow simmer is absolutely crucial; it allows the liquid to slowly evaporate, concentrating the flavors and naturally thickening the chili to that perfect, hearty texture.
Remember to stir occasionally to prevent any sticking to the bottom of the pot, especially during the final hour of simmering.
- Final Touches: Seasoning and Serving
Taste the chili and adjust seasonings as needed, adding more salt, pepper, or spices to your preference. Don’t be afraid to fine-tune it to your liking.
Serve your perfectly thick and flavorful Hearty Beef & Bean Chili hot and enjoy every comforting spoonful!
When you’re ready for another hearty meal, try this chili stuffed skillet cornbread.
Beyond the Recipe: Expert Tips for Your Best Chili Yet
Choosing Your Ground Beef Wisely
For the deepest flavor, select ground beef with about 20% fat (80/20). This fat renders during browning, contributing significantly to the richness of your chili.
If you prefer a leaner option, ensure you add a little extra olive oil during the searing step to prevent sticking and ensure even browning.
Spice Freshness Matters: Check Your Pantry
Spices lose their potency over time, so using fresh, high-quality chili powder and cumin is essential. Old spices will result in a bland chili that lacks that desired aromatic punch.
If your spices have been sitting in the pantry for years, it’s time to replace them for maximum flavor impact.
Don’t Rush the Simmer: Patience is a Virtue
The long, slow simmer is a non-negotiable step for this Hearty Beef & Bean Chili. It’s during this time that flavors marry, the beef becomes incredibly tender, and the chili naturally thickens to perfection.
Resist the urge to rush it; those extra hours are what transform good chili into truly great chili.
Layering Flavors Through Tasting and Adjustment
Taste your chili at various stages of cooking, especially before the final simmer and again before serving. This allows you to adjust seasonings, adding a little more salt, a pinch of sugar to balance acidity, or a dash of hot sauce for extra kick.
A squeeze of lime juice or a splash of apple cider vinegar at the end can also brighten the flavors beautifully.
Dairy-Free Swaps & Optional Additions
For an extra layer of complexity, consider adding a tablespoon of cocoa powder or a small amount of strong brewed coffee during the simmering phase. A smoked chipotle pepper, minced, can also add incredible depth and a hint of smokiness.
For dairy-free toppings, avocado slices, fresh salsa, or a generous sprinkle of fresh cilantro are fantastic choices.
When Things Go Awry: Chili Troubleshooting & Solutions
My Chili is Too Thin/Watery
If your chili is thinner than desired, uncover the pot and continue simmering for an extended period, allowing more liquid to evaporate. You can also carefully mash some of the beans against the side of the pot to release their starches, which will help thicken the chili naturally.
As a last resort, mix a tablespoon of cornstarch with an equal amount of cold water to form a slurry, then stir it into the simmering chili and cook for a few minutes until it thickens.
My Chili Tastes Bland or Lacks Depth
First, check for enough salt; salt is a flavor enhancer. If it’s still bland, add a bit more chili powder and cumin, or consider a pinch of smoked paprika for extra depth.
A squeeze of lime juice, a dash of hot sauce, or even a tiny amount of sugar can help balance flavors and bring out the best in your chili.
The Beef is Tough or Chewy
With ground beef, tough or chewy texture is less common, but it can occur if the beef is overcooked at the browning stage or if it’s not truly simmered for long enough. Ensure you break up the beef thoroughly and brown it evenly without over-agitating.
The long, slow simmer is key to tenderizing the meat, so give it ample time to cook gently.
Too Spicy? Or Not Spicy Enough?
If your chili is too spicy, you can add more crushed tomatoes or an extra can of rinsed beans to dilute the heat. A spoonful of sugar or a dollop of sour cream (if not dairy-free) can also help to temper the spiciness.
For more heat, stir in a pinch of cayenne pepper or a dash of your favorite hot sauce after the chili has finished simmering.
Your Chili Queries Answered: FAQs for Our Hearty Recipe
Can I make this Hearty Beef & Bean Chili vegetarian?
Absolutely! You can easily adapt this recipe to be vegetarian. Replace the ground beef with plant-based ground “meat” crumbles, or increase the quantity and variety of beans (e.g., black beans, pinto beans) and add more vegetables like diced zucchini or mushrooms.
Use vegetable broth instead of beef broth for a completely plant-based option.
How long does homemade chili last in the fridge?
Properly stored homemade chili will last for 3-4 days in the refrigerator. Ensure it’s placed in an airtight container to maintain freshness and prevent spoilage.
Cool the chili quickly before refrigerating by dividing it into shallower containers.
Can I freeze this Hearty Beef & Bean Chili for later?
Yes, this thick chili freezes beautifully, making it an excellent meal prep option. Allow it to cool completely before transferring it to freezer-safe containers or heavy-duty freezer bags, removing as much air as possible.
It can be frozen for up to 3 months. Thaw overnight in the refrigerator and reheat gently on the stovetop or in the microwave.
What are the best toppings for chili?
The best toppings enhance the chili experience! Classic choices include shredded cheddar cheese, a dollop of sour cream or Greek yogurt, thinly sliced green onions, and fresh cilantro. For extra crunch, add crushed corn chips or Fritos.
Consider diced avocado, pickled jalapeños, or a sprinkle of a smoky spice blend for more adventurous options.
Can I use different types of beans or add more vegetables?
This recipe is very flexible! Feel free to substitute or add other beans like black beans, pinto beans, or great northern beans based on your preference. Just remember to rinse and drain them.
You can also increase the vegetable content with diced carrots, celery, or even finely chopped mushrooms for added umami and texture.
Enjoying Every Bite: Serving and Storing Your Hearty Chili
Classic Toppings and Creative Pairings for the Perfect Bowl
Serve your Hearty Beef & Bean Chili with a generous assortment of toppings to let everyone customize their bowl. Beyond the classics, consider serving it over a bed of fluffy white rice, on baked potatoes, or alongside a warm slice of honey-kissed cornbread.
Complementary Recipes
Round out your chili meal with these comforting bakes.
- For a classic pairing, try this golden cornbread, a simple yet satisfying addition.
- If you like a little warmth, this hot honey jalapeño cornbread offers a sweet and spicy kick that complements the chili well.
For a lighter option, a simple green salad provides a fresh contrast to the rich flavors of the chili.
Storing Leftovers Safely for Future Enjoyment
To safely store any leftover chili, allow it to cool down to room temperature within two hours of cooking. Transfer it to shallow, airtight containers and refrigerate promptly.
Proper storage is key to enjoying your delicious chili for several days to come.
Make-Ahead Magic: Freezing for Later Convenience
This chili is ideal for making ahead and freezing. Portion it into individual servings in freezer-safe containers or bags, ensuring you leave a little headspace for expansion. Label with the date.
Having frozen portions of this flavorful chili on hand makes for quick, delicious, and convenient meals on busy weeknights.
Your Culinary Journey Continues: Share Your Chili Success!
There you have it – a proven recipe for a truly exceptional Hearty Beef & Bean Chili that promises perfect thickness and incredible flavor every time. I’m confident this recipe will become a cherished favorite in your kitchen, simplifying weeknight dinners and delighting guests.
Don’t wait to experience the rich, comforting taste of this expertly crafted chili. Give it a try, savor every bite, and share your delicious creations with us!
Beef and Bean Chili
Course: Soups-StewsCuisine: AmericanDifficulty: medium6
servings20
minutes2
hours450
kcal120
minutesDiscover the secret to making a rich, hearty, and perfectly thick homemade chili every time. This recipe transforms good chili into absolutely amazing chili, full of deep flavors and a satisfying texture, ensuring you never have watery chili again.
Ingredients
1.5 pounds ground beef
1 large onion, diced
1 bell pepper, diced (any color)
2 cloves garlic, minced
1 tablespoon olive oil
2 tablespoons chili powder
1 tablespoon ground cumin
1 teaspoon dried oregano
1 teaspoon salt
0.5 teaspoon black pepper
1 28-ounce can crushed tomatoes
1 6-ounce can tomato paste
1 15-ounce can kidney beans, rinsed and drained
1 15-ounce can cannellini beans, rinsed and drained
1 15-ounce can corn, drained
1 cup beef broth
Directions
- Heat olive oil in a large Dutch oven or pot over medium-high heat. Add ground beef and cook, breaking it up with a spoon, until fully browned and no pink remains. Drain any excess fat from the pot.
- Add diced onion and bell pepper to the pot with the browned beef. Cook for about 5-7 minutes, stirring occasionally, until vegetables are softened. Stir in the minced garlic and cook for 1 more minute until fragrant.
- This is key for rich, thick chili: Stir in the chili powder, cumin, oregano, salt, and black pepper. Cook for 1 minute, stirring constantly, to bloom the spices. Then, add the tomato paste and cook it down for 2-3 minutes, stirring, allowing it to deepen in color and stick slightly to the bottom of the pot. This step adds incredible depth and helps prevent a watery consistency later.
- Pour in the crushed tomatoes and beef broth. Add the rinsed and drained kidney beans, cannellini beans, and drained corn. Stir everything together well, scraping up any browned bits from the bottom of the pot.
- Bring the chili to a gentle simmer. Once simmering, reduce the heat to low, cover the pot partially (allowing a small gap for steam to escape), and let it cook for at least 1.5 to 2 hours. The long, slow simmer is crucial; it allows the liquid to slowly evaporate, concentrating the flavors and naturally thickening the chili to that perfect, hearty texture. Stir occasionally to prevent sticking.
- Taste and adjust seasonings as needed. Serve hot and enjoy your perfectly thick and flavorful chili!
Notes
- The long, slow simmer and blooming spices with tomato paste are crucial for achieving a thick, rich chili.