I remember the frustration of messy slices when attempting a layered dessert – smudged layers and crumbling edges were far too common. But after much experimentation, I discovered a simple technique that transforms these delicious Layered Chocolate Cookie Dream Bars into a stunning, bakery-worthy treat every single time.
This recipe isn’t just about incredible flavor; it’s about achieving that visual perfection, making it a reliable showstopper that everyone will rave about. You’ll be proud to share these beautifully defined, irresistible squares.
Why These Layered Chocolate Cookie Dream Bars Will Become Your Go-To Dessert
Effortless Elegance: Achieving Defined Layers Every Time
This recipe uniquely solves the common problem of layers blending into each other, a challenge many bakers face. With our proven method, you’ll create a dessert that boasts visually stunning, distinct strata, elevating its appeal. Each square presents a beautiful cross-section of flavor and texture.
For that same visual appeal, learn about the no-leak method for red velvet cheesecake cookies.
The Ultimate Crowd-Pleaser: Why Everyone Craves These Bars
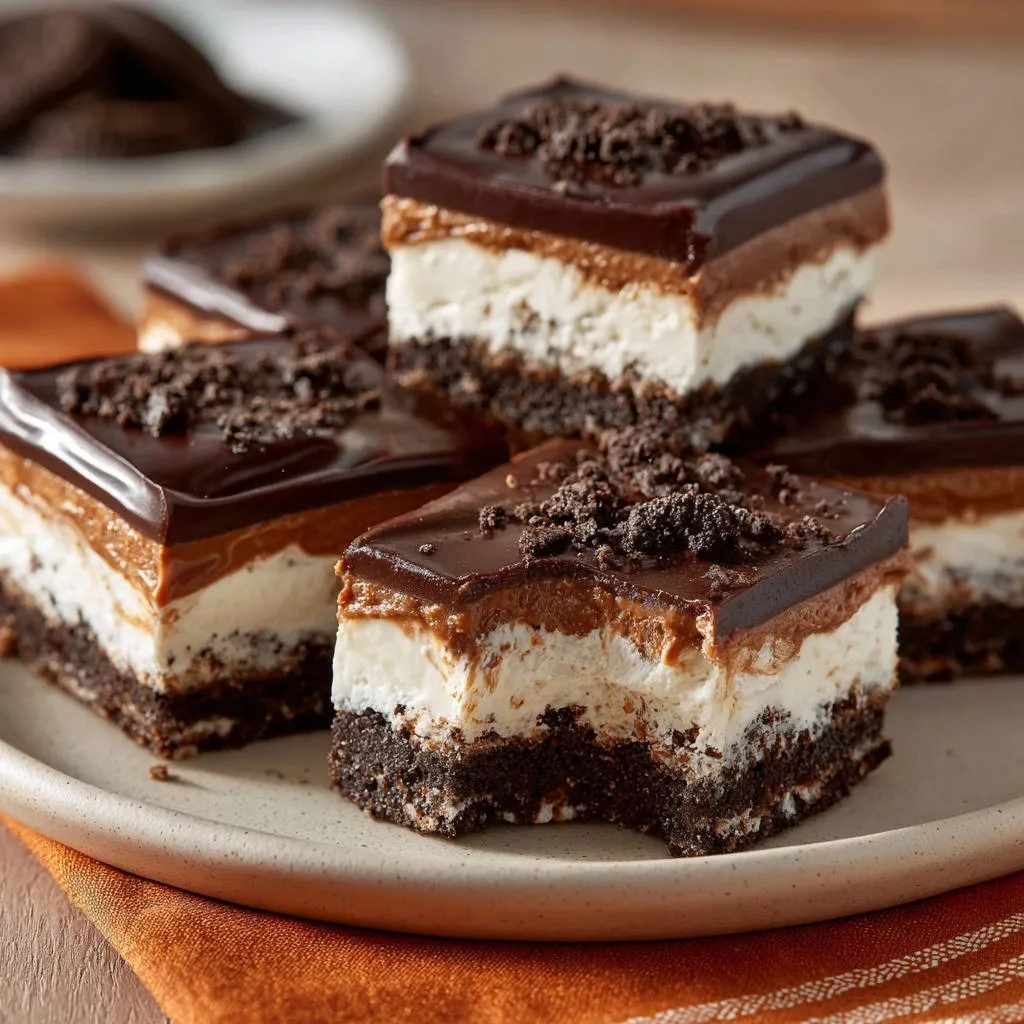
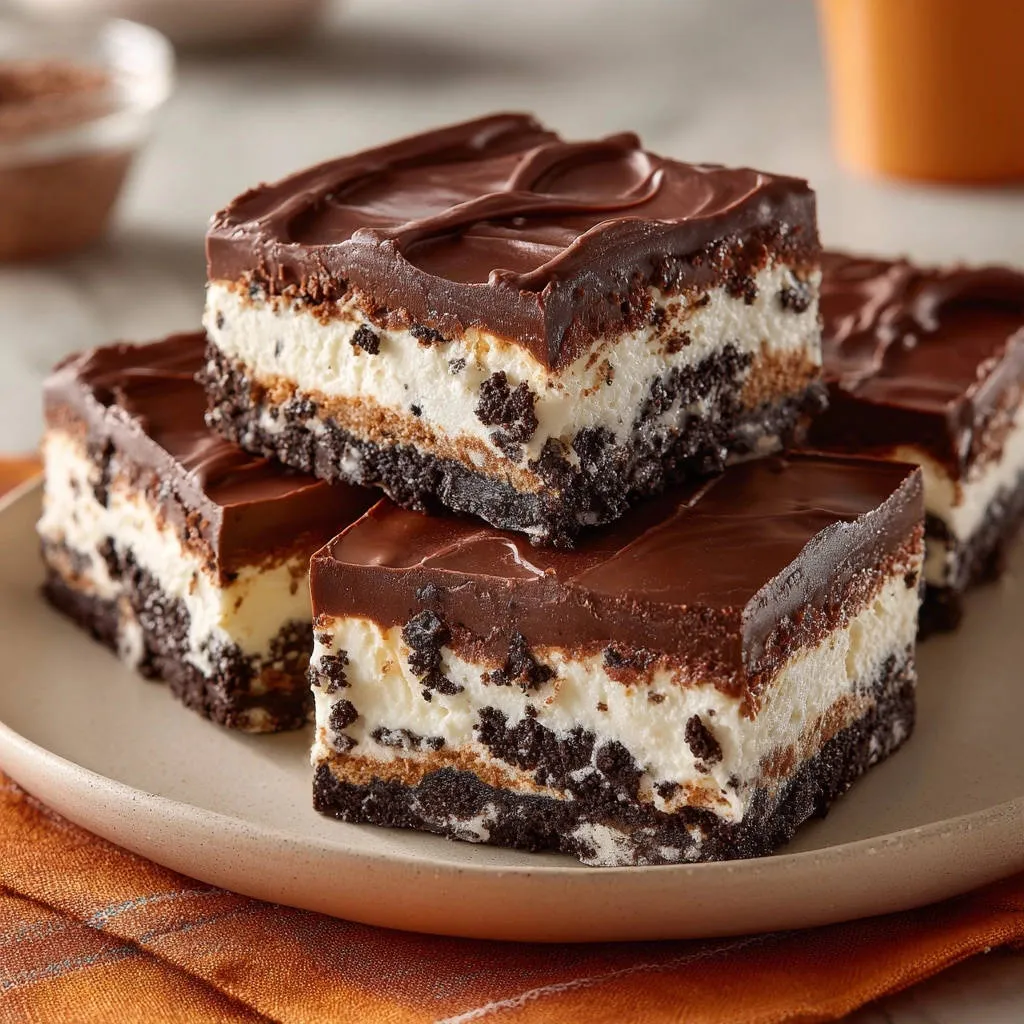
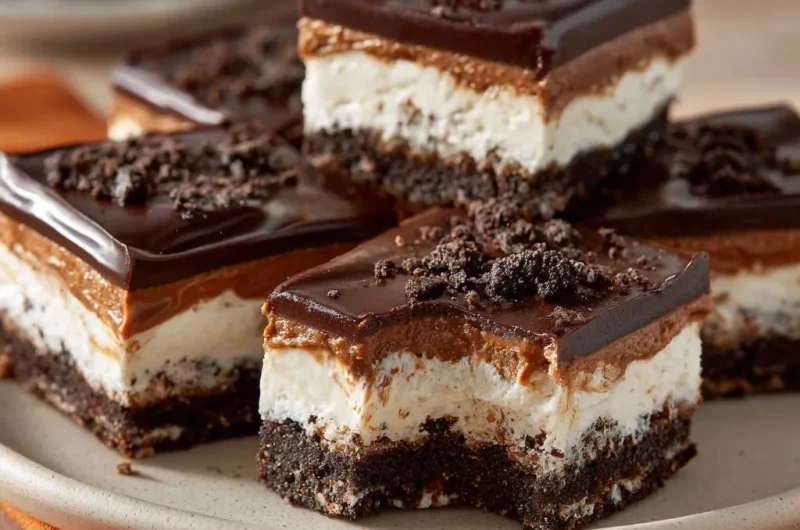
These Layered Chocolate Cookie Dream Bars offer an irresistible combination of a crisp chocolate cookie crust, a velvety cream cheese layer, rich chocolate pudding, and a glossy ganache. The medley of textures and deep chocolate notes makes this a universal favorite. It’s truly perfect for any gathering, from casual potlucks to festive celebrations.
For those who appreciate well-defined chocolate layers, you might also enjoy the rich gooeyness of a molten lava cookie pie.
Simple Steps, Stunning Results: A Stress-Free Baking Experience
Despite their sophisticated appearance, these dessert bars are surprisingly straightforward to prepare. The instructions are designed to guide you through each layer with ease, ensuring a stress-free baking experience. Even novice bakers can achieve spectacular results with minimal effort.
Gather Your Delights: Essential Components for Our Dream Bars
The Crunchy Foundation: Chocolate Cookie Crust
Finely crushed chocolate sandwich cookies form the bedrock of these bars, providing a delightful crunch and deep cocoa flavor. When combined with melted unsalted butter, they create a firm, flavorful base that holds its structure beautifully.
Velvety Smoothness: The White Cream Cheese Layer
Softened cream cheese is paramount for a smooth, lump-free white layer, offering a tangy counterpoint to the chocolate. Cold heavy cream, whipped to stiff peaks, ensures this layer is light, airy, and stable, preventing a dense texture.
Deep Chocolate Indulgence: The Pudding Center
Instant chocolate pudding mix is the secret to a quick, rich chocolate creamy layer that sets beautifully. Using cold milk helps the pudding thicken rapidly and achieve its desired consistency, contributing to the distinct layers of these no-bake chocolate bars.
Glossy Perfection: Homemade Ganache Topping
Creating a homemade ganache with semi-sweet chocolate chips and heavy cream delivers a luscious, shiny finish. Allowing the ganache to cool slightly before pouring is critical; it ensures a smooth spread without melting the layers below.
For That Final Flourish: The Garnish
A scattering of extra crushed chocolate sandwich cookies provides visual appeal and an additional textural element. This simple garnish adds a professional touch and reinforces the cookie theme.
Your Baking Arsenal: Tools for Layered Dream Bar Success
9×13 Inch Baking Pan: This standard size is essential for achieving the perfect thickness and generous portions for your dessert bars.
Electric Mixer: A stand or hand mixer is invaluable for effortlessly beating cream cheese and whipping heavy cream to fluffy perfection.
Medium and Large Bowls: You’ll need multiple bowls for preparing the crust, white creamy layer, chocolate pudding, and ganache.
Whisk: Essential for smoothly combining the instant pudding mix with milk, ensuring no lumps.
Spatula or Offset Spatula: Ideal for evenly spreading each creamy layer and the ganache for a clean finish.
Measuring Cups and Spoons: Accurate measurements are key for consistent results in this precise layered dream bar recipe.
Sharp Knife (Chef’s or Slicer): Crucial for the clean slice method, ensuring beautiful, defined cuts.
Crafting Your Layered Chocolate Cookie Dream Bars: A Visual Guide
- Prepare the Crust:
In a medium bowl, combine the finely crushed chocolate sandwich cookies and melted butter thoroughly. Ensure the cookie crumbs are uniformly coated with the butter, which acts as the binding agent.
Press this mixture firmly and evenly into the bottom of your prepared 9×13 inch baking pan. Use the bottom of a glass or a flat measuring cup to achieve a compact, even layer. Refrigerate immediately to allow the crust to set, preventing it from crumbling later.
- Make the White Creamy Layer:
In a large bowl, beat the softened cream cheese, granulated sugar, and vanilla extract with an electric mixer until the mixture is smooth and creamy, ensuring no lumps remain. Softened cream cheese is crucial for this step.
In a separate, very cold bowl, whip the cold heavy cream until it forms stiff peaks. A cold bowl and cold cream contribute to a more stable, airy texture. Gently fold the whipped cream into the cream cheese mixture until it is just combined. Overmixing here can deflate the whipped cream, making the layer less airy.
Spread this delicate mixture evenly over the chilled crust using an offset spatula. Return the pan to the refrigerator and chill for at least 30 minutes, allowing it to firm up before the next layer is added.
- Prepare the Chocolate Creamy Layer:
In a medium bowl, whisk together the instant chocolate pudding mix and cold milk for 2 minutes until it visibly thickens. Use cold milk to help the pudding set quickly and properly, creating a stable layer.
Spread this thickened pudding mixture evenly over the set white creamy layer, taking care not to disturb the layer beneath. Return the pan to the refrigerator and chill for at least 1 hour, or until the layer is fully set. This step is critical for maintaining distinct and beautiful layers in your chocolate bar dessert.
- Make the Chocolate Ganache Topping:
Combine the semi-sweet chocolate chips and heavy cream in a microwave-safe bowl. Start with quality chocolate for the best flavor.
Microwave on high for 30 seconds, then stir the mixture gently from the center outwards. Continue microwaving in 15-second intervals, stirring after each, until the chocolate is fully melted and the ganache is smooth and glossy. Be careful not to overheat the chocolate, as it can seize.
Let the ganache cool slightly for about 5-10 minutes. It should still be pourable but not piping hot, which could melt and disturb the delicate layers below.
- Assemble and Chill for Perfection:
Pour the slightly cooled ganache evenly over the set chocolate pudding layer, spreading it gently with a spatula to cover completely. Aim for an even, consistent coating for a professional look.
Sprinkle the remaining crushed chocolate sandwich cookies evenly over the ganache for a beautiful garnish and added crunch. This final touch adds both visual appeal and textural interest.
Return the pan to the refrigerator and chill for a minimum of 4 hours, or preferably overnight. This extended chilling period is the absolute key to achieving clean, distinct layers and making slicing effortless, ensuring your Layered Chocolate Cookie Dream Bars live up to their name.
- The Clean Slice Method:
Once thoroughly chilled (ideally overnight), remove the pan from the refrigerator. Proper chilling makes all the difference in achieving neat squares.
For the cleanest cuts, run a long, sharp knife under hot water, wipe it completely dry with a towel, and then make your first cut. The hot, dry blade glides through the cold layers cleanly.
Repeat this precise process – running the knife under hot water and wiping it dry – before each subsequent cut. This technique ensures the knife glides smoothly through all the layers without sticking or smudging, guaranteeing beautifully defined and impressive squares every time you serve these perfect chocolate slices.
Beyond the Recipe: Expert Tips for Flawless Layered Chocolate Cookie Dream Bars
The Golden Rule of Chilling: Why Patience Pays Off
Extended chilling is not just a suggestion; it’s a structural necessity for these dessert bars. Each layer needs sufficient time to firm up and bind properly, preventing them from bleeding into one another.
Rushing this step compromises the integrity of your bars, leading to a softer, less defined end product that’s difficult to slice. Plan ahead and give your bars the time they need.
The Clean Slice Method: Achieving Bakery-Quality Cuts
The hot knife technique is the single most important tip for achieving professional-looking cuts. A long, thin-bladed slicing knife or chef’s knife works best.
Always wipe the blade completely dry after running it under hot water; any moisture can cause stickiness and affect the chocolate. This extra step ensures every square is perfectly pristine.
Flavor Boosters & Customization Ideas
Enhanced Chocolate: For an even richer chocolate profile, try adding a tiny pinch of sea salt to your ganache. A few drops of espresso or coffee extract in the pudding layer can also intensify the chocolate flavor without making it taste like coffee.
Zesty Twist: Incorporate a teaspoon of orange zest into the white cream cheese layer for a subtle, bright citrus note that pairs beautifully with chocolate.
Crust Variations: Don’t limit yourself to chocolate sandwich cookies! Graham cracker crumbs or vanilla wafers can offer a different base flavor. For a truly decadent base, consider making your own ultimate fudgy brownies for the bottom layer if you’re feeling ambitious.
Garnish Galore: Beyond crushed cookies, experiment with chocolate shavings, mini chocolate chips, cocoa powder, or even a sprinkle of flaky sea salt for a sophisticated finish.
More Chocolatey Goodness
If you enjoyed these layered chocolate bars, here are a couple more sweet ideas.
- For a breakfast treat that echoes the campfire flavors, consider these s’mores pancakes, perfect for a sweet start.
- If you’re after more baked chocolate delights, give these chocolate sprinkle donuts a try for a fun, handheld dessert.
Don’t Rush the Layers: Setting for Success
Each individual layer requires adequate time to set and firm up before the next is applied. This meticulous approach prevents bleeding between layers and maintains the distinct structural integrity of your Layered Chocolate Cookie Dream Bars.
If a layer isn’t fully set, the weight of the next one, or the warmth of the ganache, can cause it to slump or merge. This patience ensures a beautiful and stable dessert.
Solving Common Conundrums: Dream Bar Rescue Mission
Why are my layers blending together?
This usually happens if you haven’t allowed sufficient chilling time between each layer. Each component needs to be firm before the next is added. Additionally, ensure your ganache isn’t too hot when poured, as excessive heat can melt the underlying layers.
Crust too crumbly or too hard?
A crumbly crust suggests there wasn’t enough melted butter to bind the cookies, or the mixture wasn’t pressed firmly enough into the pan. If it’s too hard, you might have over-chilled it, making it difficult to cut. Aim for a balanced texture that is firm but yields.
Ganache seizing or too thin?
Ganache seizing occurs from overheating the chocolate or not stirring enough to emulsify it with the cream. For a thin ganache, you might have too much cream relative to chocolate chips. For a thicker consistency, add a few more chocolate chips and gently melt.
My bars are difficult to cut cleanly.
The primary culprit here is insufficient overall chilling. The entire dessert needs to be thoroughly cold, ideally overnight. Secondly, not using the hot knife method before each cut will lead to sticky, smudged slices. This is the ultimate trick for easy layered dessert cutting.
Enjoying & Preserving Your Layered Chocolate Cookie Dream Bars
Perfect Pairings and Serving Suggestions
These bars are exquisite on their own, but can be elevated with simple additions. A light dusting of cocoa powder or a few fresh raspberries provides an elegant contrast.
For a truly indulgent experience, serve a square with a scoop of premium vanilla bean ice cream or a dollop of fresh whipped cream.
Storing Your Delicious Creation
To maintain their freshness and perfect texture, store your Layered Chocolate Cookie Dream Bars in an airtight container in the refrigerator. Proper storage prevents drying out and absorption of other fridge odors.
When stored correctly, these bars will remain delicious for up to 5-7 days. Always bring them closer to room temperature for about 15-20 minutes before serving for optimal flavor and texture.
Can I Make These Ahead?
Absolutely! These bars are an excellent make-ahead dessert. Preparing them a day in advance allows for maximum chilling time, which is crucial for perfect slices and flavor development.
Simply assemble and chill overnight, then slice and serve the next day. This makes them perfect for entertaining, as it frees up time on the day of your event.
Your Top Questions Answered: Layered Chocolate Cookie Dream Bars Edition
Can I use different cookies for the crust?
Yes, you can certainly experiment! Graham cracker crumbs will give a classic, buttery base, while vanilla wafers or even shortbread cookies can offer a different flavor profile. Just ensure the quantity remains the same and they are finely crushed to bind properly.
What if I don’t have instant pudding mix?
While instant pudding speeds up the process, you could use a homemade chocolate pastry cream or a cooked pudding for a richer taste. Be aware that these alternatives will require longer cooling and chilling times to set fully before applying the next layer.
Can I make these dairy-free or gluten-free?
Making these Layered Chocolate Cookie Dream Bars dairy-free is possible using non-dairy cream cheese, plant-based milks (like almond or oat), and coconut cream (chilled, solid part only) for whipping. For gluten-free, opt for gluten-free chocolate sandwich cookies for the crust. Ensure all other ingredients are certified gluten-free.
How long do these bars last?
When stored properly in an airtight container in the refrigerator, these delicious chocolate bar desserts will maintain their quality and freshness for 5 to 7 days. They are best enjoyed within the first few days for optimal texture.
Can I freeze Layered Chocolate Cookie Dream Bars?
Yes, these bars freeze beautifully! Once completely chilled and sliced, arrange them in a single layer on a parchment-lined baking sheet and freeze until solid. Then, transfer the frozen bars to an airtight container, separating layers with parchment paper.
They can be frozen for up to 1 month. Thaw in the refrigerator overnight before serving for the best texture and flavor. If you enjoy make-ahead treats, you might also like these amazing no-bake peanut butter bars that never fall apart.
Ready to Create Your Own Dream Bar Masterpiece?
Now that you have all the insider tips and tricks, you’re ready to create a dessert that looks as impressive as it tastes. These Layered Chocolate Cookie Dream Bars are more than just a sweet treat; they’re a testament to how simple techniques can yield extraordinary results.
Give this recipe a try and prepare to amaze your guests (and yourself!) with picture-perfect chocolate slices every time. We’d love to hear about your experience in the comments below!
Chocolate Cookie Dream Bars
Course: DessertCuisine: AmericanDifficulty: easy12
servings30
minutes450
kcal30
minutesUnlock the secret to perfectly layered chocolate cookie dream bars that are as beautiful as they are delicious. This no-bake recipe guides you through creating distinct layers and achieving picture-perfect slices every time. A guaranteed crowd-pleaser for any dessert bar!
Ingredients
For the Crust:
2 cups chocolate sandwich cookies, finely crushed (about 25 cookies)
1/2 cup unsalted butter, melted
For the White Creamy Layer:
1 (8 ounce) package cream cheese, softened
1/2 cup granulated sugar
1 teaspoon vanilla extract
1 cup heavy cream, cold
For the Chocolate Creamy Layer:
1 (3.9 ounce) package instant chocolate pudding mix
2 cups cold milk (dairy or non-dairy equivalent like almond milk)
For the Chocolate Ganache Topping:
1 cup semi-sweet chocolate chips
1/2 cup heavy cream
For Garnish:
1/4 cup chocolate sandwich cookies, crushed
Directions
- Prepare the Crust: In a medium bowl, combine the finely crushed chocolate sandwich cookies and melted butter. Press firmly and evenly into the bottom of a 9×13 inch baking pan. Place in the refrigerator to chill while preparing the next layer. This helps the crust set firmly.
- Make the White Creamy Layer: In a large bowl, beat the softened cream cheese, granulated sugar, and vanilla extract until smooth and creamy. In a separate cold bowl, whip the cold heavy cream until stiff peaks form. Gently fold the whipped cream into the cream cheese mixture until just combined. Spread this mixture evenly over the chilled crust. Return the pan to the refrigerator and chill for at least 30 minutes to allow this layer to firm up.
- Prepare the Chocolate Creamy Layer: In a medium bowl, whisk together the instant chocolate pudding mix and cold milk for 2 minutes until thickened. Spread this pudding mixture evenly over the set white creamy layer. Return the pan to the refrigerator and chill for at least 1 hour, or until fully set. This step is crucial for distinct layers.
- Make the Chocolate Ganache Topping: In a microwave-safe bowl, combine the chocolate chips and heavy cream. Microwave on high for 30 seconds, then stir. Continue microwaving in 15-second intervals, stirring after each, until the chocolate is melted and smooth. Let the ganache cool slightly, about 5-10 minutes, but make sure it is still pourable.
- Assemble and Chill: Pour the slightly cooled ganache evenly over the chocolate pudding layer. Sprinkle the remaining crushed chocolate sandwich cookies over the ganache for garnish. Return the pan to the refrigerator and chill for a minimum of 4 hours, or preferably overnight. This extended chilling period is the absolute key to clean, distinct layers and easy slicing.
- The Clean Slice Method: Once thoroughly chilled (ideally overnight), remove the pan from the refrigerator. For the cleanest cuts, run a long, sharp knife under hot water, wipe it dry, and then make your first cut. Repeat this process (hot water, wipe dry) before each subsequent cut. This helps the knife glide through the layers without sticking or smudging, ensuring beautifully defined squares.
Notes
- For perfectly clean slices, run a long, sharp knife under hot water and wipe dry before each cut.