
For years, achieving a truly tender, Perfect Herb-Crusted Beef Roast felt like a culinary enigma, often resulting in either dry or tough slices despite my best efforts. I finally cracked the code, discovering one crucial, yet often overlooked, step that transforms a good roast into an unforgettable one. This isn’t just another beef roast recipe; it’s a guide to consistent perfection, ensuring every slice is incredibly juicy, bursting with flavor, and effortlessly tender.
Why This Perfect Herb-Crusted Beef Roast Will Be Your New Go-To
Unlocking Unrivaled Tenderness: The Resting Revelation
The secret to an incredibly tender roast beef isn’t just about cooking it to the right temperature. It’s about what happens immediately after. Our method emphasizes the critical resting period, allowing muscle fibers to relax and juices to redistribute, guaranteeing succulence in every bite.
Effortless Elegance: Simple Steps, Stunning Results
This recipe demystifies the art of roasting, making gourmet-quality roast beef accessible for even novice home cooks. With clear, concise instructions, you’ll achieve stunning results that impress without hours of complex preparation.
Flavor Foundation: That Irresistible Herb Crust
The generous application of fragrant herbs and spices, followed by a proper sear, creates a magnificent, savory herb crust recipe. This exterior not only adds incredible flavor but also seals in the natural juices, enhancing the overall dining experience.
Essential Kitchen Gear for a Flawless Roast
Oven-Safe Skillet or Roasting Pan with Rack: This is essential for achieving a perfect sear on the stovetop and then seamlessly transferring your roast to the oven for even cooking.
Instant-Read Meat Thermometer: Absolutely crucial for hitting your desired doneness with precision. It eliminates guesswork, ensuring your juicy beef roast is never undercooked or overcooked.
Sharp Carving Knife: A well-sharpened knife allows for effortless, thin slicing against the grain, which is key for maximizing the tenderness of your finished roast.
Cutting Board: A sturdy board is needed for preparing the roast and, importantly, for providing a stable surface during the vital resting period.
Aluminum Foil: Used for tenting the roast during its crucial rest, which helps to keep it warm while the juices settle.
Gathering Your Flavorful Foundations
The Star of the Show: Selecting Your Beef Roast
For a consistently tender and flavorful outcome, I recommend a 2-3 pound beef roast such as top round or sirloin tip. Look for a piece with good marbling, which indicates a good fat distribution that will melt during cooking, enhancing both flavor and moisture.
For consistently tender results, consider this roasted glazed meat & potatoes recipe.
This size is perfect for most families, ensuring a generous meal while still cooking efficiently and evenly.
Aromatic Herbs and Spices for the Perfect Crust
Olive oil acts as a crucial binder, helping the seasonings adhere perfectly to the meat and promoting a beautiful, crispy crust during searing. It’s the first layer of flavor and texture.
A simple yet potent blend of salt, black pepper, garlic powder, and dried thyme creates the classic herb crust recipe. This combination delivers depth, savoriness, and that irresistible aromatic quality.
The Simple Yet Creamy Pepper Sauce
A quick sauce of plain yogurt and fresh black pepper offers a delightful, tangy contrast to the richness of the beef. Its simplicity allows the flavors of the roast to shine while adding a refreshing counterpoint.
For those who prefer, you could also consider a simple horseradish cream or a classic au jus, but this yogurt sauce is surprisingly effective and easy.
Garnish for a Final Flourish
Fresh thyme sprigs are an optional but recommended garnish. They add a vibrant pop of color and a delicate, fresh aroma, elevating the visual appeal and tying into the herb-crusted theme.
Crafting Your Perfect Herb-Crusted Beef Roast: A Guided Journey
Preparing for Perfection: Room Temperature & Patting Dry
Remove your beef roast from the refrigerator at least one hour before cooking. Allowing the roast to come closer to room temperature ensures more even heat penetration and consistent doneness throughout the meat.
Next, it’s critical to pat the roast thoroughly dry with paper towels on all sides. A dry surface is essential for achieving a deep, flavorful sear and a beautiful crust.
Generously rub the entire roast with olive oil, then season it evenly on all sides with salt, black pepper, garlic powder, and dried thyme. Don’t be shy with the seasoning; this forms your incredible herb crust.
The Flavor-Building Sear: Achieving a Golden Crust
Preheat a large, heavy-bottomed, oven-safe skillet (like cast iron) over medium-high heat until it’s very hot but not smoking. A properly heated pan is crucial for an effective sear.
Carefully place the seasoned roast in the hot skillet. Sear each side, including the ends, until a deep golden-brown crust forms, which usually takes about 2-3 minutes per side. This step builds incredible flavor, known as the Maillard reaction, and creates a beautiful exterior.
For more on achieving that browned crust, consider garlic herb crusted prime rib.
While optional, I highly recommend this searing step. It contributes immensely to the overall depth of flavor and texture of your Perfect Herb-Crusted Beef Roast.
Roasting to Your Ideal Doneness: Oven Magic
Preheat your oven to 375 degrees F (190 degrees C). This consistent heat will gently cook the roast to perfection after the initial sear.
If you used an oven-safe skillet, simply transfer it directly to the preheated oven. Otherwise, place the seared roast on a roasting rack set in a shallow baking pan.
Roast for approximately 45-60 minutes. The most accurate way to determine doneness is by using an internal meat temperature thermometer inserted into the thickest part of the roast, avoiding any bone.
Medium-Rare: 125-130 degrees F (52-54 degrees C)
Medium: 135-140 degrees F (57-60 degrees C)
Remember, the temperature will rise a few degrees during resting.
The Crucial Resting Period: Unlocking Juiciness
This is the single most crucial step for achieving that incredibly tender, juicy beef roast. Once your roast reaches your desired internal temperature, immediately remove it from the oven.
Transfer the roast to a clean cutting board. Tent it loosely with aluminum foil, creating a warm, enclosed space, but not sealing it tightly, which could steam the crust.
Allow the roast to rest undisturbed for at least 15-20 minutes, or up to 30 minutes for larger cuts. Do not, under any circumstances, skip or shorten this resting meat technique.
During this time, the muscle fibers, which have contracted during cooking, relax, and the internal juices, pushed to the center by the heat, redistribute evenly throughout the entire roast. This prevents them from gushing out when sliced, ensuring every piece is tender and moist.
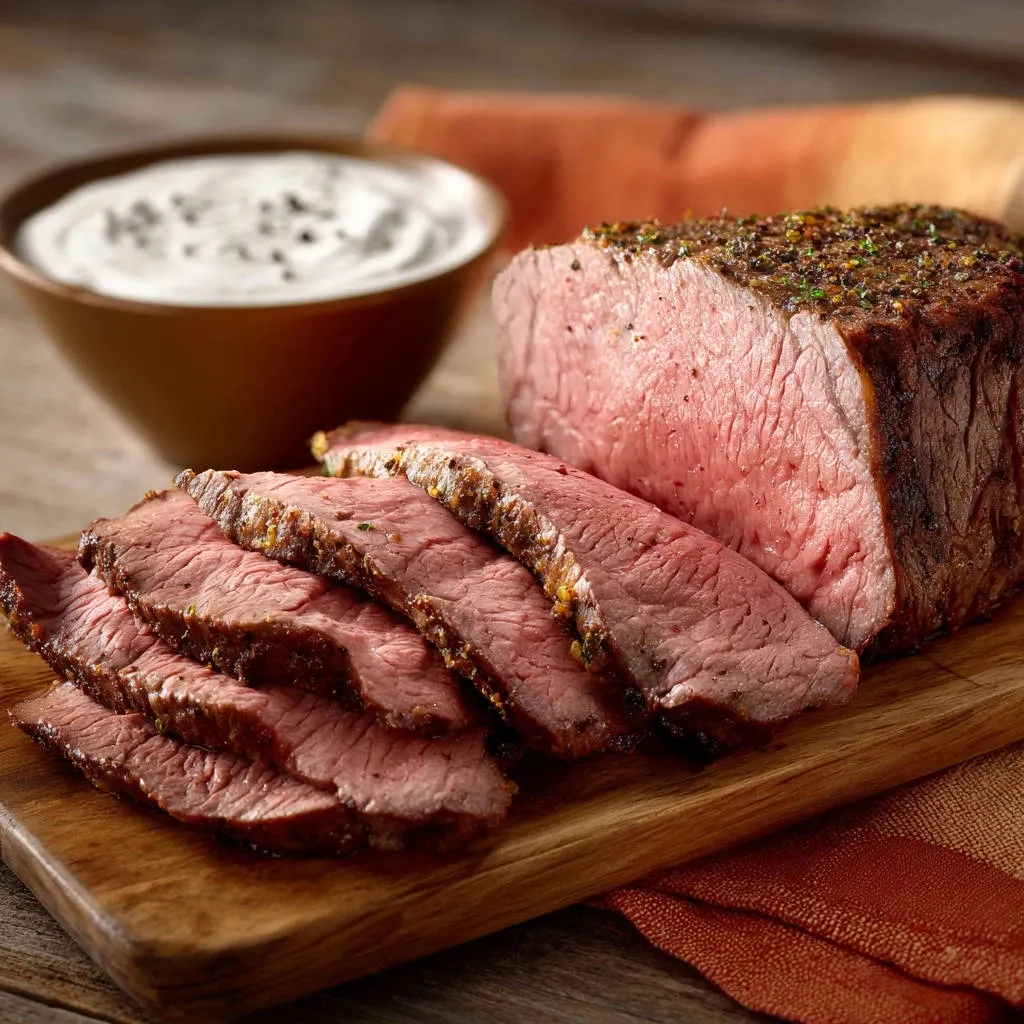
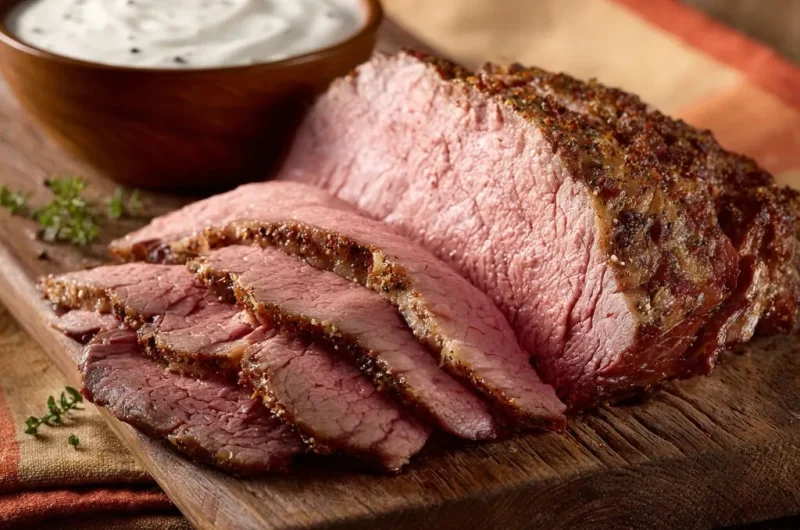
Slice, Sauce, and Savor: The Grand Finale
While the roast is resting, quickly prepare the creamy pepper sauce by simply combining plain yogurt and black pepper in a small bowl. Stir until well mixed.
Once the roast has fully rested, carve it thinly against the grain. Slicing against the grain shortens the muscle fibers, making each bite significantly more tender and easier to chew.
Arrange the thinly sliced roast on a platter. If desired, garnish with fresh thyme sprigs for an aromatic and visual flourish. Serve immediately with the creamy pepper sauce on the side.
Expert Tips to Elevate Your Roast to Legendary Status
Temperature Taming: Don’t Rush the Roast
Always bring your roast to room temperature before cooking. This simple step ensures even heat distribution, preventing the outer layers from overcooking while the center remains raw.
Against the Grain: Mastering Your Slices
To slice against the grain, look closely at the cooked meat to identify the direction of the muscle fibers. Your knife cuts should be perpendicular to these lines. This technique shortens the tough muscle fibers, resulting in incredibly tender, melt-in-your-mouth slices.
The Power of Patting Dry
A bone-dry surface is paramount for a spectacular crust. Excess moisture creates steam, which prevents browning. Patting thoroughly dry ensures a crispier, more flavorful exterior.
Flavor Boosters: Customizing Your Herb Crust
Feel free to experiment with your herb blend. Adding finely chopped fresh rosemary or a pinch of smoked paprika can introduce new layers of flavor. Onion powder also complements beef beautifully, enhancing the savory profile of your Perfect Herb-Crusted Beef Roast.
Thermometer Placement Precision
Always insert your instant-read meat thermometer into the thickest part of the roast, ensuring it avoids touching any bone or fat pockets. Improper placement can lead to inaccurate readings and an under- or overcooked roast.
Common Roast Challenges & Simple Solutions
Why is My Roast Dry or Tough?
This is almost always due to overcooking or neglecting the crucial resting step. Ensure you pull the roast from the oven at the target internal temperature and allow it to rest fully. These two steps are non-negotiable for a tender roast beef.
My Herb Crust Isn’t Golden Enough!
Ensure your roast is exceptionally dry before searing. Also, make sure your skillet is adequately preheated to medium-high heat and allow enough time (2-3 minutes per side) for that deep golden-brown crust to develop.
What if My Roast Cooks Too Quickly/Slowly?
Oven calibration varies, and roast thickness can impact cooking time. Always rely on your instant-read meat thermometer, not just the clock. Start checking temperatures a bit earlier than suggested if your oven tends to run hot, or a bit later if it’s slower.
Complementary Dishes
To round out your meal with the herb-crusted beef roast, consider these refreshing and flavorful options.
- For a bright contrast, try the creamy zesty chicken and corn salad, which offers a cool, tangy counterpoint.
- Another excellent choice is the creamy dill potato pea salad, featuring tender potatoes and peas that complement the richness of the roast.
What to Serve Alongside Your Magnificent Roast
Classic Companions
For a traditional meal, roasted potatoes, garlic-infused green beans, or a fluffy Yorkshire pudding make perfect partners. These familiar sides complement the rich flavors of the beef beautifully.
Light & Fresh Pairings
If you prefer a lighter accompaniment, a crisp green salad with a vibrant vinaigrette, steamed asparagus, or simply some sautéed mushrooms can offer a refreshing balance to the hearty roast.
Planning Ahead: Make-Ahead & Storage Tips
Can I Prepare Parts of the Roast in Advance?
Yes, you can season your roast a day in advance! Rub it with the olive oil and herb mixture, then cover and refrigerate. This allows the flavors to penetrate deeper, enhancing the final taste of your Perfect Herb-Crusted Beef Roast.
Storing Leftovers for Future Feasts
Allow any leftover roast to cool completely, then transfer it to an airtight container. It will keep well in the refrigerator for up to 3-4 days, making delicious sandwiches or quick weeknight meals.
Reheating Without Losing Juiciness
To reheat slices without drying them out, place them in a covered skillet with a splash of beef broth over low heat until warmed through. Alternatively, gently warm them in a low oven (around 250°F / 120°C) also covered, until just heated.
Your Burning Questions Answered
What’s the best type of beef roast for this recipe?
Top round or sirloin tip roasts are ideal for this beef roasting guide. They are lean yet flavorful cuts that benefit immensely from the searing and precise temperature control in this recipe, yielding wonderful tenderness.
How important is searing? Can I skip it?
Searing is highly recommended. It creates an incredible depth of flavor and a beautiful crust that you won’t get otherwise. While technically optional, skipping it means missing out on significant texture and taste enhancement.
Can I skip the resting step if I’m short on time?
Absolutely not! The resting step is arguably the most critical part of this recipe for achieving a juicy and tender roast. Skipping it will result in a dry, tough roast, as all the delicious juices will escape when you slice it. Patience here truly pays off.
What if I don’t have fresh thyme for garnish?
Fresh thyme for garnish is purely for aesthetic appeal and a hint of fresh aroma. If you don’t have it, simply omit it. It won’t affect the core flavor or succulence of your Perfect Herb-Crusted Beef Roast.
How do I know if my roast is medium-rare or medium without a thermometer?
While an instant-read thermometer is the most reliable tool, you can use the “touch test.” A medium-rare roast will feel soft and springy like the fleshy part between your thumb and forefinger when your hand is relaxed. Medium will feel a bit firmer. However, these are approximations, and a thermometer offers far greater accuracy for perfect results.
Your New Favorite Roast Awaits!
You now possess all the knowledge and techniques to create a truly spectacular, Perfect Herb-Crusted Beef Roast, complete with that irresistible juicy tenderness every time. This recipe is designed for success, transforming a seemingly complex dish into an accessible culinary triumph.
Go forth and roast with confidence! I encourage you to try this recipe, savor the incredible results, and share your delicious creations. It’s time to make this magnificent roast a cherished staple in your home.
Herb-Crusted Beef Roast
Course: Main CourseCuisine: AmericanDifficulty: medium4
servings15
minutes1
hour350
kcal60
minutesUnlock the secret to a perfectly tender and juicy beef roast with this simple recipe. Featuring a flavorful herb crust, this dish is surprisingly easy to master. The crucial resting step guarantees every slice is incredibly succulent.
Ingredients
1 (2-3 pound) beef roast (like top round or sirloin tip)
1 tablespoon olive oil
1 teaspoon salt
1/2 teaspoon black pepper
1 teaspoon garlic powder
1 teaspoon dried thyme
Fresh thyme sprigs for garnish (optional)
For the creamy pepper sauce:
1 cup plain yogurt
1/4 teaspoon black pepper
Directions
- Prepare the Roast: Remove the beef roast from the refrigerator about 1 hour before cooking to allow it to come closer to room temperature. This promotes more even cooking. Pat the roast thoroughly dry with paper towels. Rub the entire roast with olive oil, then season generously on all sides with salt, black pepper, garlic powder, and dried thyme.
- Sear (Optional but Recommended): Preheat a large, oven-safe skillet over medium-high heat. Once hot, carefully place the seasoned roast in the skillet. Sear all sides until a deep golden-brown crust forms, about 2-3 minutes per side. This step builds incredible flavor and a beautiful exterior.
- Roast in the Oven: Preheat your oven to 375 degrees F (190 degrees C). Transfer the seared roast (if using an oven-safe skillet, simply transfer the skillet to the oven; otherwise, place the roast on a roasting rack set in a baking pan). Roast for 45-60 minutes, or until an instant-read meat thermometer inserted into the thickest part of the roast registers your desired internal temperature:
- degrees F (52-54 degrees C) for medium-rare
- degrees F (57-60 degrees C) for medium
- The Juiciness Secret (Resting!): This is the most crucial step for achieving tender, juicy slices! Once the roast reaches your desired internal temperature, immediately remove it from the oven and transfer it to a clean cutting board. Tent it loosely with aluminum foil and let it rest undisturbed for at least 15-20 minutes (or up to 30 minutes for larger roasts). Do not skip this step! Resting allows the muscle fibers to relax and the internal juices to redistribute evenly throughout the meat, preventing them from running out when you slice it. This guarantees every piece is incredibly juicy and tender.
- Slice and Serve: While the roast is resting, prepare the dipping sauce by combining plain yogurt and black pepper in a small bowl. Once the roast has fully rested, slice it thinly against the grain. Arrange the slices on a platter, garnish with fresh thyme sprigs if desired, and serve immediately with the creamy pepper sauce. Enjoy your perfectly tender and juicy roast!
Notes
- The resting step is crucial for maximum tenderness and juiciness; do not skip!