I know the frustration of a multi-layered dessert that promises perfection but delivers a messy, unsliceable heap. Years ago, I too struggled with bars that would crumble or melt into an indistinguishable pile when cut. That’s why I’m thrilled to share my perfected recipe for these Ultimate Peanut Butter Chocolate Bars, designed for flawless, distinct layers that slice beautifully every single time.
This recipe is a game-changer for anyone craving that classic peanut butter and chocolate combination without the usual fuss. Get ready to create a show-stopping treat that’s as easy to make as it is to enjoy.
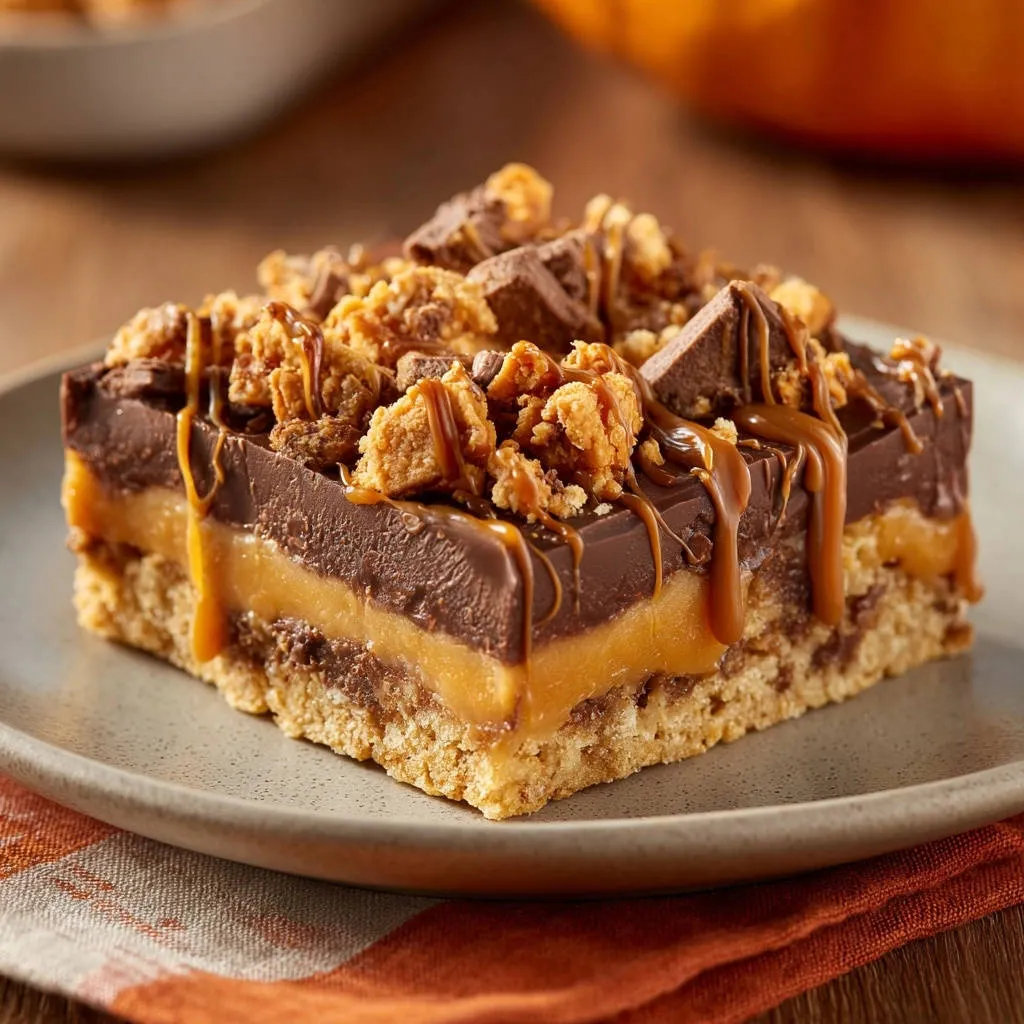
If you enjoy the rich layers here, you’ll want to explore these white chocolate cranberry bliss bars.
Why These Ultimate Peanut Butter Chocolate Bars Will Become Your Go-To Dessert
The Secret to Effortlessly Perfect, Distinct Layers
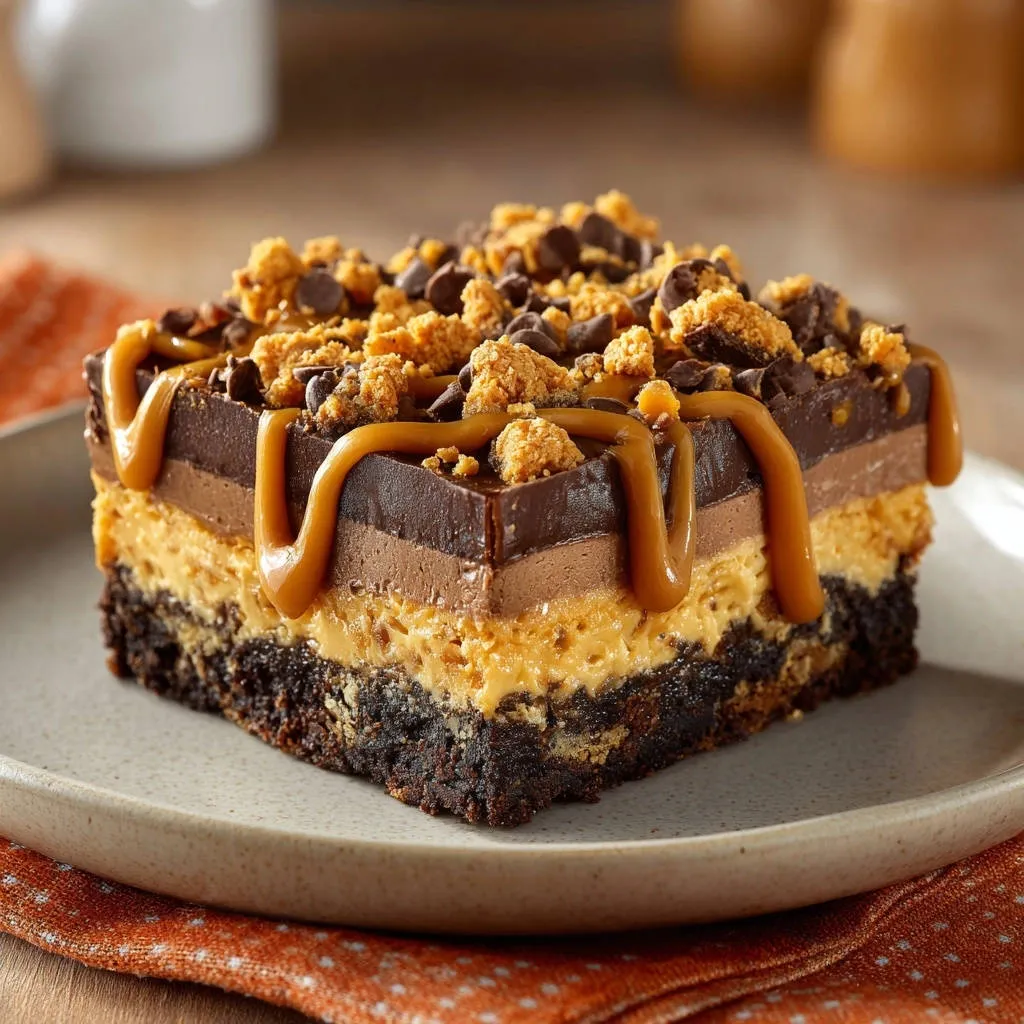
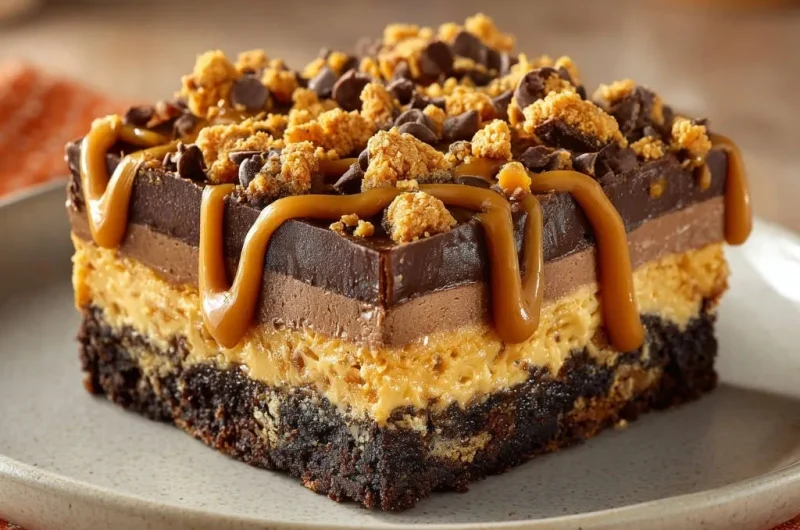
The key to these spectacular bars lies in the strategic chilling and precise layering. Each component sets up perfectly firm, ensuring that when you slice into them, you get clean, defined lines, not a merged mess.
You’ll appreciate how each layer-from the chocolate cookie crust to the creamy peanut butter and airy chocolate mousse-holds its shape, delivering a satisfying bite of distinct textures and flavors.
Slicing Made Simple: Clean Cuts Every Time
Forget sticky, uneven slices. This recipe ensures your Ultimate Peanut Butter Chocolate Bars emerge from the pan ready for a clean cut, promising a professional-looking dessert without any fuss.
For those who appreciate firm, no-runny perfection in their bars, try these Triple Chocolate Layer Bars.
The firm structure means no more tugging or smudging; just smooth, elegant slices that are picture-perfect for any occasion.
Irresistible Flavor Profile: A Symphony of Sweet & Salty
These bars are a harmonious blend of rich chocolate and creamy, slightly salty peanut butter. The deep cocoa of the crust, the luscious peanut butter filling, and the light chocolate mousse create an unparalleled taste experience.
Finished with a glossy ganache and optional garnishes, this layered dessert is an absolute dream for any sweet and salty enthusiast.
Gather Your Sweet Symphony: Ingredients for Unforgettable Bars
For the Decadent Chocolate Cookie Crust
- 1.5 cups chocolate sandwich cookie crumbs (about 18 cookies)
- 0.5 cup unsalted butter, melted
The finely crushed chocolate sandwich cookies provide a dark, rich base, perfectly complementing the peanut butter. Melted butter binds the crumbs, forming a firm, flavorful foundation.
Crafting the Velvety Peanut Butter Layer
- 1 cup creamy peanut butter
- 0.5 cup unsalted butter, softened
- 1 cup powdered sugar
- 4 ounces cream cheese, softened
- 1 teaspoon vanilla extract
Using truly softened butter and cream cheese is crucial here. This ensures a silky-smooth, lump-free peanut butter layer that’s both rich and perfectly spreadable.
The Light & Airy Chocolate Mousse Foundation
- 1 cup semi-sweet chocolate chips
- 0.5 cup heavy cream, heated
- 1 cup cold heavy cream, whipped to soft peaks
The initial heated cream melts the chocolate chips into a smooth base, while the separate cold, whipped cream provides the light, airy texture that defines a perfect mousse. Combining them gently preserves that delicate fluffiness.
The Glossy Ganache Topping & Creative Garnish
- 0.5 cup semi-sweet chocolate chips
- 0.25 cup heavy cream, heated
For the Garnish:
- Mini chocolate chips
- Crushed shortbread cookies or peanut butter candies
- Caramel sauce, for drizzling
The ganache creates a beautiful, shiny finish and adds another layer of intense chocolate flavor. Garnish choices allow for personalization, enhancing both visual appeal and taste.
Your Baking Arsenal: Essential Tools for Layered Perfection
8×8 Inch Baking Pan: Crucial for the right thickness and easy lifting with parchment.
Electric Mixer: Makes light work of the creamy peanut butter layer.
Parchment Paper: Your best friend for lifting and clean removal.
Sharp Knife: Essential for those perfectly clean, Instagram-worthy slices.
Heatproof Bowls & Saucepans: For preparing ganache and melting chocolate.
Mastering Each Layer: A Step-by-Step Guide to Ultimate Peanut Butter Chocolate Bars
- Prepare Your Pan for Success:
Lightly grease an 8×8 inch baking pan and line it with parchment paper. Ensure you leave an overhang on two sides; this simple step is vital for easily removing the fully set bars later without damage.
- Build the Stable Cookie Crust:
In a medium bowl, combine the chocolate cookie crumbs and melted butter. Press this mixture firmly and evenly into the bottom of the prepared pan. Place the pan in the refrigerator and chill for at least 15 minutes; this initial chill is key for a solid foundation that won’t crumble when subsequent layers are added.
- Craft the Creamy Peanut Butter Core:
In a large bowl, use an electric mixer to beat together the softened peanut butter, softened butter, powdered sugar, cream cheese, and vanilla extract until completely smooth and creamy, ensuring no lumps remain. Spread this mixture evenly over the chilled cookie crust. Return the pan to the refrigerator and chill for a minimum of 1 hour, or until this layer is firm to the touch; this extended chill is critical for a perfect set and clean, distinct layers.
- Create the Light Chocolate Mousse Layer:
Place 1 cup of semi-sweet chocolate chips in a heatproof bowl. Heat 0.5 cup of heavy cream until it just begins to simmer, then pour the hot cream over the chocolate chips. Let it sit for 5 minutes before whisking until completely smooth and melted. Allow this chocolate mixture to cool to room temperature. In a separate bowl, whip 1 cup of cold heavy cream to soft peaks, then gently fold the cooled chocolate mixture into the whipped cream until no streaks remain. Pour this mousse mixture over the firm peanut butter layer, spreading it evenly, and chill for at least 2 hours, or until completely set and firm.
- Whisk Up the Silky Ganache Topping:
Place 0.5 cup of semi-sweet chocolate chips in a small heatproof bowl. Heat 0.25 cup of heavy cream until it just begins to simmer, then pour the hot cream over the chocolate chips. Let it sit for 5 minutes, then whisk until smooth. Let the ganache cool slightly, about 10 minutes, so it is still pourable but not hot, which prevents it from melting the delicate mousse layer beneath.
- Final Assembly and Crucial Chilling:
Pour the slightly cooled ganache over the completely firm chocolate mousse layer, spreading it gently to cover the top. Immediately sprinkle with mini chocolate chips and crushed cookies or candies for garnish. Return the pan to the refrigerator for at least 30 minutes, or until the ganache is set. For the cleanest cuts and best texture, it is best to chill the bars for at least 4 hours, or preferably overnight, before serving.
- Slice and Serve Your Masterpiece:
Once thoroughly chilled and firm, use the parchment paper overhang to lift the entire slab of bars from the pan. Place on a cutting board and slice into squares using a sharp knife, wiping the knife clean between each cut for perfectly defined layers. Drizzle with caramel sauce just before serving for an extra touch of indulgence and a beautiful presentation.
Chef’s Secrets: Elevate Your Ultimate Peanut Butter Chocolate Bars Game
The Golden Rule of Chilling: Don’t rush the refrigeration! Each chilling step is integral to achieving distinct, firm layers that slice beautifully without becoming a messy pile. Patience is truly a virtue in this recipe.
Temperature Matters for Creaminess: Ensure your butter and cream cheese are truly softened for the peanut butter layer. This guarantees a smooth, lump-free texture that spreads evenly and sets perfectly.
Folding Mousse Like a Pro: When incorporating the cooled chocolate into whipped cream, fold gently using a spatula in an upward motion to maintain the mousse’s airy texture. Overmixing will deflate it, resulting in a denser layer.
Cool Ganache, Not Cold: Pour the ganache when it’s still warm and fluid but not hot. Too hot will melt the mousse; too cold will be difficult to spread evenly and might crack when chilled. Aim for a consistency that flows smoothly.
The Hot Knife Trick for Perfect Slices: For ultra-clean cuts, dip your sharp knife in hot water and wipe it dry between each slice. The warmth helps glide through the layers, creating crisp, defined edges every time.
Solving Common Challenges: Your Ultimate Peanut Butter Chocolate Bars Troubleshooting Guide
My Crust is Crumbly and Won’t Hold Together
Ensure you used enough melted butter and pressed the mixture very firmly into the pan, compacting it well. Chilling thoroughly (at least 15 minutes) before adding the next layer is also critical for stability, allowing the butter to solidify and bind the crumbs.
The Peanut Butter Layer is Too Sticky or Greasy
This can happen if your butter or cream cheese were too warm, causing them to separate, or if the layer wasn’t chilled long enough to firm up. Make sure to use softened (not melted) ingredients and adhere to the minimum 1-hour chill time for a firm, non-sticky set.
My Chocolate Mousse Didn’t Set Firmly
The most common culprits are insufficient whipping of the cold heavy cream (it needs to reach soft peaks) or not cooling the melted chocolate mixture to room temperature before folding. Folding warm chocolate into whipped cream will melt it. Always allow ample chilling time (2+ hours).
The Ganache Topping Looks Dull or Separated
A dull appearance usually means it wasn’t whisked enough after combining the cream and chocolate, or it wasn’t poured at the ideal temperature. If it separated, it might have been too hot; try whisking vigorously off the heat or adding a tiny bit more warm cream (a teaspoon at a time) to re-emulsify it.
I’m Struggling to Get Clean Slices
Ensure the bars are thoroughly chilled for at least 4 hours, or ideally overnight. The colder the bars, the cleaner the cut. Use a very sharp knife and wipe it clean with a hot, damp cloth between each cut, as detailed in our chef’s tips. You might find our tips for no-bake peanut butter bars that never fall apart helpful for general bar slicing techniques.
Enjoying Your Creation: Serving, Storing, and Making Ahead
The Best Way to Serve Your Ultimate Peanut Butter Chocolate Bars
These bars are best served chilled, straight from the refrigerator. Their firm layers hold beautifully when cold, offering a satisfying mouthfeel.
Allow them to sit at room temperature for just 5-10 minutes if you prefer a slightly softer texture, but not much longer to maintain their elegant structure. Garnish just before serving with additional mini chocolate chips, crushed candies, or a generous drizzle of caramel sauce for an extra touch of indulgence.
Storage Solutions for Lasting Freshness
Store any leftover bars in an airtight container in the refrigerator for up to 5-7 days. To prevent them from absorbing fridge odors and to keep them pristine, you can layer parchment paper between bars if stacking.
Can I Make These Ultimate Peanut Butter Chocolate Bars Ahead?
Absolutely! This recipe is fantastic for making ahead, perfect for parties or meal prep. The bars truly benefit from an overnight chill, allowing all layers to set perfectly and flavors to meld beautifully. You can confidently prepare them 1-2 days in advance.
For longer storage, you can freeze the uncut bars in an airtight container for up to 1 month. When ready to enjoy, thaw them in the refrigerator overnight before slicing and serving. For another excellent make-ahead dessert, consider our recipe for decadent chocolate brownies.
Your Burning Questions Answered: Ultimate Peanut Butter Chocolate Bars FAQ
Can I use crunchy peanut butter instead of creamy?
While creamy peanut butter is recommended for a smooth layer that blends seamlessly, you can certainly use crunchy for added texture and a more rustic feel. Just be aware the layer might not be as uniformly smooth.
Can I make this recipe gluten-free?
Yes! Simply substitute the chocolate sandwich cookie crumbs with gluten-free chocolate sandwich cookies or a gluten-free graham cracker crust alternative. Always ensure all other ingredients, like vanilla extract, are certified gluten-free.
What if I don’t have an 8×8 inch pan?
You can use a 9×9 inch pan, but the layers will be slightly thinner, and the chilling times might be marginally shorter. A 9×13 inch pan would yield much thinner bars and would require scaling up the recipe by about 1.5x to maintain a good layer height.
Can I use different types of chocolate?
Yes, feel free to experiment! You can use milk chocolate chips for a sweeter profile or dark chocolate chips for a more intense cocoa flavor in both the mousse and ganache layers to suit your preference. Adjust sweetness as needed.
How do I prevent my ganache from cracking when slicing?
Ensure your ganache has cooled slightly before pouring (so it’s not piping hot) but is still fluid enough to spread smoothly. The most important step is to chill the entire bar thoroughly, ideally overnight, and use a hot, sharp knife as mentioned in our tips. A warmer knife cuts cleanly through the chilled, firm ganache.
Ready to Share Your Ultimate Peanut Butter Chocolate Bars Masterpiece?
There’s immense satisfaction in creating a dessert that looks as good as it tastes, especially when it solves common baking frustrations. With this comprehensive guide to our Ultimate Peanut Butter Chocolate Bars, you’re now equipped to create a show-stopping treat with perfectly firm, distinct layers that slice like a dream.
Whether you’re impressing guests, delighting your family, or simply treating yourself, these bars are guaranteed to be a hit. Don’t forget to share your delicious creations with us on social media! We love seeing your baking triumphs and hearing how much you enjoyed these perfect peanut butter chocolate bars.
More Sweet Slices and Treats
If you enjoyed these peanut butter chocolate bars, you might like these other sweet ideas.
- For a breakfast treat with a similar chocolatey appeal, check out these S’mores Pancakes, which bring campfire flavors to your morning.
- If you’re in the mood for another baked good with chocolate, these Chocolate Sprinkle Donuts offer a delightful bakery-style finish.
Peanut Butter Chocolate Bars
Course: DessertCuisine: AmericanDifficulty: medium9
bars45
minutes550
kcal240
minutesSay goodbye to messy layers! This foolproof recipe for Ultimate Peanut Butter Chocolate Bars ensures every layer sets perfectly firm, making slicing a breeze. Enjoy a delicious multi-layered dessert that’s easy to make and even easier to devour.
Ingredients
For the Cookie Crust:
1.5 cups chocolate sandwich cookie crumbs (about 18 cookies)
0.5 cup unsalted butter, melted
For the Peanut Butter Layer:
1 cup creamy peanut butter
0.5 cup unsalted butter, softened
1 cup powdered sugar
4 ounces cream cheese, softened
1 teaspoon vanilla extract
For the Chocolate Mousse Layer:
1 cup semi-sweet chocolate chips
0.5 cup heavy cream, heated
1 cup cold heavy cream, whipped to soft peaks
For the Ganache Topping:
0.5 cup semi-sweet chocolate chips
0.25 cup heavy cream, heated
For the Garnish:
Mini chocolate chips
Crushed shortbread cookies or peanut butter candies
Caramel sauce, for drizzling
Directions
- Prepare Your Pan: Lightly grease an 8×8 inch baking pan and line it with parchment paper, leaving an overhang on two sides to easily lift the bars out later.
- Make the Crust: In a medium bowl, combine the chocolate cookie crumbs and melted butter. Press this mixture firmly and evenly into the bottom of the prepared pan. Place the pan in the refrigerator and chill for at least 15 minutes while you prepare the next layer. This initial chill is key for a stable base.
- Prepare the Peanut Butter Layer: In a large bowl, using an electric mixer, beat together the softened peanut butter, softened butter, powdered sugar, cream cheese, and vanilla extract until completely smooth and creamy. Ensure all ingredients are well combined and no lumps remain. Spread this mixture evenly over the chilled cookie crust. Return the pan to the refrigerator and chill for a minimum of 1 hour, or until this layer is firm to the touch. This extended chill time is crucial for the perfect set and clean layers.
- Create the Chocolate Mousse Layer: Place 1 cup of semi-sweet chocolate chips in a heatproof bowl. In a small saucepan or microwave, heat 0.5 cup of heavy cream until it just begins to simmer. Pour the hot cream over the chocolate chips, let it sit for 5 minutes, then whisk until completely smooth and melted. Let this chocolate mixture cool to room temperature. In a separate bowl, whip the 1 cup of cold heavy cream to soft peaks. Gently fold the cooled chocolate mixture into the whipped cream until no streaks remain. Pour this mousse mixture over the firm peanut butter layer, spreading it evenly. Return the pan to the refrigerator and chill for at least 2 hours, or until the mousse layer is completely set and firm.
- Make the Ganache Topping: Place 0.5 cup of semi-sweet chocolate chips in a small heatproof bowl. Heat 0.25 cup of heavy cream until it just begins to simmer. Pour the hot cream over the chocolate chips, let it sit for 5 minutes, then whisk until smooth. Let the ganache cool slightly, about 10 minutes, so it is still pourable but not hot.
- Assemble and Chill: Pour the slightly cooled ganache over the completely firm chocolate mousse layer, spreading it gently to cover the top. Sprinkle immediately with mini chocolate chips and crushed cookies or candies. Return the pan to the refrigerator for at least 30 minutes, or until the ganache is set. For the cleanest cuts, it is best to chill the bars for at least 4 hours, or preferably overnight, before serving.
- Serve: Once thoroughly chilled and firm, use the parchment paper overhang to lift the entire slab of bars from the pan. Place on a cutting board and slice into squares using a sharp knife, wiping the knife clean between each cut for perfectly defined layers. Drizzle with caramel sauce just before serving.
Notes
- For the cleanest cuts, chill bars for at least 4 hours, or preferably overnight, before serving.