Why This Chocolate Churro Cheesecake Will Become Your Go-To Dessert
This isn’t just another cheesecake recipe; it’s a guaranteed success story, designed to eliminate the common pitfalls of cheesecake baking. We focus on specific techniques that ensure a crack-free surface, offering a smooth, velvety texture that melts in your mouth.
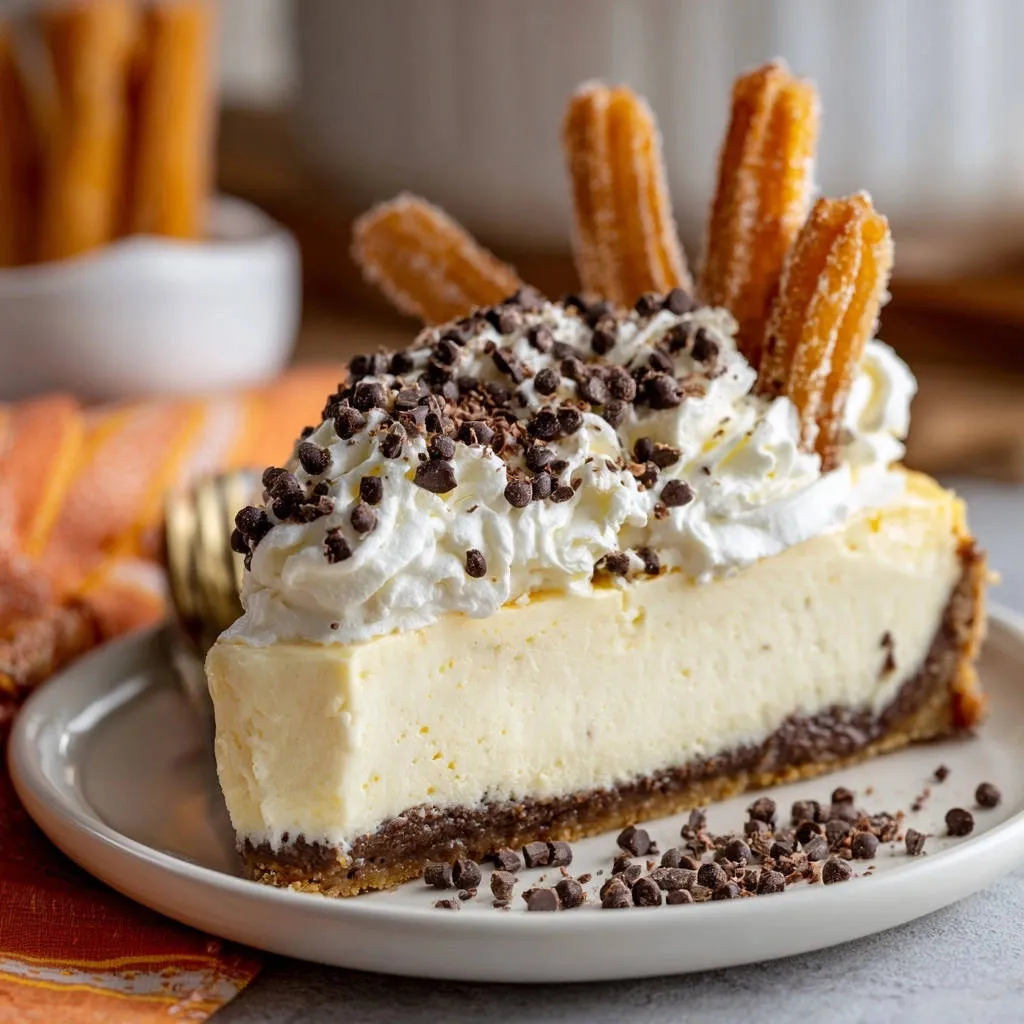
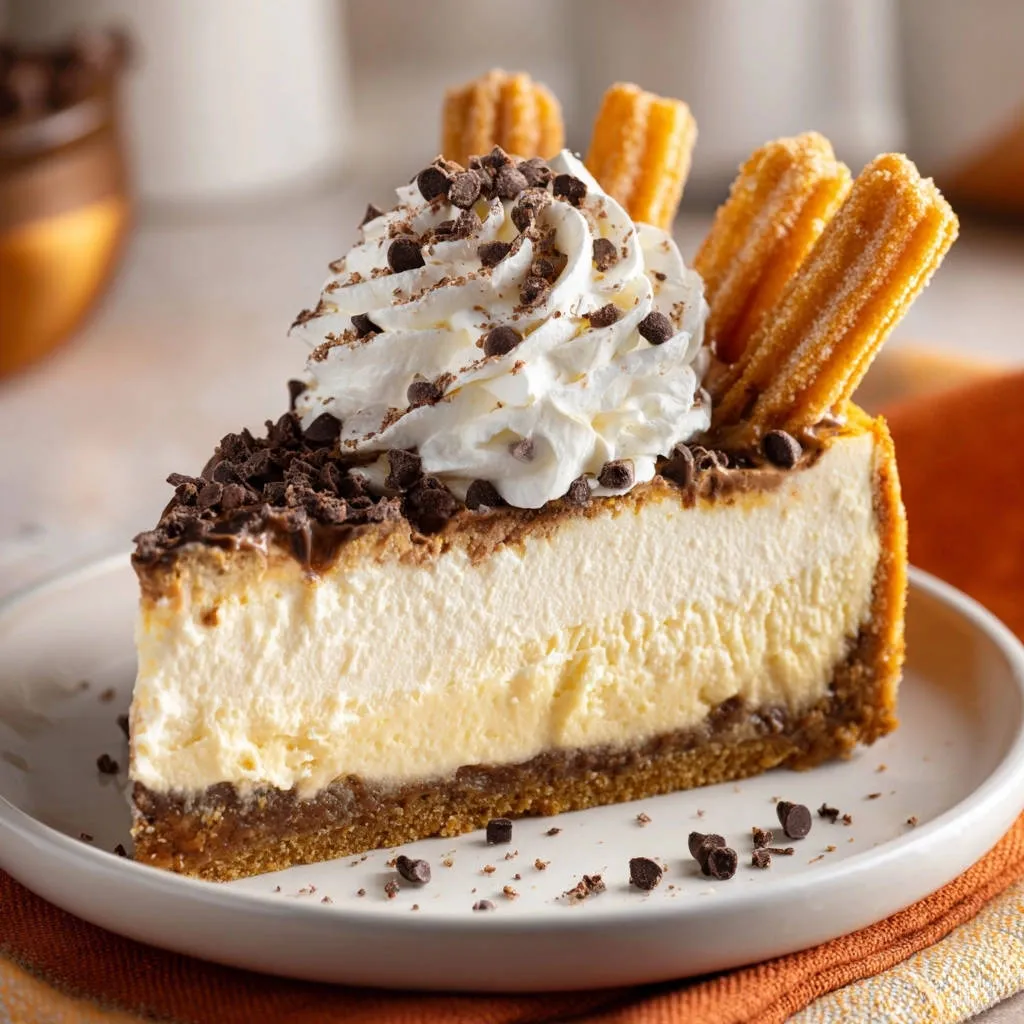
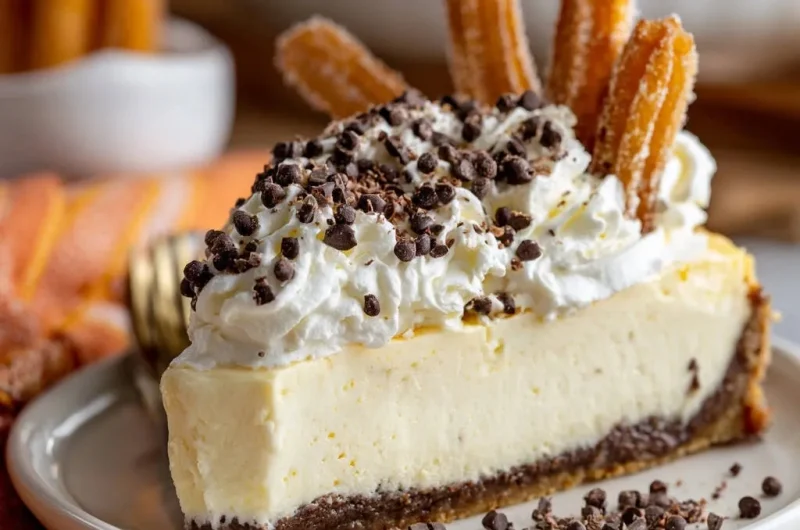
The magic lies in the fusion of flavors: a rich chocolate cookie crust, a decadent chocolate layer, and a creamy cheesecake filling infused with the spirit of churros, crowned with actual mini churros. It’s a dessert that’s both elegant and playfully nostalgic.
Despite its stunning appearance and complex flavor profile, this Chocolate Churro Cheesecake is surprisingly approachable. With our detailed guidance, even novice bakers can achieve impressive, professional-looking results that will undoubtedly wow any guest.
The Culinary Essentials: Ingredients for Your Masterpiece
Crunchy Foundation: Chocolate Cookie Crust
The crust sets the stage, providing a sturdy, flavorful base. Using chocolate cookie crumbs adds a deep cocoa note that perfectly complements the cheesecake and churro elements.
Planning Your Next Sweet Treat?
This Chocolate Churro Cheesecake is a rich dessert. If you are looking for more sweet ideas, here are a couple of options you might enjoy.
- For a refreshing drink to accompany your cheesecake, consider this Creamy Copycat Iced Coffee, offering a cool counterpoint.
- If you’re in the mood for something baked with a hint of sweetness, these Golden Cottage Cheese Fritters offer a different texture.
Melted unsalted butter binds these crumbs together, creating a firm, rich foundation that won’t crumble when sliced. Quality butter enhances the overall taste.
The Secret Heart: Smooth Chocolate Layer
Semi-sweet chocolate chips provide a balanced sweetness and intense chocolate flavor for this hidden layer. It adds depth and a delightful surprise beneath the creamy filling.
Heavy cream, when combined with the chocolate, creates a smooth, pourable ganache-like layer. This ensures an even distribution of chocolate that enhances every bite.
Velvety Core: Cheesecake Filling Must-Haves
Softened cream cheese is non-negotiable; it’s the heart of the cheesecake, ensuring a silky, lump-free batter when beaten. Three 8-ounce blocks provide the ideal richness and body.
Granulated sugar sweetens the cream cheese, creating a balanced flavor profile without being overly saccharine. Gradually adding it helps maintain a smooth consistency.
Large eggs, at room temperature, are crucial for binding the filling and contributing to its creamy texture. Adding them one at a time and mixing gently prevents over-aeration.
Vanilla extract enhances all the sweet flavors, adding a warm, aromatic note that is essential for any classic dessert. Always use pure vanilla for the best taste.
For a similar creamy filling experience, explore red velvet cheesecake cookies with a no-leak method.
Sour cream, also at room temperature, adds a subtle tang and an incredible creaminess to the cheesecake, making it exceptionally smooth and moist. It also helps prevent cracks.
For a similar creamy texture, check out this creamy pumpkin swirl cheesecake.
Dreamy Garnish: Topping the Sweetness
Cold heavy whipping cream is whipped into a light, airy topping that provides a beautiful contrast to the rich cheesecake. Ensure it’s very cold for the best volume.
Powdered sugar sweetens the whipped cream, dissolving instantly for a smooth, perfect finish. Adjust to your preferred level of sweetness.
Mini chocolate chips and chocolate shavings add textural interest and an extra boost of chocolate flavor, making each slice even more decadent.
Mini churros are the star garnish, adding that signature crunchy, cinnamon-sugar element that makes this dessert truly unique and ties the theme together.
Essential Tools for Cheesecake Success
Springform Pan (9-inch): Essential for easy release of your delicate cheesecake without disturbing its perfect edges. This ensures a beautiful presentation every time.
Heavy-Duty Aluminum Foil: Crucial for the water bath, this strong foil prevents any water from seeping into your pan, protecting the crust and texture.
Large Roasting Pan: This holds the springform pan and the hot water, forming the protective water bath for even, gentle baking. It’s key to preventing cracks.
Electric Mixer: Whether stand or hand-held, an electric mixer is vital for effortlessly achieving smooth cream cheese and whipping heavy cream to perfect, fluffy peaks.
Wire Rack: Allows your cheesecake to cool evenly on all sides, preventing condensation buildup on the bottom and ensuring a stable, beautiful dessert.
Crafting Your Flawless Chocolate Churro Cheesecake: A Step-by-Step Guide
Preheat & Pan Prep: Start by preheating your oven to 325 degrees F (160 degrees C). This precise, lower temperature is ideal for cheesecake, preventing rapid baking that can lead to cracks.
Crust Assembly: In a medium bowl, combine 1 ½ cups of chocolate cookie crumbs with ¼ cup of melted unsalted butter. Mix these thoroughly until the crumbs are evenly moistened. Press the mixture firmly and evenly into the bottom of a 9-inch springform pan to create a compact, stable crust.
Water Bath Wisdom (The First Key!): This step is paramount for a crack-free cheesecake. Tightly wrap the bottom and sides of your springform pan with a double layer of heavy-duty aluminum foil. This creates an impenetrable barrier, preventing any water from reaching your delicate crust and filling. Place the foil-wrapped pan inside a larger roasting pan, ready for the hot water.
Creating the Chocolate Base: In a microwave-safe bowl, combine ½ cup of semi-sweet chocolate chips and 2 tablespoons of heavy cream. Microwave in 30-second intervals, stirring well after each, until the chocolate is completely melted and smooth. Pour this luscious melted chocolate mixture over the prepared cookie crust, spreading it evenly. Transfer the pan to the refrigerator to chill while you prepare the filling, allowing the chocolate to set.
Whipping the Cream Cheese Dream: In a large bowl, using an electric mixer on medium speed, beat the 24 ounces of softened cream cheese until it is exceptionally smooth and creamy, about 2-3 minutes. Gradually add 1 cup of granulated sugar, beating until just combined, stopping to scrape down the sides of the bowl to ensure everything is incorporated evenly.
Gentle Egg Incorporation & Flavor Infusion: Add 3 large room-temperature eggs, one at a time, mixing on low speed only until each egg is just incorporated. Overmixing at this stage can introduce too much air, which leads to puffing and cracking during cooling. Stir in 1 teaspoon of vanilla extract and ½ cup of sour cream until the mixture is smooth. Again, be gentle and avoid overbeating.
The Grand Assembly & Water Bath Baking: Pour the cheesecake filling over the chilled chocolate layer in your springform pan. Carefully place the roasting pan, with the springform pan inside it, into your preheated oven. Now, pour hot water into the roasting pan until it reaches approximately halfway up the sides of the springform pan. Bake for 60-75 minutes, or until the edges are set and the center of the cheesecake still jiggles slightly when gently shaken.
The Patient Cool Down (The Second Key!): This crucial step prevents sudden temperature changes that cause cracks. Turn off the oven, but leave the cheesecake in the water bath inside the oven with the oven door ajar for 1 hour. This slow, gradual cooling allows the cheesecake to set without stress.
Unveiling Your Creation: After the slow cool-down, carefully remove the cheesecake from the oven and lift it out of the water bath and roasting pan. Gently remove the foil from the springform pan. Let the cheesecake cool completely on a wire rack at room temperature; patience here ensures optimal texture.
Chilling for Perfection: Once completely cooled, cover the Chocolate Churro Cheesecake with plastic wrap and refrigerate for at least 6 hours, or preferably overnight. This extended chilling period is vital for the cheesecake to fully set, firm up, and develop its rich, dense texture, making it easy to slice.
Whipping Up the Heavenly Topping: In a cold mixing bowl, using an electric mixer, whip 1 ½ cups of cold heavy cream with 3 tablespoons of powdered sugar until stiff peaks form. The cold bowl and cream are essential for achieving maximum volume and stability in your whipped topping.
Serving Your Masterpiece: Carefully run a thin, warm knife around the edge of the springform pan before releasing its sides. This prevents the cheesecake from sticking and ensures a clean release. Garnish each slice generously with the freshly whipped cream, a sprinkle of mini chocolate chips, elegant chocolate shavings, and, of course, the delightful mini churros for that irresistible crunch and flavor. Enjoy your perfectly crafted, crack-free dessert!
Chef’s Secrets for an Irresistible Chocolate Churro Cheesecake
Room Temperature Magic: Ensure all dairy ingredients, especially cream cheese and eggs, are at room temperature. This is crucial for a smooth, lump-free batter that incorporates easily, leading to a perfectly even texture and helping prevent cracks during baking.
The Art of Not Overmixing: When adding eggs and sour cream, mix only until just combined on low speed. Overmixing introduces too much air into the batter, which can cause the cheesecake to puff up significantly in the oven and then tragically crack as it cools.
Master the Water Bath: Don’t skip or skimp on the double-layered, heavy-duty foil and hot water. The gentle, moist heat of a water bath (bain-marie) helps the cheesecake bake evenly and slowly, preventing the edges from drying out and cracking, ensuring a uniform creamy texture.
The Gentle Cooling Process: The slow cooling period, first in the oven with the door ajar, and then on a wire rack, is as important as the water bath itself. It gradually brings down the temperature of the cheesecake, minimizing thermal shock that can lead to unsightly surface cracks.
Precision with Toppings: For the ultimate churro cheesecake experience, use fresh, crispy mini churros. Add them just before serving to maintain their delightful texture. For beautiful chocolate shavings, simply run a vegetable peeler along the edge of a good quality chocolate bar.
Troubleshooting Your Cheesecake: Common Hurdles & Solutions
Why Did My Cheesecake Crack?
Cracks are usually caused by overmixing the batter, overbaking the cheesecake, or experiencing sudden temperature changes during the cooling process. To prevent this, ensure all ingredients are at room temperature, mix minimally, always use a water bath, and allow for a slow, gentle cooling period inside the oven.
My Cheesecake is Soggy!
If your cheesecake has a soggy bottom or watery texture, it’s almost always due to water seeping into the springform pan during the water bath. The solution is to double-wrap your pan very tightly with heavy-duty aluminum foil, ensuring a completely impenetrable seal.
The Crust Won’t Hold Together
A crumbly crust usually indicates that there wasn’t quite enough melted butter to bind the cookie crumbs, or the mixture wasn’t pressed firmly enough into the pan. Ensure the crumbs are fully saturated with butter and compacted tightly before chilling.
Whipped Cream Not Stiffening
For perfectly stiff, stable whipped cream, it is essential that both the heavy cream and your mixing bowl (along with the beaters) are thoroughly chilled. Always use full-fat heavy cream, as lower-fat alternatives will not whip to the desired consistency.
Enhancing Your Experience: Serving & Storage Tips
Perfect Presentation: Garnish & Slicing Ideas
For an extra flourish that truly embraces the churro theme, consider dusting your Chocolate Churro Cheesecake with a light sprinkle of cinnamon-sugar alongside the chocolate chips and mini churros. A warm, homemade chocolate drizzle can also elevate the experience to gourmet levels. For impeccably clean slices, use a thin knife dipped in hot water and wiped clean between each cut.
Make-Ahead Mastery
This Chocolate Churro Cheesecake is an ideal dessert for preparing in advance, allowing you to relax on the day of serving. The cheesecake itself can be baked and thoroughly chilled up to 2-3 days before your event. Store it meticulously covered in the refrigerator. For the freshest texture, simply prepare the whipped cream topping just before you plan to serve.
Storing Leftovers Like a Pro
Any leftover cheesecake, covered tightly with plastic wrap or stored in an airtight container, will maintain its peak freshness and delicious flavor for 3-5 days in the refrigerator. For extended enjoyment, individual slices can be carefully wrapped and frozen for up to 1 month. Always thaw frozen slices in the refrigerator before serving to preserve their texture.
Your Chocolate Churro Cheesecake Questions Answered
Can I Make This Gluten-Free?
Yes! To effortlessly transform this Chocolate Churro Cheesecake into a gluten-free delight, simply substitute the chocolate cookie crumbs with a high-quality gluten-free chocolate cookie alternative. Always double-check that all other ingredients you use are certified gluten-free to avoid any cross-contamination.
What If I Don’t Have a Springform Pan?
While a springform pan offers unparalleled ease for releasing and presenting your cheesecake, you can certainly use a regular 9-inch round cake pan. To facilitate removal, line the pan with parchment paper, leaving an overhang on two opposite sides to create convenient “slings” for lifting. Be extra diligent with your foil wrapping for the water bath to prevent any leaks.
Can I Use Different Chocolate for the Layer?
Absolutely! The beauty of baking is in customization. While semi-sweet chocolate is specified for the chocolate layer, you can readily experiment. For a richer, more intense cocoa flavor, consider using dark chocolate. If you prefer a sweeter, creamier profile, milk chocolate would also work wonderfully. You might need to adjust the amount of heavy cream slightly if the consistency is too thick or too thin after melting.
How Long Does Cheesecake Last?
When properly stored, covered tightly in the refrigerator, this delightful Chocolate Churro Cheesecake will maintain its peak freshness and exquisite flavor for 3 to 5 days. For long-term enjoyment, it also freezes beautifully; individual slices can be wrapped and frozen for up to a month. For more tips on achieving the perfect, crack-free dessert every time, you might enjoy our article on Decadent Chocolate Chip Cheesecake (No Cracks!).
Ready to Impress? Share Your Chocolate Churro Cheesecake Masterpiece!
Armed with these expert techniques and a dash of enthusiasm, you’re now perfectly equipped to create a truly spectacular Chocolate Churro Cheesecake. Say goodbye to the frustration of cracks and hello to standing ovations and delighted smiles! We wholeheartedly encourage you to try this recipe, trust in the process, and revel in the satisfaction of producing a bakery-worthy dessert right in your own kitchen.
Don’t forget to share your stunning creations with our community online! We love seeing your baking triumphs, so tag us on social media and let us know how your flawless Chocolate Churro Cheesecake turned out. For more indulgent chocolate treats, consider trying our Delicious Raspberry Chocolate Coconut Truffles. Happy baking!
Churro Cheesecake
Course: DessertCuisine: AmericanDifficulty: medium12
servings30
minutes2
hours450
kcal480
minutesDiscover the secret to a flawless, crack-free cheesecake with this incredible Chocolate Churro Cheesecake recipe. Featuring a rich chocolate crust, creamy filling, and a fun churro garnish, it’s bakery-worthy perfection every time. Learn the simple water bath and cooling methods for a truly impressive dessert.
Ingredients
For the Crust:
1 ½ cups chocolate cookie crumbs
¼ cup unsalted butter, melted
For the Chocolate Layer:
½ cup semi-sweet chocolate chips
2 tablespoons heavy cream
For the Cheesecake Filling:
24 ounces (three 8-ounce blocks) cream cheese, softened to room temperature
1 cup granulated sugar
3 large eggs, room temperature
1 teaspoon vanilla extract
½ cup sour cream, room temperature
For the Topping:
1 ½ cups heavy whipping cream, cold
3 tablespoons powdered sugar
Mini chocolate chips, for sprinkling
Chocolate shavings, for sprinkling
Mini churros, for garnish
Directions
- Preheat your oven to 325 degrees F (160 degrees C).
- Prepare the crust: In a medium bowl, combine the chocolate cookie crumbs and melted butter until well mixed. Press the mixture firmly into the bottom of a 9-inch springform pan.
- Prepare for the water bath (the secret to no cracks!): Tightly wrap the bottom and sides of your springform pan with a double layer of heavy-duty aluminum foil. This prevents water from seeping in. Place the foil-wrapped springform pan inside a larger roasting pan.
- Make the chocolate layer: In a microwave-safe bowl, combine the chocolate chips and heavy cream. Microwave in 30-second intervals, stirring between each, until melted and smooth. Pour this melted chocolate mixture over the cookie crust in the springform pan and spread it evenly. Place the pan in the refrigerator while you prepare the filling.
- Prepare the cheesecake filling: In a large bowl, using an electric mixer on medium speed, beat the softened cream cheese until smooth and creamy. Gradually add the granulated sugar and beat until just combined, scraping down the sides of the bowl.
- Beat in the eggs one at a time, mixing on low speed only until each egg is just incorporated. Do not overmix, as too much air can cause cracks. Stir in the vanilla extract and sour cream until just smooth. Again, be gentle and do not overbeat.
- Assemble and bake: Pour the cheesecake filling over the chilled chocolate layer in the springform pan. Carefully place the roasting pan, with the springform pan inside, into the preheated oven. Pour hot water into the roasting pan until it reaches about halfway up the sides of the springform pan.
- Bake for 60-75 minutes, or until the edges are set and the center jiggles slightly when gently shaken.
- Cool the cheesecake (the second secret to no cracks!): Turn off the oven, but leave the cheesecake in the water bath inside the oven with the oven door ajar for 1 hour. This slow cooling prevents sudden temperature changes that can cause cracks.
- Remove the cheesecake from the water bath and the roasting pan. Carefully remove the foil from the springform pan. Let it cool completely on a wire rack at room temperature.
- Once cooled, cover the cheesecake with plastic wrap and refrigerate for at least 6 hours, or preferably overnight, until thoroughly chilled and set.
- Prepare toppings: In a cold bowl, whip the cold heavy cream and powdered sugar until stiff peaks form.
- To serve: Carefully run a thin knife around the edge of the pan before releasing the springform sides. Top each slice generously with whipped cream, mini chocolate chips, chocolate shavings, and mini churros for that extra special touch. Enjoy your perfect, crack-free cheesecake!
Notes
- The water bath and slow cooling are key to preventing cracks.