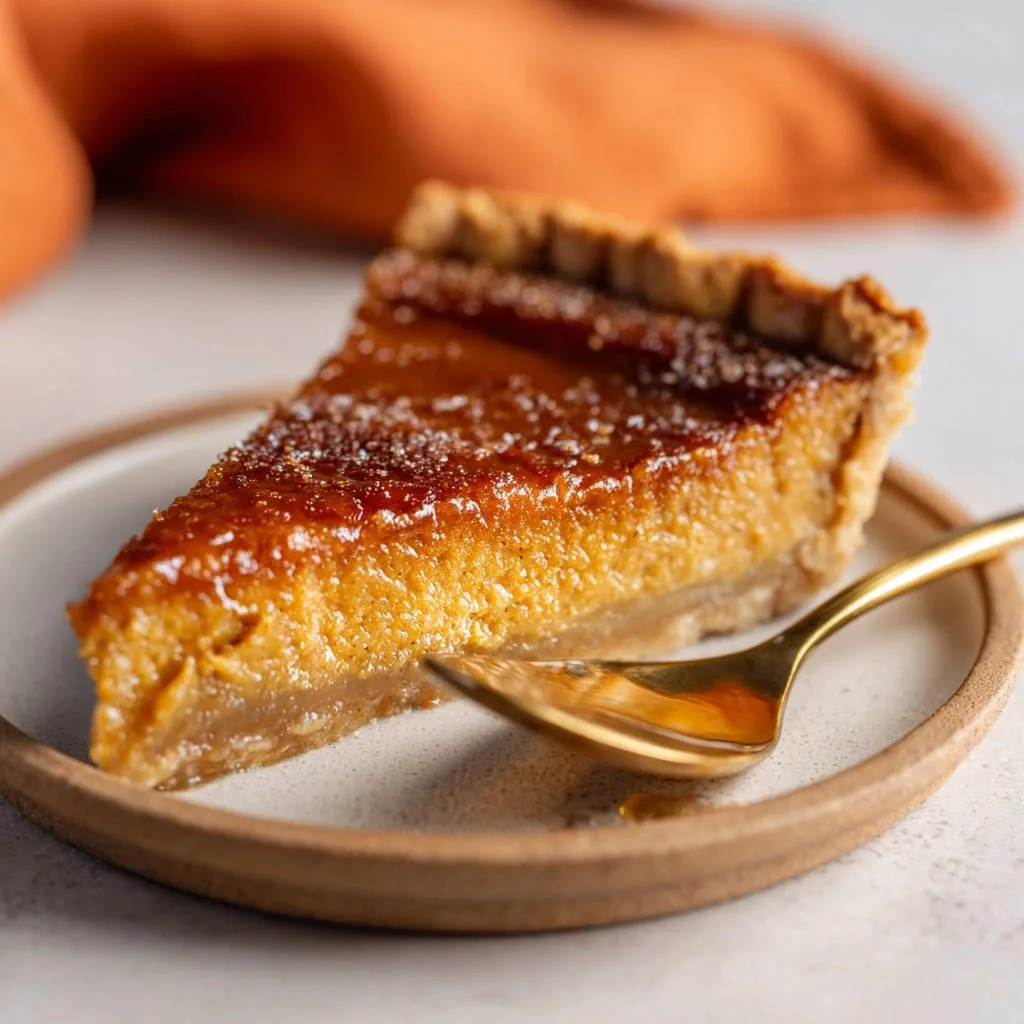
For years, the dream of a perfect Classic Sweet Potato Pie was often met with the disappointment of a soggy bottom crust. I understand that struggle completely! This recipe is my tried-and-true solution, guaranteeing a flaky, golden crust and a filling so smooth and rich, you’ll wonder why you ever settled for less.
This isn’t just another sweet potato pie recipe; it’s a masterclass in achieving that elusive, perfectly crisp base, ensuring every slice holds its integrity beautifully. Prepare to delight your family and friends with a dessert that truly stands apart.
For another way to enjoy sweet potatoes, check out this silky thyme butter sweet potato mash.
Why This Classic Sweet Potato Pie Stands Apart
The Unbeatable Crust Secret Revealed
The magic begins with our unique blind-baking method, employing a two-stage temperature approach. We start at a higher heat to quickly crisp the crust, then lower it for a gentle bake.
Crucially, after an initial bake with weights, we remove them and return the crust to the oven for a few minutes. This second stage seals the bottom, creating an impenetrable barrier against moisture from the creamy filling, forever banishing the dreaded soggy bottom.
Achieving that Irresistibly Smooth, Fluffy Filling
Our filling is a symphony of flavor and texture. By combining perfectly cooked, mashed sweet potatoes with melted butter, a thoughtful blend of granulated and brown sugars, and just the right dairy and egg ratio, we create a filling that is incredibly smooth, delightfully fluffy, and never dense.
The balance of spices enhances the sweet potato’s natural earthiness without overwhelming it, resulting in a comforting, aromatic experience in every bite.
Effortless Elegance for Any Occasion
Despite its impressive appearance and gourmet taste, this homemade sweet potato pie is surprisingly straightforward to prepare. It’s a reliable recipe that delivers show-stopping results with minimal fuss.
Whether it’s the centerpiece of your holiday dessert table or a comforting treat on a quiet evening, this pie brings a touch of effortless elegance to any occasion, truly embodying the spirit of a cherished holiday pie.
The Heart of the Harvest: Ingredients You’ll Need
The Foundation: Sweet Potatoes and Their Preparation
Sweet Potatoes: Choose medium-sized, firm sweet potatoes with smooth skin. Varieties like Beauregard or Jewel are ideal for their vibrant orange color and naturally sweet, moist flesh.
Proper Cooking & Mashing: Cook sweet potatoes until fork-tender. Roasting them whole (pierced) in their skins often yields a richer, more concentrated flavor than boiling, as it prevents waterlogging. Ensure they are mashed until absolutely smooth, with no lumps, for that silky filling texture.
Sweetness & Structure: Sugars, Dairy, and Eggs
Granulated Sugar: Provides the foundational sweetness for our Classic Sweet Potato Pie, ensuring a perfectly balanced taste.
Packed Light Brown Sugar: Adds depth of flavor with its subtle molasses notes, contributing to the pie’s rich, comforting profile.
Unsalted Butter, Melted: Incorporates richness and a luxurious mouthfeel into the filling.
Evaporated Milk or Whole Milk: Evaporated milk provides a creamy, concentrated dairy flavor that helps the pie set beautifully. Whole milk can be used for a slightly lighter result.
Large Eggs: Essential for binding the filling ingredients together, giving the pie its characteristic custardy texture and ensuring it sets properly when baked.
Aromatic Embrace: Spices for Warmth and Depth
Ground Cinnamon: A warm, sweet spice that forms the cornerstone of the pie’s classic flavor profile.
Ground Nutmeg: Offers a warm, slightly nutty aroma that perfectly complements the sweet potato and cinnamon.
Ground Ginger: Adds a subtle, zesty warmth that brightens the overall spice blend without being overpowering.
Pinch of Salt: A crucial ingredient that balances the sweetness and enhances all the aromatic spices, making their flavors truly sing.
Crust Choices: Mastering Your Base
9-inch Unbaked Pie Crust: The choice between a store-bought crust for convenience or a homemade pie crust for bespoke flavor is yours. Regardless, ensure it’s a good quality base for our “no soggy bottom” method.
Flour, for Dusting: Used to prevent sticking when handling or rolling out your pie dough, particularly important for blind baking.
Pie Weights or Dried Beans: Essential for blind baking, these prevent the crust from puffing up and shrinking during the initial bake, ensuring a perfectly shaped base.
Setting Up for Success: Essential Pie-Making Tools
Kitchen Must-Haves for a Perfect Bake
9-inch Pie Dish: The standard size for this recipe, ensuring even baking and beautiful presentation.
Large Mixing Bowl: Necessary for comfortably combining and whisking all the filling ingredients.
Whisk: Ideal for ensuring the filling is perfectly smooth and lump-free.
Measuring Cups & Spoons: For accurate ingredient proportions, which is key to a perfectly balanced sweet potato pie recipe.
Potato Masher or Fork: For mashing the cooked sweet potatoes until smooth.
Parchment Paper or Aluminum Foil: Used to line the pie crust during blind baking, preventing direct contact with pie weights.
Pie Weights or Dried Beans: Crucial for weighing down the crust during blind baking, preventing bubbles and shrinkage.
Wire Rack: For cooling the pie completely, allowing air circulation which is vital for the filling to set properly.
Optional Aids for a Smoother Process
Electric Mixer (Handheld or Stand): While a whisk works, an electric mixer can make quick work of creaming the filling ingredients for an even smoother consistency.
Food Processor: Can be used to make exceptionally smooth mashed sweet potatoes with minimal effort.
Pie Crust Shield: A handy tool that protects the edges of your pie crust from over-browning during the longer bake time, ensuring a uniformly golden crust.
Your Path to Perfection: A Step-by-Step Guide
Phase 1: Conquering the Crust (The No-Soggy Secret)
- Preheat Oven & Prep Crust:
Preheat your oven to a robust 400 degrees F (200 degrees C). This initial higher temperature is absolutely critical for the success of our “no soggy bottom” method.
Carefully unroll your pie crust onto a lightly floured surface if store-bought, or roll out your homemade dough. Gently fit it into your 9-inch pie dish, then trim and crimp the edges as desired for a beautiful finish.
- First Blind Bake with Weights:
Line the unbaked pie crust with parchment paper or aluminum foil, making sure it extends over the edges to protect them from excessive browning. Fill this liner completely with pie weights or dried beans; this prevents the crust from puffing up and shrinking.
Bake for 15 minutes. This initial bake sets the crust structure and begins the drying process.
- The Anti-Soggy Finish (Crucial Step!):
Carefully remove the pie weights and the parchment/foil liner. This exposes the partially baked crust bottom.
Using a fork, prick the bottom of the crust all over. This allows steam to escape during the final blind bake. Return the crust to the oven and bake for another 5-7 minutes, or until the bottom appears lightly golden and dry to the touch. This step is the game-changer, creating a crucial barrier that prevents moisture from the filling from seeping in.
Once dry, remove the crust from the oven and immediately reduce the oven temperature to 350 degrees F (175 degrees C). The crust is now ready for your luscious filling.
Phase 2: Crafting the Silky Sweet Potato Filling
- Prepare the Filling Mixture:
In a large mixing bowl, combine the cooked and mashed sweet potato, melted butter, granulated sugar, packed light brown sugar, evaporated milk (or whole milk), large eggs, vanilla extract, ground cinnamon, ground nutmeg, ground ginger, and the pinch of salt.
- Whisk Until Smooth:
Using a whisk, beat the mixture until it is completely smooth and well combined. Ensure there are no lumps of sweet potato remaining. This dedication to smoothness guarantees a luxurious, uniform texture in your fluffy sweet potato filling.
Phase 3: The Bake: Achieving Golden-Brown Glory
- Fill and Prepare for Baking:
Pour the prepared sweet potato filling into your warm, pre-baked pie crust. Gently tap the pie dish on the counter a few times to release any trapped air bubbles, ensuring an even bake and a smooth surface.
- Bake to Perfection:
Carefully place the pie into your preheated 350 degrees F (175 degrees C) oven. Bake for approximately 50-60 minutes.
The pie is done when the edges are set, and the center still has a slight jiggle when gently nudged. A knife inserted near the center should come out clean, indicating the filling is fully cooked. Avoid overbaking, as this can lead to cracks.
Phase 4: The Crucial Cooling Stage
- Cool Completely:
Once baked, carefully remove the pie from the oven and immediately place it on a wire rack to cool completely. This crucial step allows the filling to continue setting and firming up properly, ensuring clean, beautiful slices.
Resist the urge to slice warm pie; patience here is key for the best texture and appearance.
Unlock Pro Secrets: Elevate Your Sweet Potato Pie
- Don’t Skimp on Cooling Time:
Proper cooling is perhaps the most overlooked step. Allowing your Classic Sweet Potato Pie to cool completely, ideally for several hours or even overnight, ensures the filling fully sets. This results in a firm, sliceable pie with a custardy texture and prevents crumbling.
- Selecting the Sweetest Potatoes:
For the richest flavor, seek out sweet potato varieties like Beauregard, Jewel, or Garnet, known for their natural sweetness and creamy texture. Roasting your sweet potatoes in their skin (pierced) instead of boiling concentrates their flavor, reducing excess moisture and intensifying their natural sugars.
- Tailoring Your Spice Profile:
While cinnamon, nutmeg, and ginger are classic, feel free to experiment. A touch of allspice or a pinch of ground cloves can add an extra layer of warmth. For a bolder flavor, consider a tiny hint of black pepper or a splash of orange zest to brighten the filling.
- Cracking the Code: Preventing Surface Imperfections:
Cracks often occur from overbaking or sudden temperature changes. To prevent them, remove the pie from the oven when the center still has a slight jiggle. Immediately transfer it to a wire rack for gradual cooling. If edges brown too quickly, tent them with foil.
Common Pie Problems Solved: Troubleshooting Your Bake
Why is My Crust Still Soggy?
A soggy bottom crust typically indicates insufficient blind baking. Ensure you’ve completed both stages: initial bake with weights, and then the crucial second bake without weights to dry and seal the bottom. Overly wet filling, if not properly whisked or with too much liquid, can also contribute to a less crisp pie crust.
Filling Consistency Issues: Too Runny or Too Firm?
If your filling is too runny, it’s likely underbaked. Continue baking in 5-minute increments until a knife inserted comes out clean and the center has only a slight jiggle. If it’s too firm or dense, you may have overbaked it or used sweet potatoes that weren’t thoroughly mashed, leading to a less custardy texture.
Avoiding Unsightly Cracks
The most common culprit for cracks is overbaking. The filling continues to cook and set as it cools, so removing it while it still has a slight jiggle ensures it doesn’t dry out. Additionally, sudden temperature changes during cooling (e.g., placing a hot pie directly into a cold refrigerator) can cause cracking; always cool on a wire rack at room temperature first.
Edges Too Dark? Burn Prevention Tips
If the edges of your Classic Sweet Potato Pie are browning too quickly, loosely cover them with strips of aluminum foil or use a dedicated pie crust shield for the last 20-30 minutes of baking. This protects the delicate crust from over-browning while the filling finishes cooking.
Your Pressing Questions Answered: Classic Sweet Potato Pie FAQs
Can I use canned sweet potatoes?
Yes, you can use canned sweet potatoes, but ensure they are thoroughly drained and mashed very smoothly. Canned varieties can sometimes be sweeter or moister than fresh, so you might consider slightly reducing the sugar or increasing the spices to maintain balance. Just remember, fresh roasted sweet potatoes will always yield the best, most authentic flavor for your homemade sweet potato pie.
Make-Ahead Marvel: How Far in Advance?
This Classic Sweet Potato Pie is an excellent make-ahead dessert! You can bake it up to 2-3 days in advance. Once completely cooled, cover it tightly with plastic wrap and store it in the refrigerator. This allows the flavors to meld beautifully, making it even more delicious.
Best Practices for Storage and Leftovers
To keep your baked pie fresh, cover it tightly with plastic wrap or aluminum foil and refrigerate for up to 3-4 days. For optimal taste and texture, bring slices to room temperature before serving, or gently warm them in the microwave for a few seconds.
If you enjoy a variety of rich desserts, you might find our Decadent Rich Chocolate Pie and Perfect Cheesecake also hold up wonderfully when stored properly.
Adapting for Dietary Needs: Dairy-Free & Gluten-Free?
To make this recipe dairy-free, substitute unsalted butter with a high-quality vegan butter and evaporated/whole milk with an unsweetened, full-fat dairy-free milk alternative like oat or almond milk. For a gluten-free version, simply use your favorite store-bought or homemade gluten-free pie crust, ensuring it’s designed for blind baking.
Serving & Savoring: The Perfect Presentation
Decadent Toppings and Garnishes
Freshly Whipped Cream: A dollop of lightly sweetened whipped cream is the quintessential topping, providing a light, airy contrast to the rich filling.
Toasted Marshmallows: For a delightful, gooey sweetness, top slices with mini marshmallows and lightly torch them or broil for a minute until golden.
Candied Pecans: A sprinkle of crunchy, sweet-and-salty candied pecans adds texture and a complementary nutty flavor.
Dusting of Spices: A final dusting of ground cinnamon or nutmeg can enhance the pie’s aromatic appeal.
Complementary Sides and Beverages
Hot Coffee or Spiced Tea: A warm beverage pairs beautifully with the comforting flavors of the pie, especially during cooler months.
Vanilla Bean Ice Cream: A scoop of creamy vanilla bean ice cream melting into a warm slice of pie is pure bliss.
Fruit Compote: A tart berry or apple compote can offer a lovely counterpoint to the pie’s sweetness.
Planning Ahead: Storage & Freezing Solutions
Pre-Bake Prep: What Can Be Done Ahead?
Sweet Potatoes: You can cook and mash your sweet potatoes up to 2 days in advance. Store them in an airtight container in the refrigerator.
Pie Crust: If making your own pie dough, it can be prepared 1-2 days ahead. The blind-baked crust can also be baked a day in advance, cooled completely, and stored loosely covered at room temperature.
Maintaining Freshness: Storing Your Baked Pie
Once your Classic Sweet Potato Pie has cooled completely, cover it loosely with plastic wrap or aluminum foil. Store it in the refrigerator for up to 3-4 days. This keeps the filling fresh and prevents the crust from becoming soggy.
Freezing for Future Feasts
Freezing Whole Pie: For long-term storage, allow the baked pie to cool completely. Wrap it tightly in several layers of plastic wrap, then a layer of aluminum foil. Freeze for up to 2-3 months.
Freezing Slices: Individual slices can also be frozen by wrapping them in plastic wrap and foil. To thaw, unwrap and place in the refrigerator overnight. You can gently rewarm slices in a low oven (300°F/150°C) for about 10-15 minutes if desired.
Ready to Bake Your Best Classic Sweet Potato Pie Yet?
With these expert tips and a foolproof method for a perfectly crisp crust, you’re now equipped to bake the most incredible Classic Sweet Potato Pie. This recipe isn’t just about a dessert; it’s about creating a comforting, memorable experience.
Dive in, trust the process, and prepare to be amazed by the rich, smooth filling and the satisfying crunch of that flawless crust. Don’t forget to explore our other decadent dessert recipes to further expand your baking repertoire!
Sweet Potato Pie
Course: DessertCuisine: AmericanDifficulty: medium8
servings25
minutes1
hour15
minutes450
kcal60
minutesSay goodbye to soggy bottoms! This Classic Sweet Potato Pie recipe guides you to a perfectly crisp crust and a delightfully set filling every time. A guaranteed homemade favorite.
Ingredients
1 9-inch unbaked pie crust (store-bought or homemade)
2 cups cooked and mashed sweet potato (about 2 medium sweet potatoes)
1/2 cup unsalted butter, melted
1 cup granulated sugar
1/2 cup packed light brown sugar
1/2 cup evaporated milk or whole milk
2 large eggs
1 teaspoon vanilla extract
1 teaspoon ground cinnamon
1/2 teaspoon ground nutmeg
1/4 teaspoon ground ginger
Pinch of salt
Flour, for dusting (for blind baking)
Pie weights or dried beans (for blind baking)
Directions
- Prepare for the Pain Point Fix: Preheat your oven to 400 degrees F (200 degrees C). This higher initial temperature is key for getting that crust crisp.
- Blind Bake the Crust: On a lightly floured surface, unroll your pie crust if it’s store-bought, or roll out your homemade dough. Carefully fit it into a 9-inch pie dish. Trim and crimp the edges as desired. Line the unbaked pie crust with parchment paper or aluminum foil, making sure it covers the edges to prevent burning. Fill the liner with pie weights or dried beans. Bake for 15 minutes.
- The Anti-Soggy Bottom Continued: Carefully remove the pie weights and parchment/foil. Prick the bottom of the crust all over with a fork. Return the crust to the oven and bake for another 5-7 minutes, or until the bottom is lightly golden and appears dry. This step creates a barrier against the wet filling. Remove from oven and reduce oven temperature to 350 degrees F (175 degrees C).
- Prepare the Filling: In a large bowl, combine the mashed sweet potato, melted butter, granulated sugar, brown sugar, evaporated milk, eggs, vanilla extract, cinnamon, nutmeg, ginger, and salt. Whisk until the mixture is smooth and well combined.
- Fill and Bake: Pour the sweet potato filling into the pre-baked pie crust. Gently tap the pie dish on the counter a few times to release any air bubbles.
- Bake for 50-60 minutes, or until the center is mostly set with a slight jiggle. A knife inserted near the center should come out clean.
- Cooling: Carefully remove the pie from the oven and place it on a wire rack to cool completely before slicing. This allows the filling to set fully and contributes to a perfectly firm slice.
Notes
- Blind baking the crust is essential for preventing a soggy bottom and achieving a perfectly crisp crust.