
I remember a time when achieving truly crispy skin on chicken thighs felt like a culinary unicorn – always elusive, often resulting in rubbery disappointment or dry meat. That struggle led me on a mission to perfect the technique, and I’m thrilled to share my secret for the most incredible Creamy Skillet Chicken Thighs.
This recipe transforms a humble cut into a show-stopping meal, boasting irresistibly golden, crunchy skin and unbelievably tender, juicy meat, all bathed in a rich, velvety sauce. It’s the ultimate weeknight indulgence that feels gourmet yet comes together with remarkable ease.
Why This Creamy Skillet Chicken Thighs Recipe Will Be Your Go-To
The Guaranteed Secret: Crispy Skin, Tender Meat
This recipe tackles the two most common chicken thigh challenges head-on. We employ specific techniques to render the fat under the skin, ensuring every bite delivers that satisfying crunch.
Simultaneously, the method locks in moisture, preventing the meat from drying out. You’ll consistently achieve perfectly cooked chicken that’s both flavorful and succulent.
Speed & Simplicity for Busy Evenings
Forget complicated processes or endless clean-up. Everything happens in one skillet, making this an ideal solution for a delicious dinner even on the busiest of nights.
From prep to plate, you’re looking at under 30 minutes of active cooking, proving that extraordinary flavor doesn’t have to demand hours in the kitchen.
A Sauce So Irresistible, You’ll Want to Drink It
The velvety cream sauce is a flavor powerhouse. It’s built on the browned bits left in the pan after searing the chicken, capturing all that delicious caramelized essence.
Infused with garlic and fresh thyme, this sauce beautifully complements the rich chicken, tying the entire dish together with a luscious finish.
Assembling Your Ingredients: The Heart of the Dish
The Foundation: Bone-In, Skin-On Chicken Thighs
We specifically choose bone-in, skin-on chicken thighs for a reason. The bone adds incredible depth of flavor to the meat as it cooks.
The skin is absolutely essential for achieving that prized, golden crispness. It protects the meat and renders delicious fat into the pan, which becomes the foundation for our sauce.
If you’re enjoying the crispy skin on these thighs, you’ll want to see how it’s done in creamy sun-dried tomato chicken thighs.
Elevating Flavor: Garlic, Thyme, & Unsalted Butter
Minced garlic provides an aromatic backbone, infusing the sauce with its pungent, savory notes. Fresh thyme contributes a wonderful herbaceous, earthy fragrance that pairs perfectly with chicken.
Unsalted butter is crucial for sautéing the aromatics and enriching the sauce, allowing you to control the overall saltiness of the dish precisely.
The Creamy Elixir: Chicken Broth & Heavy Cream
Good quality chicken broth forms the flavorful base of our sauce, helping to deglaze the pan and incorporate all the delicious fond. Choose a low-sodium option to adjust seasoning to your taste.
Heavy cream is what gives our sauce its signature richness and luxurious, velvety texture. It transforms the pan drippings into an indulgent, cohesive sauce.
Pantry Staples: Olive Oil, Salt, and Freshly Ground Pepper
Olive oil is used for searing, contributing to a beautiful crust. Both salt and freshly ground black pepper are fundamental for seasoning the chicken and balancing the flavors in the sauce.
Don’t underestimate the impact of good quality, fresh pepper; it makes a noticeable difference.
Essential Tools for Your Skillet Chicken Adventure
Choosing the Best Skillet for the Job
A large, heavy-bottomed skillet is non-negotiable for this recipe. Cast iron is my absolute favorite, as it retains and distributes heat incredibly well, leading to superior searing and crispy skin.
Heavy-bottomed stainless steel skillets also work wonderfully. The key is even heat distribution and enough surface area to avoid overcrowding the chicken.
Key Kitchen Gadgets for Precision and Ease
Tongs: Essential for safely flipping the chicken and handling it in the hot pan. Long-handled tongs provide the best control.
Meat Thermometer: Your best friend for ensuring perfectly cooked, juicy chicken every time. A digital instant-read thermometer is highly recommended.
Paper Towels: Absolutely critical for patting the chicken thighs dry. This is a small step with a huge impact on skin crispness.
Your Step-by-Step Journey to Creamy Skillet Chicken Thighs Perfection
The Critical First Step: Preparing the Chicken
Start by patting each chicken thigh super dry with paper towels. This step is non-negotiable; excess moisture prevents the skin from crisping, leading to a rubbery texture instead of a golden crunch.
Season both sides generously with salt and freshly ground black pepper. This builds flavor from the inside out and helps create a delicious crust.
Achieving the Golden Sear: Patience is Key
Heat the olive oil in your large, heavy-bottomed skillet over medium-high heat until it shimmers, indicating it’s hot enough. Carefully place the chicken thighs skin-side down in the hot skillet.
Do not overcrowd the pan; cook in batches if necessary. Allow the chicken to sear undisturbed for 8 to 10 minutes. Resist the urge to move or flip them! This allows the skin to render its fat, develop a deep golden brown color, and become incredibly crispy.
Finishing the Chicken: Internal Temperature Matters
Once the skin is perfectly crispy and golden, flip the chicken thighs. Cook on the other side for another 5 to 7 minutes, or until the internal temperature reaches 165°F (74°C) when measured with a meat thermometer in the thickest part of the thigh, away from the bone.
Remove the cooked chicken from the skillet and set it aside on a plate, tenting loosely with foil to keep it warm while you prepare the sauce. This resting period also allows the juices to redistribute.
Building the Flavorful Sauce Base
Reduce the heat to medium. Add the unsalted butter to the skillet, letting it melt. Once melted, add the minced garlic and cook for about 30 seconds, stirring constantly, until it becomes fragrant. Be careful not to burn the garlic.
The Velvety Cream Sauce: Simmer and Thicken
Pour in the chicken broth, making sure to scrape up any delicious browned bits (fond) from the bottom of the pan with a wooden spoon. This deglazing step is crucial for incorporating all the caramelized flavor into your sauce.
Bring the mixture to a gentle simmer, then stir in the heavy cream. Season the sauce with additional salt and pepper to taste. Let it simmer gently for 3 to 5 minutes, stirring occasionally, until the sauce thickens slightly to your desired consistency.
Bringing It All Together: A Harmonious Finish
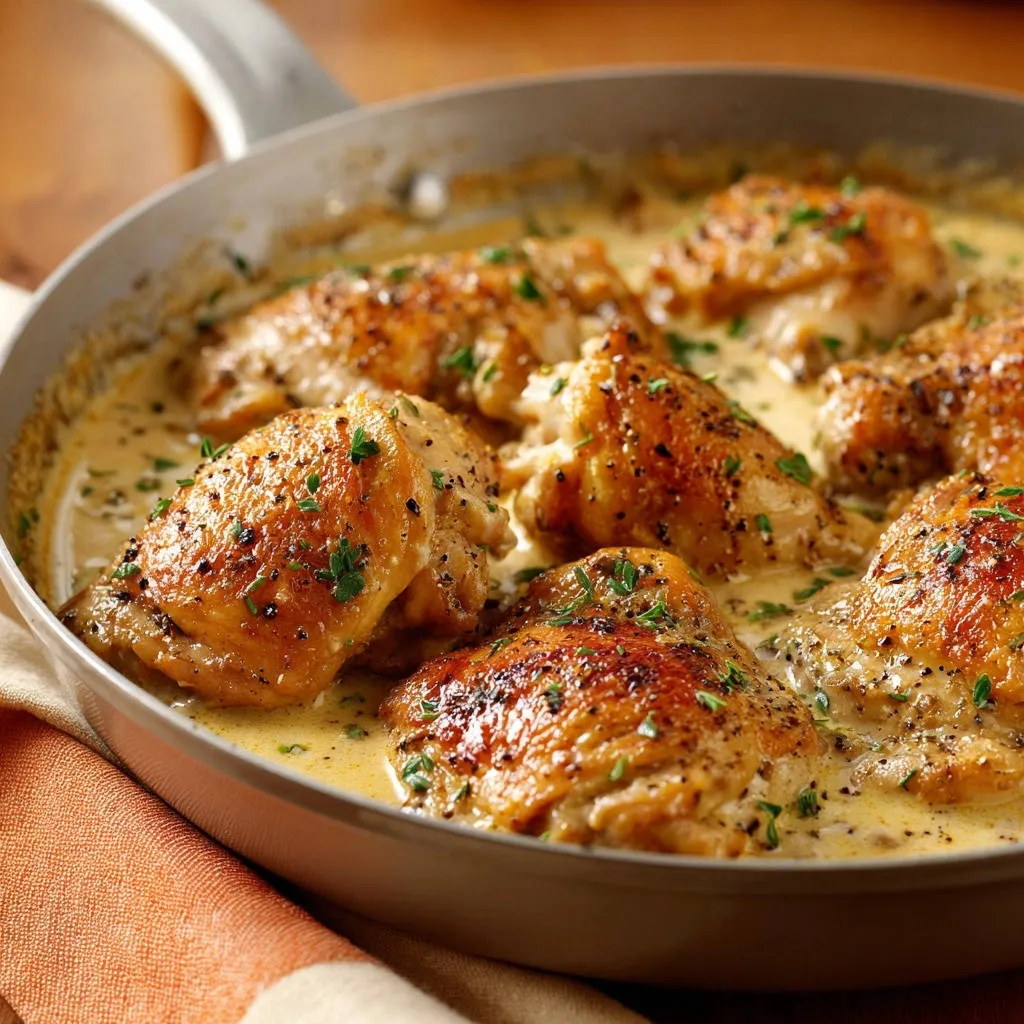
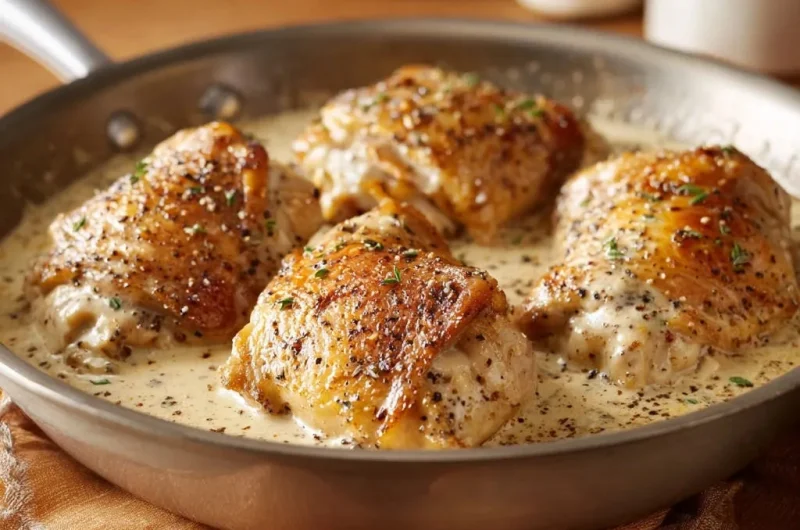
Return the cooked Creamy Skillet Chicken Thighs to the skillet, nestling them into the luscious, creamy sauce. This allows the chicken to warm through and absorb more of that wonderful flavor.
For a deeper dive into that velvety sauce, check out creamy garlic skillet chicken.
Garnish generously with fresh thyme leaves for a final aromatic flourish and a pop of color. Serve immediately and prepare for rave reviews!
Unlocking Max Flavor: Expert Tips & Tricks
The Power of a Dry Thigh: Your Crispy Skin Secret
Seriously, this cannot be overstated. Moisture is the enemy of crispy skin. By thoroughly patting the chicken dry, you allow the skin to directly contact the hot pan and get golden brown, rather than steaming.
For an even crisper result, you can refrigerate the seasoned, uncovered chicken for an hour or two (or even overnight). This further dries out the skin.
Resist the Urge to Flip Too Soon
That initial 8-10 minute sear, undisturbed, is where the magic happens. The skin needs time to render its fat and develop a deep, rich crust. Moving it prematurely prevents this browning.
Trust the process; the chicken will release easily from the pan when it’s ready to flip.
Don’t Forget to Deglaze! Unlocking Deep Flavor
Those browned bits stuck to the bottom of your pan after searing the chicken are pure gold. Deglazing with chicken broth scrapes them up, dissolving them into the sauce and adding layers of complex flavor.
It’s a simple step that significantly elevates the taste of your velvety cream sauce.
When to Trust Your Thermometer (And How to Use It)
While visual cues are helpful, a meat thermometer is your ultimate guarantee against dry chicken. Insert it into the thickest part of the thigh, ensuring it doesn’t touch the bone, to get an accurate reading.
Cooking to exactly 165°F (74°C) ensures your chicken is perfectly juicy and safe to eat, without overcooking.
The Magic of Fresh Herbs: Garnish Beyond Looks
Fresh thyme isn’t just for decoration; it adds a burst of fresh, earthy aroma and flavor that brightens the entire dish. Stirring some into the sauce at the very end or just before serving can also heighten its impact.
Consider a sprinkle of fresh parsley or chives for additional brightness if you don’t have thyme.
Solving Common Challenges: Troubleshooting Your Skillet Chicken
Why Is My Chicken Skin Not Crispy?
The most common culprit is insufficient drying. Ensure you pat the chicken thighs thoroughly dry with paper towels before seasoning. Don’t rush this step!
Another reason could be that your pan wasn’t hot enough, or you overcrowded the skillet, which lowers the temperature and steams the chicken instead of searing it. Cook in batches if needed.
My Chicken Is Dry! What Went Wrong?
Dry chicken usually means it’s been overcooked. Always use a meat thermometer and aim for exactly 165°F (74°C) in the thickest part.
Remember that the chicken will continue to cook slightly after being removed from the heat (carryover cooking), so taking it off right at 165°F is ideal.
Sauce Consistency: Too Runny or Too Thick?
If your sauce is too runny, simply simmer it for a few more minutes, stirring occasionally, to allow more liquid to evaporate and thicken. If it’s too thick, add a splash more chicken broth or water until it reaches your desired consistency.
For a quick fix for a thin sauce, you can create a cornstarch slurry (1 tsp cornstarch mixed with 1 tsp cold water) and whisk it into the simmering sauce, cooking for 1-2 minutes until thickened.
Needs More Flavor? Quick Fixes and Enhancements.
Taste your sauce! It might just need a bit more salt and freshly ground pepper. A squeeze of fresh lemon juice at the end can brighten all the flavors beautifully.
Consider adding a pinch of onion powder or a dash of smoked paprika to the chicken seasoning for extra depth. For an even richer sauce, try a touch of Dijon mustard.
Beyond the Pan: Serving & Pairing Suggestions
Classic Comfort Sides That Complement
These Creamy Skillet Chicken Thighs pair wonderfully with classic comfort foods. Creamy mashed potatoes are a natural fit, soaking up every drop of that delicious sauce.
Complementary Recipes
To round out your meal with these creamy skillet chicken thighs, consider these dishes that pair well with chicken.
- For a fresh and flavorful addition, try the Garlic Herb Grilled Chicken Salad, featuring bright herbs that complement the chicken’s richness.
- If you’re craving something warm and comforting, these Garlic Cheddar Chive Drop Biscuits offer a savory bite that’s perfect alongside tender chicken.
Fluffy white rice or a simple egg noodle pasta also make excellent canvases for the rich flavors of the dish.
Lighten It Up: Fresh & Healthy Veggie Pairings
For a lighter meal, consider serving alongside vibrant, crisp vegetables. Steamed green beans or roasted asparagus provide a lovely contrast in texture and freshness.
A simple side salad with a tangy vinaigrette would also cut through the richness beautifully, offering a refreshing counterpoint.
Consider pairing with a delicious side like crispy roasted cauliflower for a healthy and satisfying addition.
What to Drink With Creamy Skillet Chicken Thighs
For wine lovers, a crisp Chardonnay or a light-bodied Pinot Grigio would complement the creamy sauce without overpowering the chicken. Their acidity helps balance the richness.
If you prefer non-alcoholic options, sparkling water with a lemon twist or a light, unsweetened iced tea are refreshing choices.
Planning Ahead: Storage & Make-Ahead Tips
Safely Storing Leftovers for Maximum Freshness
Allow any leftover Creamy Skillet Chicken Thighs to cool completely before storing. Transfer both the chicken and the sauce to an airtight container.
Refrigerate promptly for up to 3-4 days. This ensures your delicious meal stays fresh and safe to enjoy.
Reheating for Best Results (Without Losing Crispness)
To best preserve some of that crispy skin, reheat the chicken in a skillet over medium-low heat until warmed through, then add the sauce to gently simmer around it. For extra crispness, you can remove the chicken from the sauce and place it under a broiler for a few minutes after reheating.
Alternatively, reheat gently in the microwave, though the skin will soften. Ensure the chicken and sauce are heated to an internal temperature of 165°F (74°C).
Can You Prepare This Dish in Advance?
While best enjoyed fresh for peak crispness, you can certainly prep elements ahead. The chicken can be seasoned a day in advance and stored in the refrigerator, uncovered, to further dry the skin.
The garlic can be minced, and thyme chopped, ready to go. The full dish is quick enough that it doesn’t typically require extensive make-ahead steps.
Your Burning Questions Answered: FAQ
Can I use boneless, skinless chicken thighs for this recipe?
Yes, you can, but adjust cooking times accordingly. Boneless, skinless thighs will cook faster, likely needing only 4-6 minutes per side. You won’t achieve the crispy skin, but the flavor will still be delicious.
For a similar but boneless version, you might enjoy our creamy chicken and orzo recipe, which offers a different texture profile.
What are dairy-free cream alternatives for the sauce?
For a dairy-free version, full-fat coconut milk or cashew cream are excellent substitutes for heavy cream. They will provide a similar richness and velvety texture, though they may impart a subtle flavor note.
Ensure you use full-fat options for the best consistency and to avoid a watery sauce.
Is a cast iron skillet essential for achieving that crispy skin?
While cast iron is highly recommended due to its superior heat retention and distribution, a heavy-bottomed stainless steel skillet will also work effectively. The key is to use a pan that holds heat well and has enough space.
Avoid thin-bottomed pans, as they can create hot spots and uneven searing.
How do I ensure the chicken cooks evenly throughout?
Ensure your chicken thighs are of relatively uniform size. If some are significantly thicker than others, they may cook unevenly. Proper searing on medium-high heat is also vital.
Always use an instant-read meat thermometer to verify the internal temperature of each thigh, inserting it into the thickest part for accuracy.
Ready to Delight? Share Your Culinary Creation!
There’s nothing quite like the satisfaction of serving a dish that truly impresses, and these Creamy Skillet Chicken Thighs are designed to do just that. With golden, crispy skin and a rich, luscious sauce, it’s a meal that promises comfort and gourmet flair in every bite.
I encourage you to try this easy skillet recipe tonight and experience the magic for yourself. Don’t forget to share your culinary triumph in the comments below or tag me on social media – I love seeing your delicious creations!
Skillet Chicken Thighs
Course: Main CourseCuisine: AmericanDifficulty: easy4
servings10
minutes25
minutes450
kcal35
minutesCrack the code to perfectly golden, crispy skin and incredibly juicy chicken with this creamy skillet recipe. It’s designed to make pan-seared chicken thighs a delicious, stress-free weeknight favorite.
Ingredients
4 bone-in, skin-on chicken thighs
1 tablespoon olive oil
1 teaspoon salt, plus more to taste
1 teaspoon black pepper, freshly ground, plus more to taste
1/2 cup chicken broth
1/2 cup heavy cream
2 cloves garlic, minced
1 tablespoon unsalted butter
1 teaspoon fresh thyme leaves, chopped, for garnish
Directions
- Prepare the chicken: Pat each chicken thigh super dry with paper towels. This step is absolutely critical for crispy skin. Season both sides generously with salt and freshly ground black pepper.
- Sear the chicken: Heat the olive oil in a large, heavy-bottomed skillet (like cast iron or stainless steel) over medium-high heat until it shimmers. Carefully place the chicken thighs skin-side down in the hot skillet. Do not overcrowd the pan; cook in batches if necessary.
- Crisp the skin: Allow the chicken to sear undisturbed for 8 to 10 minutes. Resist the urge to move or flip them! This allows the skin to render its fat and become deeply golden brown and incredibly crispy.
- Finish cooking chicken: Flip the chicken thighs and cook on the other side for another 5 to 7 minutes, or until the internal temperature reaches 165°F. Remove the chicken from the skillet and set aside on a plate, keeping it warm.
- Make the sauce base: Reduce the heat to medium. Add the unsalted butter to the skillet. Once melted, add the minced garlic and cook for about 30 seconds until fragrant.
- Build the creamy sauce: Pour in the chicken broth, scraping up any delicious browned bits from the bottom of the pan with a wooden spoon. Bring the mixture to a gentle simmer.
- Thicken the sauce: Stir in the heavy cream. Season the sauce with additional salt and pepper to taste. Let it simmer gently for 3 to 5 minutes, stirring occasionally, until the sauce thickens slightly to your desired consistency.
- Combine and serve: Return the cooked chicken thighs to the skillet, nestling them into the creamy sauce. Garnish with fresh thyme leaves and serve immediately.
Notes
- Patting chicken thighs super dry with paper towels is critical for achieving crispy skin.