I distinctly remember my early struggles in the kitchen, chasing that elusive, perfectly crispy chicken bite only to end up with a disappointingly soggy mess. After countless experiments, I finally cracked the code to achieving unbelievably crispy golden chicken bites that stay crunchy for longer. This recipe is your reliable guide to restaurant-quality crunch, making it perfect for satisfying cravings or impressing any crowd.
Why These Crispy Golden Chicken Bites Will Be Your New Favorite
The “Never Soggy” Promise: Crunch That Lasts
This recipe is engineered for enduring crispiness. Our unique method ensures a golden, crunchy exterior that resists moisture, keeping your chicken bites delightfully crisp even after cooling slightly.
The Double-Dredge Difference: Unmatched Texture
The secret lies in a meticulously applied double-dredge technique. This, combined with a precise cornstarch blend, creates an incredibly craggy, flavorful crust that delivers superior texture with every bite.
For an even more craggy crust, explore Southern fried chicken tenders.
Simple Steps, Spectacular Results: Home Cook Friendly
Don’t let the professional crunch intimidate you. We’ve broken down complex frying techniques into straightforward steps, making it easy for any home cook to achieve truly spectacular, restaurant-quality golden chicken.
Versatile & Family-Approved: A Crowd-Pleasing Meal
These crunchy chicken bites are universally loved. They’re ideal for a quick weeknight dinner, a fun game-day snack, or a centerpiece for any casual gathering, delighting both kids and adults.
Crafting the Perfect Bite: Essential Ingredients & Substitutions
The Chicken Base: Breast vs. Thigh
For these bites, boneless, skinless chicken breast or thigh works wonderfully. Chicken breast offers a leaner, more uniform bite, while thigh meat provides a juicier, richer flavor.
Ensure your chosen cut is trimmed of any excess fat and cut into uniform 1-inch pieces. Uniform size guarantees even cooking for every piece of golden chicken.
The Crisping Foundation: Flour & Cornstarch Blend
All-purpose flour forms the base of our crispy coating. Combined with cornstarch, it creates a lighter, airier, and more resilient crust that locks in moisture and maximizes crunch.
For gluten-free alternatives, a good quality gluten-free all-purpose flour blend can be used. Ensure it contains xanthan gum for optimal binding and texture.
Flavor Builders: Spices and Seasonings
Our blend of garlic powder, onion powder, paprika, salt, and black pepper infuses every bite with savory depth. Paprika also contributes to that beautiful golden hue.
Feel free to customize the spice profile. A pinch of cayenne pepper adds heat, smoked paprika offers a deeper flavor, or dried oregano can introduce an herbaceous note to your crispy chicken recipe.
For more ideas on achieving that perfect crunch, check out crispy honey garlic chicken.
The Binding Agent: Egg Wash Perfection
The egg and milk mixture serves as the crucial bridge between the chicken and the flour coating. It helps the seasoned flour adhere firmly, ensuring a substantial, crispy crust.
Frying Medium: Best Oil Choices
Select oils with high smoke points for deep frying. Vegetable oil is a classic choice, but canola oil or peanut oil also work exceptionally well.
These oils withstand high temperatures without breaking down or imparting undesirable flavors, crucial for perfect fried chicken bites.
Homemade Dipping Sauce Components
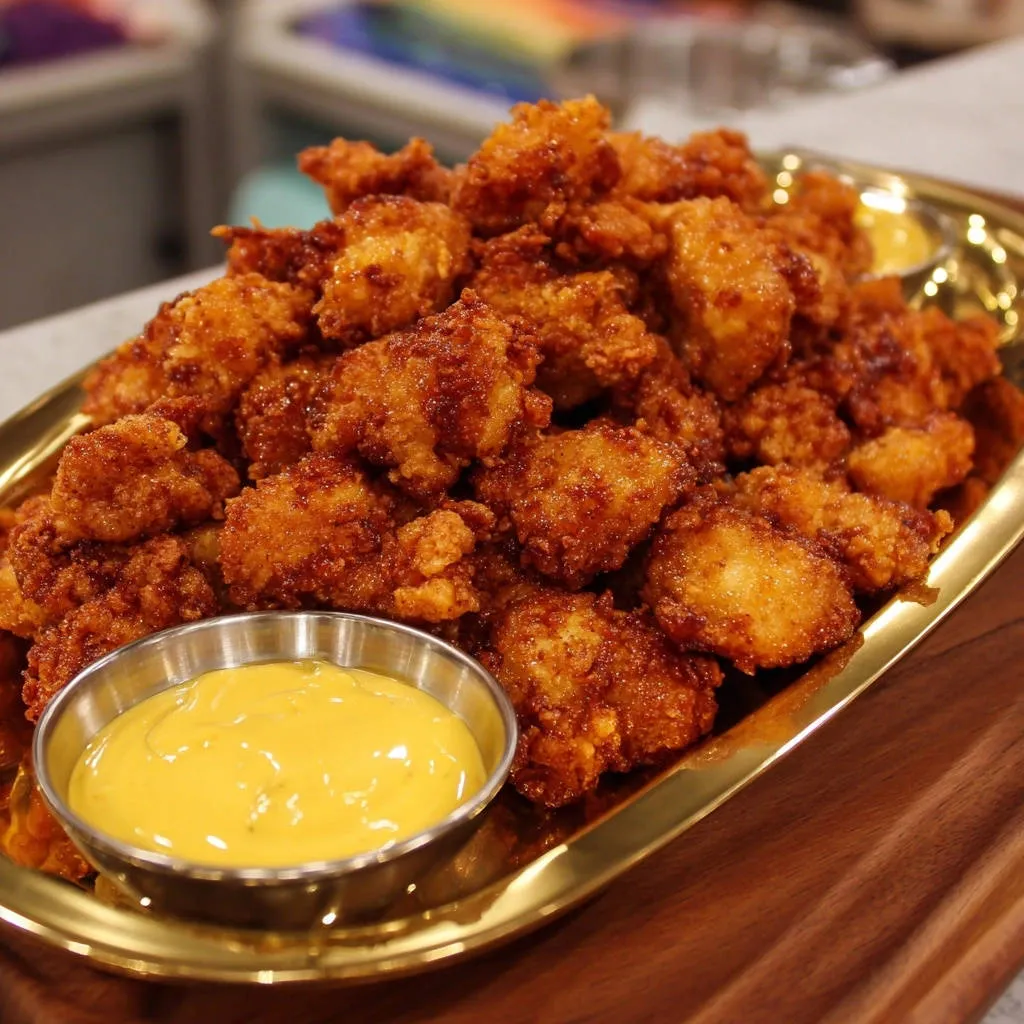
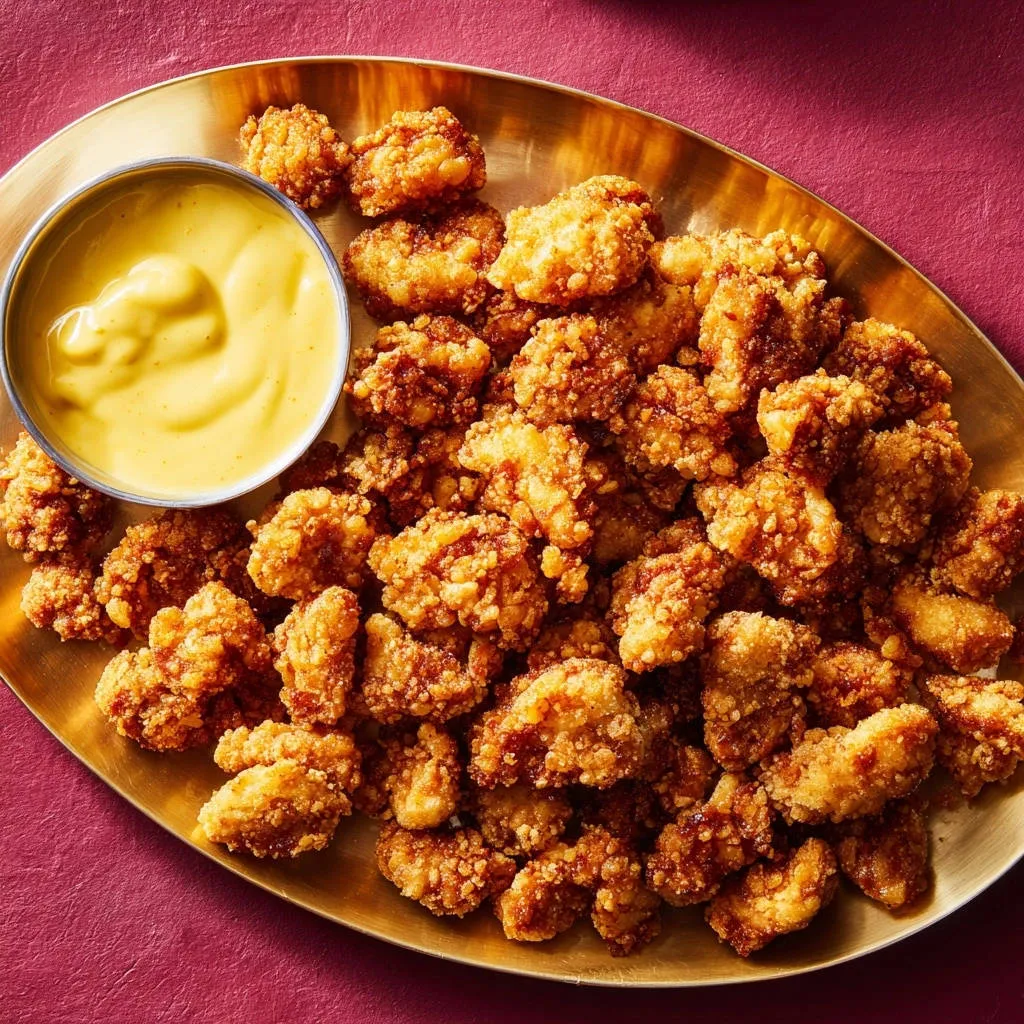
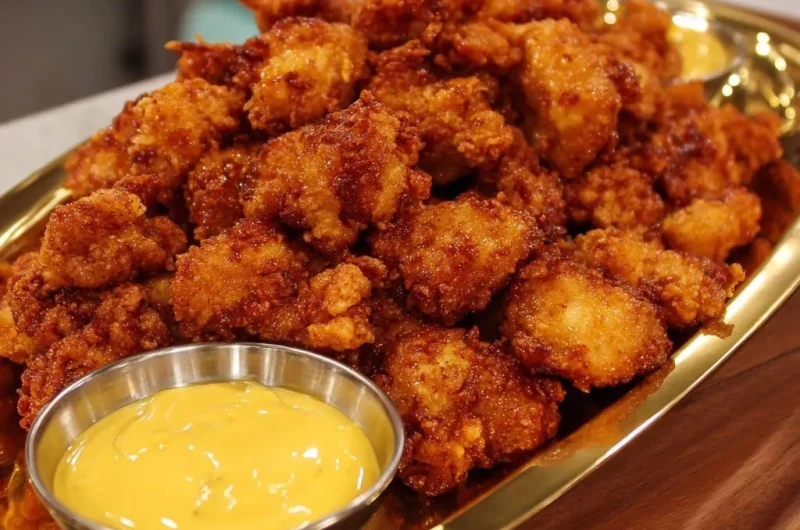
Our simple yet irresistible dipping sauce combines mayonnaise, Dijon mustard, and honey with a pinch of salt. This blend offers a creamy, tangy, and subtly sweet counterpoint to the savory chicken.
Gear Up for Success: Tools for Crispy Golden Chicken Bites
The Frying Vessel: Pot or Dutch Oven
A heavy-bottomed pot or Dutch oven is ideal for deep frying. Its robust construction ensures even heat distribution, preventing hot spots and promoting consistent cooking of your golden chicken.
Temperature Control: Your Kitchen Thermometer
A reliable kitchen thermometer is non-negotiable for achieving perfectly crispy, non-greasy results. Maintaining the correct oil temperature (350-375°F / 175-190°C) is vital for food safety and texture.
Dredging & Draining: Shallow Dishes & Wire Racks
Shallow dishes make the dredging process efficient and mess-free. A wire rack set over a baking sheet is essential for resting coated chicken before frying and draining excess oil after, ensuring maximum crispness.
Additional Handy Helpers
Keep a pair of tongs, a slotted spoon, and plenty of paper towels close by. Tongs facilitate safe handling of chicken, the slotted spoon is for easy removal from oil, and paper towels absorb grease.
From Prep to Plate: Your Detailed Guide to Crispy Golden Chicken Bites
Phase 1: Preparing Your Chicken for Peak Crispness
Prepare Chicken: Begin by patting your 1.5 pounds of boneless, skinless chicken pieces thoroughly dry with paper towels. This crucial step removes surface moisture, allowing the coating to adhere properly and become incredibly crispy.
Season the chicken all over with a pinch of salt and black pepper at this stage. This initial seasoning ensures flavor penetrates beyond the coating, creating delicious crispy chicken.
Phase 2: Mastering the Double Dredge Technique
Set Up Dredging Stations: In your first shallow dish, whisk together 2 cups all-purpose flour, 1/2 cup cornstarch, 1 tablespoon garlic powder, 1 tablespoon onion powder, 1 teaspoon paprika, 1 teaspoon salt, and 1/2 teaspoon black pepper until fully combined. In a second shallow dish, whisk 2 large eggs and 1/2 cup milk until smooth to create the egg wash.
Double Dredge for Maximum Crispness: Dip each chicken piece first into the seasoned flour mixture, ensuring it is fully coated. Shake off any excess flour, as too much will create a gummy crust. Next, dip it into the egg mixture, allowing any excess to drip off completely.
Finally, return the chicken to the flour mixture, pressing the flour onto all surfaces firmly to create a substantial, craggy coating. This double dredge, especially with the cornstarch, is the critical step for achieving that ultimate crispy, textured crust. Place all coated chicken pieces on a wire rack as you work to prevent them from sticking and to allow the coating to set slightly.
Phase 3: The Art of Frying to Golden Perfection
Heat Oil: Pour vegetable oil into a large heavy-bottomed pot or Dutch oven, to a depth of about 2-3 inches. Heat the oil over medium-high heat until it reaches 350-375°F (175-190°C). Use a reliable kitchen thermometer to monitor the temperature; maintaining this range is vital for crispy results and even cooking without burning.
Fry Chicken: Carefully add the coated chicken pieces to the hot oil, making sure not to overcrowd the pot. Overcrowding significantly drops the oil temperature, leading to greasy, soggy chicken. Fry in batches for 5-7 minutes per batch, or until the chicken is a deep golden brown and cooked through, reaching an internal temperature of 165°F (74°C).
Consistent oil temperature prevents the coating from becoming greasy or soggy. Flip the pieces occasionally to ensure even browning on all sides, contributing to that perfect golden chicken color.
Phase 4: Finishing Touches & Dipping Sauce
Drain and Season: Using a slotted spoon, remove the cooked chicken from the oil and transfer it to a wire rack set over a baking sheet to allow any excess oil to drain away. Immediately sprinkle with a little extra salt while the chicken is still hot; this enhances flavor and helps maintain crispness by drawing out residual moisture.
Make Dipping Sauce: While the chicken cools slightly, combine the 1/2 cup mayonnaise, 2 tablespoons Dijon mustard, 1 tablespoon honey, and a pinch of salt in a small bowl. Whisk until the sauce is smooth and creamy. This easy homemade sauce perfectly complements the savory, crunchy chicken.
Serve: Serve your perfectly crispy golden chicken bites hot with the homemade dipping sauce on the side. These are best enjoyed fresh to savor their ultimate crunch.
Chef’s Secrets: Elevating Your Crispy Golden Chicken Bites Game
The Drying Imperative: Patting Chicken Bone Dry This is paramount. Ensure every single piece of chicken is as dry as possible before dredging. Any residual moisture will create steam, preventing crispiness and causing the coating to fall off.
Oil Temperature Mastery: The Key to Non-Greasy Bites Always use a thermometer to maintain the precise oil temperature. Too low, and the chicken absorbs excess oil, becoming greasy. Too high, and the outside burns before the inside cooks through, leading to undercooked homemade chicken nuggets.
Don’t Overcrowd the Pot: Why Batch Frying Matters Frying too many pieces at once drastically drops the oil temperature. This results in soggy, poorly cooked chicken. Fry in small, manageable batches to maintain consistent heat and achieve uniform crispiness.
Seasoning Post-Fry: Amplify Flavor & Maintain Crisp Sprinkling a little extra salt immediately after frying enhances the flavor significantly. The hot oil helps the salt adhere and draws out any residual moisture, further maintaining that satisfying crunch of your fried chicken bites.
Resting for Optimal Texture Allow the chicken bites to rest briefly on a wire rack after frying. This allows residual heat to finish cooking the interior and excess oil to drain. Resting also prevents steam buildup on a flat surface, which can soften the hard-won crust.
Beyond the Bites: Creative Serving Ideas & Pairings
Our Signature Honey-Dijon Dipping Sauce
The provided Honey-Dijon sauce is a perfect balance of creamy, tangy, and sweet. Its bright flavors cut through the richness of the fried chicken, offering a delightful contrast that enhances every bite.
Alternative Dipping Delights
Experiment with other dipping sauces to customize your experience. Classic options like ranch, smoky BBQ, sweet chili, or even a spicy sriracha mayo provide delicious variations for your crispy chicken.
Making it a Meal: Sides & Accompaniments
Transform these crispy chicken bites into a complete meal. Serve them with a side of crispy fries, creamy coleslaw, homemade mac and cheese, a fresh garden salad, or fluffy rice for a satisfying dinner.
Round Out Your Meal
To complement your crispy chicken bites, consider these dishes focusing on fresh ingredients and satisfying textures.
- For a refreshing contrast, serve with these cranberry apple chicken salad cups, offering a sweet and tangy element.
- Enjoy a vibrant plate with the harvest apple and walnut salad, bringing together crisp apples and crunchy nuts.
Kid-Friendly Presentations
Kids adore these crispy golden chicken bites! Serve them with their favorite mild dipping sauces, alongside some raw veggie sticks, or even in fun shapes. Their irresistible crunch makes them an instant hit.
Plan Ahead: Prep, Storage, and Reheating Your Crispy Golden Chicken Bites
Can You Prep Them in Advance?
Yes, you can prep the chicken up to a few hours in advance. Once coated with the double dredge, arrange the chicken pieces on a wire rack over a baking sheet, cover loosely with plastic wrap, and refrigerate.
Frying immediately after coating is ideal for maximum crispness, but short-term storage works well. This allows the coating to dry out slightly, which can actually enhance its crunch.
Storing Leftovers for Maximum Crispness
To store leftover crispy golden chicken bites, ensure they are completely cooled. Place them in a single layer in an airtight container lined with paper towels to absorb any moisture. Refrigerate for up to 3-4 days.
Reheating for a Second Life
Avoid the microwave for reheating, as it will make them soggy. The best methods for bringing back crispness are the oven or air fryer. Reheat at 375°F (190°C) for 8-12 minutes in the oven, or 5-7 minutes in an air fryer, until heated through and crisp again.
Cracking the Code: Common Issues & Quick Fixes
Why Are My Chicken Bites Soggy?
Soggy chicken is usually due to insufficient drying of the chicken before dredging, low oil temperature during frying, or overcrowding the pot. Ensure chicken is bone dry, oil is at the correct temperature, and fry in small batches.
My Coating Isn’t Sticking!
If your coating isn’t adhering, the chicken was likely too wet. It’s also possible you didn’t press the flour firmly enough during the second dredge, or your egg wash had too much milk, making it too thin.
The Chicken is Burnt Outside, Raw Inside
This common issue points to oil that is too hot. The exterior cooks rapidly, but the inside doesn’t have time to reach a safe temperature. Always use a thermometer to maintain the oil between 350-375°F (175-190°C).
They’re Bland – What Went Wrong?
Blandness often comes from under-seasoning the chicken itself or the flour mixture. Remember to season the chicken before dredging and add that final sprinkle of salt immediately after frying for maximum impact on your perfect fried chicken.
Your Crispy Golden Chicken Bites Questions Answered
Can I Bake or Air Fry These Crispy Golden Chicken Bites?
While deep frying yields the ultimate crispness, you can certainly bake or air fry these for a lighter option. For baking, spray coated chicken lightly with oil and bake at 400°F (200°C) for 20-25 minutes, flipping halfway. For air frying, cook at 375°F (190°C) for 12-15 minutes, shaking the basket periodically.
The texture will be crispy but slightly different from deep-fried, usually less “craggy.” Ensure even oil distribution for best results in these alternative cooking methods for your homemade chicken nuggets.
What’s the purpose of cornstarch in the coating?
Cornstarch is a game-changer for crispiness! It helps absorb excess moisture from the chicken, prevents the gluten in the flour from developing too much, and contributes to a lighter, incredibly crispy, and more stable crust. It’s key to these crispy golden chicken bites.
Can I use gluten-free flour?
Absolutely! A good quality all-purpose gluten-free flour blend can be used as a direct substitute for the all-purpose flour. Look for blends that contain ingredients like rice flour, tapioca starch, and xanthan gum for the best texture and binding properties.
How do I know when the oil is hot enough without a thermometer?
While a thermometer is strongly recommended for precision, a quick test is to drop a tiny pinch of the flour mixture into the oil. If it immediately sizzles and floats to the top, the oil is likely ready. Alternatively, dip the end of a wooden spoon into the oil; if small bubbles steadily form around it, the oil is hot enough.
Is it possible to make these spicy?
Yes, easily! To add a spicy kick to your crispy chicken recipe, simply mix 1/2 to 1 teaspoon of cayenne pepper into the seasoned flour mixture. For even more heat, a dash of your favorite hot sauce can be whisked into the egg wash.
Ready to Transform Your Kitchen? Share Your Crispy Golden Chicken Bites Success!
You now have all the secrets to create truly irresistible crispy golden chicken bites that will impress everyone. No more soggy regrets, just pure, crunchy delight!
Don’t wait another moment! Gather your ingredients and experience the satisfaction of mastering this phenomenal recipe. We’d love to see your culinary creations – share your photos and tell us about your experience in the comments below!
Crispy Golden Chicken Bites
Course: Main CourseCuisine: AmericanDifficulty: easy4
servings25
minutes30
minutes750
kcal55
minutesTired of soggy chicken? Discover the secret to unbelievably crispy, golden chicken bites that stay crunchy for longer. This recipe uses a special double-dredging technique and cornstarch for a perfect textured crust every time, served with a tangy homemade dipping sauce.
Ingredients
1.5 pounds boneless, skinless chicken breast or thigh, cut into 1-inch pieces
2 cups all-purpose flour
1/2 cup cornstarch
1 tablespoon garlic powder
1 tablespoon onion powder
1 teaspoon paprika
1 teaspoon salt, plus more for seasoning
1/2 teaspoon black pepper
2 large eggs
1/2 cup milk
Vegetable oil, for frying
For the Dipping Sauce:
1/2 cup mayonnaise
2 tablespoons Dijon mustard
1 tablespoon honey
Pinch of salt
Directions
- Prepare Chicken: Pat chicken pieces thoroughly dry with paper towels. Season the chicken all over with a pinch of salt and black pepper. This initial drying step is absolutely essential for the coating to adhere properly and become crispy.
- Set Up Dredging Stations: In a shallow dish, whisk together the flour, cornstarch, garlic powder, onion powder, paprika, 1 teaspoon salt, and 1/2 teaspoon black pepper until well combined. In a second shallow dish, whisk the eggs and milk until smooth.
- Double Dredge for Maximum Crispness (The Key!): Dip each chicken piece first into the seasoned flour mixture, ensuring it is fully coated. Shake off any excess flour. Next, dip it into the egg mixture, allowing any excess to drip off. Finally, return the chicken to the flour mixture, pressing the flour onto all surfaces firmly to create a substantial, craggy coating. This double dredge, especially with the added cornstarch, is the critical step for achieving that ultimate crispy, textured crust. Place all coated chicken pieces on a wire rack as you work.
- Heat Oil: Pour vegetable oil into a large heavy-bottomed pot or Dutch oven, to a depth of about 2-3 inches. Heat the oil over medium-high heat until it reaches 350-375°F (175-190°C). Use a reliable kitchen thermometer to monitor the temperature; maintaining this range is vital for crispy results and even cooking without burning.
- Fry Chicken: Carefully add the coated chicken pieces to the hot oil, making sure not to overcrowd the pot. Fry in batches for 5-7 minutes per batch, or until the chicken is a deep golden brown and cooked through, reaching an internal temperature of 165°F (74°C). Consistent oil temperature prevents the coating from becoming greasy or soggy. Flip the pieces occasionally to ensure even browning.
- Drain and Season: Using a slotted spoon, remove the cooked chicken from the oil and transfer it to a wire rack set over a baking sheet to allow any excess oil to drain away. Immediately sprinkle with a little extra salt while the chicken is still hot; this enhances flavor and helps maintain crispness.
- Make Dipping Sauce: While the chicken cools slightly, combine the mayonnaise, Dijon mustard, honey, and a pinch of salt in a small bowl. Whisk until the sauce is smooth and creamy.
- Serve: Serve your perfectly crispy chicken bites hot with the homemade dipping sauce on the side.
Notes
- Ensure chicken is thoroughly dry and use the double-dredging method for best crispness.