I used to find making truffles a test of patience, often ending with a sticky, shapeless mess that quickly melted. But after refining this recipe, I can confidently say these Dreamy Cream Cheese Truffles are the epitome of effortless elegance, consistently holding their perfect shape while delivering an irresistible creamy indulgence. Get ready to create delightful treats that impress with minimal fuss.
Why These Cream Cheese Truffles Will Be Your New Favorite Treat
This recipe for Dreamy Cream Cheese Truffles stands apart because it tackles common challenges head-on. No more struggling with overly soft or greasy mixtures that refuse to cooperate. My method guarantees truffles that are firm enough to handle, yet melt-in-your-mouth creamy.
The secret lies in precise chilling and ingredient preparation, ensuring a stable base. This means you get beautifully formed, professional-looking treats every single time. They’re delightfully easy to make, even for novice bakers.
These truffles are incredibly versatile, perfect for gifting, parties, or simply satisfying a sweet craving. Their rich flavor and appealing texture make them a guaranteed crowd-pleaser.
The Simple Ingredients: Building Your Dreamy Cream Cheese Truffles
Cream Cheese & Butter: The Foundation of Creaminess
The unsung heroes of these creamy bites are softened cream cheese and unsalted butter. They must be at true room temperature for smooth blending, but crucially, never melted, as this would lead to a greasy or overly soft truffle base.
Using softened ingredients ensures your mixture emulsifies properly, creating that signature light, airy texture. High-quality cream cheese and butter will significantly enhance the richness and overall flavor of your truffles.
Powdered Sugar & Vanilla: Sweetness and Aroma
Powdered sugar is essential for achieving the smooth, melt-in-your-mouth consistency of the truffle filling. Sifting it before adding prevents any stubborn lumps, ensuring a silky-smooth experience.
Vanilla extract adds a classic, warm aroma that complements the tang of the cream cheese perfectly. Opt for pure vanilla extract for the best flavor depth.
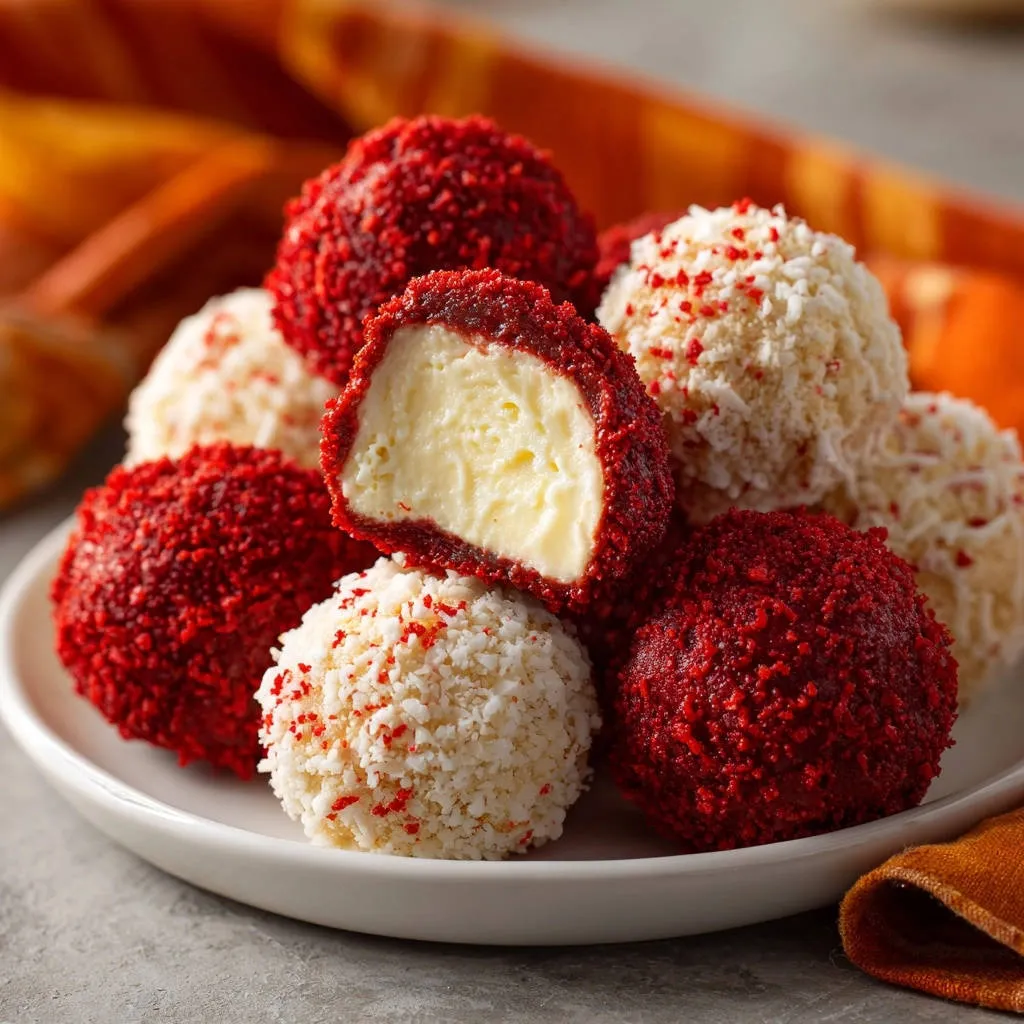
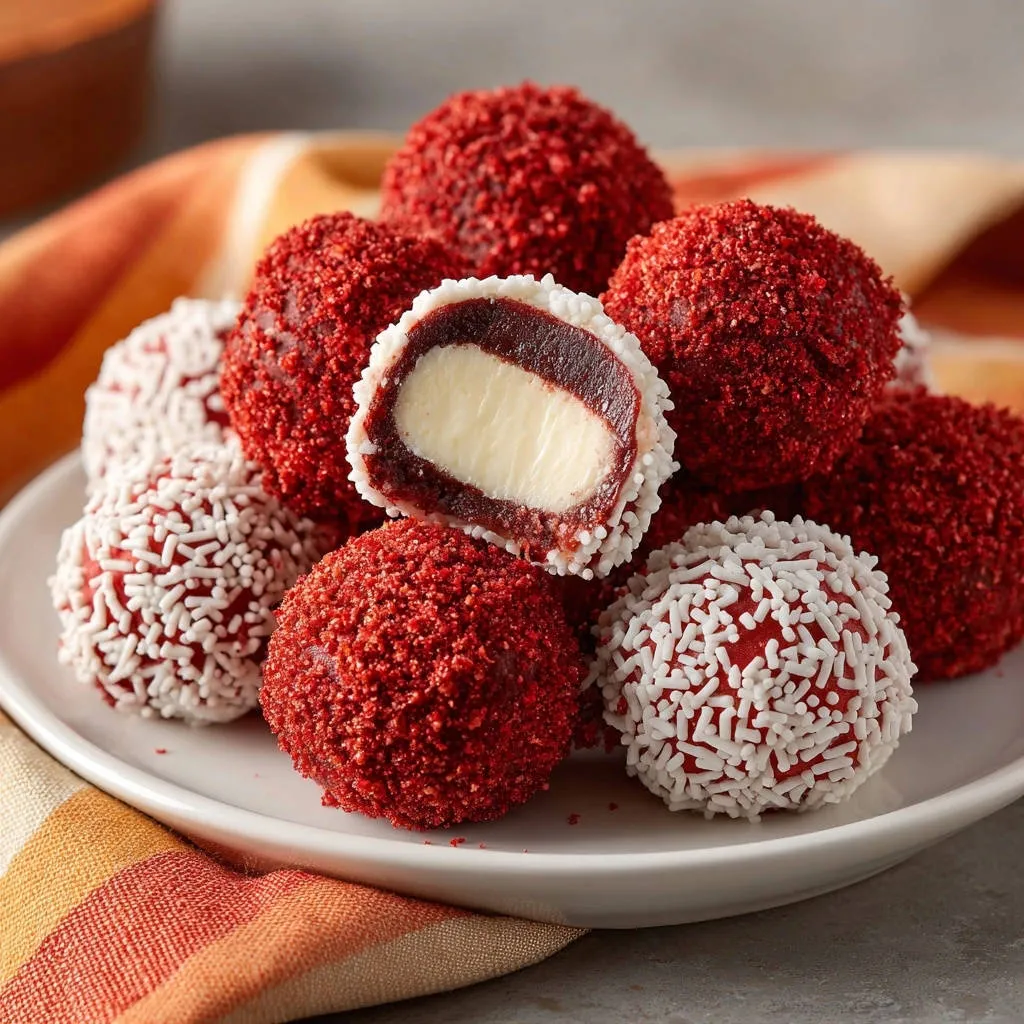
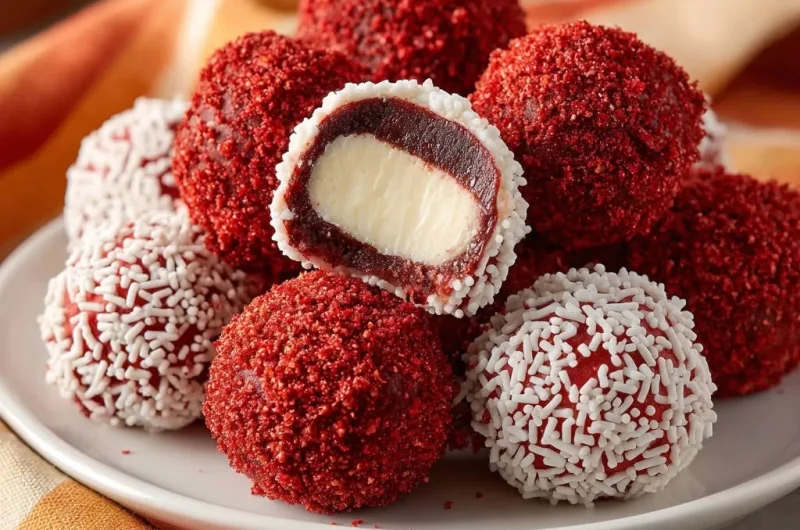
Red Velvet Cake & Coconut: Signature Coatings
Crumbled red velvet cake provides a beautiful color contrast and a delicious, moist texture to the exterior of some truffles. Using pre-made cake or cupcakes makes this step incredibly simple.
Sweetened shredded coconut offers a delightful chewiness and tropical sweetness. These coatings not only add flavor but also make the Dreamy Cream Cheese Truffles visually appealing and easier to handle.
Gearing Up: Essential Tools for Your Truffle-Making Adventure
Large Mixing Bowl: Provides ample space for beating the cream cheese and butter without spills.
Electric Mixer (Handheld or Stand): Crucial for achieving a smooth, lump-free base quickly and efficiently.
Sifter: Ensures powdered sugar is free of lumps, resulting in a silky-smooth truffle mixture.
Small Scoop or Tablespoon: Helps in portioning the truffle mixture uniformly for consistent sizing.
Parchment-Lined Baking Sheet: Prevents sticking during chilling and makes transferring truffles easy.
Shallow Dishes: Ideal for holding the various coatings, allowing for even coverage.
Crafting Your Dreamy Cream Cheese Truffles: A Step-by-Step Guide to Perfection
- Perfectly Softened Ingredients:
Before you begin, confirm your 8 ounces of cream cheese and 1/2 cup of unsalted butter are properly softened. They should be pliable to the touch, but not greasy or melted. This crucial initial step ensures a smooth, uniform base without lumps or separation.
- Creamy Base Creation:
In a spacious mixing bowl, combine the softened cream cheese and butter. Beat them together with an electric mixer until the mixture transforms into a wonderfully smooth, light, and airy consistency. This usually takes about 2-3 minutes of continuous beating.
- Sweetening the Mixture:
Gradually add the 3 cups of sifted powdered sugar to the cream cheese mixture, mixing on low speed to avoid a sugar cloud. Continue mixing until the sugar is fully incorporated and the mixture is entirely smooth, with no lingering lumps. Finally, stir in 1 teaspoon of vanilla extract until just combined.
- The First Chill: Achieving Firmness:
This is a critical step for creating truffles that hold their shape: Cover the bowl securely with plastic wrap. Refrigerate the mixture for a minimum of 2 hours. It must become firm enough to easily scoop and roll into balls without being overly sticky.
- Preparing Your Coatings:
While your truffle mixture is chilling, prepare your coatings. Place the 2 cups of crumbled red velvet cake into one shallow dish and the 1 1/2 cups of sweetened shredded coconut into another. This setup streamlines the coating process later.
- Rolling Perfection:
Once the mixture is thoroughly chilled, use a small scoop or a tablespoon to portion out individual amounts. Work efficiently, quickly rolling each portion between your palms into a smooth, even ball. Minimizing hand contact keeps the mixture from warming up too much.
- The Second Chill: Pre-Coating Firm-Up:
After rolling, place all the truffle balls onto a parchment-lined baking sheet. Return them to the refrigerator for another 30 minutes. This second chilling step is vital for firming them up just before coating, which guarantees a neat, even, and well-adhered finish.
- Coating Your Truffles:
Take the thoroughly chilled truffles from the refrigerator. Gently roll approximately half of the truffle balls in the red velvet cake crumbs, pressing lightly to ensure full adherence. Roll the remaining truffles in the shredded coconut until each is completely coated.
- The Final Set: Ready for Indulgence:
Arrange your newly coated Dreamy Cream Cheese Truffles on a clean plate or within an airtight container. Refrigerate them for at least 30 minutes more. This final setting time allows them to become perfectly firm before serving and ensures optimal storage.
Unlock Success: Expert Tips for Truffle Triumph and Beyond
Mastering the Chill: Why refrigeration at multiple stages is non-negotiable for perfectly shaped Dreamy Cream Cheese Truffles.
Chilling isn’t just a suggestion; it’s the backbone of sturdy truffles. The initial long chill makes the mixture firm enough to roll without sticking, and the pre-coating chill ensures the coating adheres smoothly. The final chill sets everything for perfect presentation.
The Power of Sifting: How sifting powdered sugar prevents lumps and contributes to a smoother texture.
Powdered sugar often clumps in the box. Sifting removes these lumps, allowing the sugar to integrate seamlessly into the cream cheese mixture. This small step makes a significant difference in achieving a uniformly smooth, velvety truffle base.
For more ideas on achieving that smooth texture, check out these berry cheesecake truffles.
Work Smarter, Not Harder (and Faster): Tips for efficient rolling to keep the mixture from warming up in your hands.
Keep your hands cool by briefly running them under cold water before rolling, then drying them thoroughly. Work quickly in small batches, returning the rest of the mixture to the fridge if your kitchen is warm. A small scoop ensures consistent size and minimal handling.
Coating Creativity: Ideas for experimenting with different coatings beyond cake crumbs and coconut.
The possibilities are endless! Try finely chopped pistachios, cocoa powder, melted and drizzled chocolate (dark, milk, or white), colorful sprinkles, or even crushed dried fruit for unique variations. For a different texture, consider my recipe for delicious raspberry chocolate coconut truffles.
For more ideas on coatings, explore smooth peanut butter truffles that are equally delightful.
Quality Ingredients Matter: Briefly discuss how good quality cream cheese and butter impact the final taste and texture.
Since cream cheese and butter form the core of these truffles, investing in good quality, full-fat brands will elevate the flavor and creaminess significantly. They contribute directly to the rich, luxurious taste and smooth mouthfeel.
Troubleshooting Your Truffles: Conquering Common Challenges
“My Truffle Mixture is Too Soft/Sticky!”
This is usually due to insufficient chilling or ingredients that were too warm initially. Return the mixture to the refrigerator for at least another hour, or even longer if your kitchen is warm. Ensure your cream cheese and butter were softened but not melted.
“Why Are My Dreamy Cream Cheese Truffles Greasy?”
Greasy truffles often result from butter or cream cheese being overly soft or even melted. It can also happen from over-mixing once the sugar is added, which can separate the fats. Ensure ingredients are just softened, not liquid, and mix only until combined.
“My Coating Won’t Stick to the Truffles!”
The truffles must be very cold for the coating to adhere properly. If they’ve warmed up, the surface becomes less tacky. Return them to the fridge for 30 minutes before attempting to coat them again, pressing gently to ensure adhesion.
“My Truffles Melt Too Quickly After Taking Them Out!”
Cream cheese truffles are delicate and best enjoyed chilled. If they melt quickly, it’s a sign they’ve been out of refrigeration for too long or your environment is very warm. Serve them straight from the fridge and keep any uneaten truffles chilled.
Beyond the Classic: Customizing Your Dreamy Cream Cheese Truffles
Flavorful Cake Variations: Explore chocolate, vanilla, or even spice cake crumbs.
Instead of red velvet, try crumbling a rich chocolate cake for an intense cocoa hit, or a vanilla pound cake for a lighter, classic flavor. Spice cake crumbs add a cozy, autumnal twist perfect for the holidays.
Creative Coatings: Think chopped nuts, sprinkles, cocoa powder, or drizzled chocolate.
For a nutty crunch, finely chop pistachios, almonds, or walnuts. Brighten them up with colorful sprinkles, or dust with unsweetened cocoa powder for a sophisticated finish. A drizzle of melted dark or white chocolate adds an elegant touch.
Extract Enhancements: Add peppermint, almond, or coffee extract for different flavor profiles.
A few drops of peppermint extract will give a festive, cool flavor. Almond extract adds a lovely nutty aroma, while a dash of coffee extract (or instant espresso powder) can deepen the chocolate notes if using a chocolate cake coating.
Dairy-Free Alternatives: Briefly discuss options for cream cheese and butter substitutes.
For a dairy-free version, use plant-based cream cheese alternatives and vegan butter sticks. Ensure they have a firm texture similar to their dairy counterparts for the best results, as consistency is key for truffle structure.
Enjoying and Storing Your Divine Truffles
Ideal Storage for Freshness
To maintain their exquisite taste and perfect texture, store your Dreamy Cream Cheese Truffles in an airtight container in the refrigerator. This prevents them from absorbing other odors and keeps them firm.
Properly stored, these delightful treats will stay fresh and delicious for up to one week. Always keep them chilled until just before serving.
Make-Ahead Magic: Preparing Dreamy Cream Cheese Truffles in Advance
These truffles are a fantastic make-ahead dessert! You can prepare the entire batch up to 5-7 days in advance. Simply keep them stored in the refrigerator, ready to be presented whenever needed.
Their stability makes them ideal for entertaining, holiday platters, or as thoughtful homemade gifts. Just pull them out a few minutes before serving for optimal enjoyment.
Presentation Perfect: Serving Suggestions
Arrange your Dreamy Cream Cheese Truffles artfully on a chilled serving platter or in mini paper liners. For an elegant touch, garnish with a few fresh berries, a sprig of mint, or a dusting of powdered sugar.
They are best served cold, straight from the refrigerator. Their rich, creamy texture and vibrant coatings make them a beautiful addition to any dessert spread.
Your Top Dreamy Cream Cheese Truffles Questions Answered
Can I use store-bought cake for these truffles?
Absolutely! Using pre-made red velvet cake or cupcakes is highly recommended and makes the process much quicker. Ensure it’s plain cake without frosting, as the frosting would alter the truffle consistency too much.
How long do Dreamy Cream Cheese Truffles last in the refrigerator?
When stored in an airtight container in the refrigerator, your cream cheese truffles will remain fresh and delicious for up to one week. Beyond that, the texture and freshness might start to diminish.
Can I freeze these cream cheese truffles?
Yes, you can freeze Dreamy Cream Cheese Truffles! Place the coated truffles in a single layer on a parchment-lined baking sheet and freeze until firm, about 1-2 hours. Then, transfer them to an airtight freezer-safe container or bag for up to 1 month. Thaw in the refrigerator before serving.
What if I don’t like shredded coconut?
No problem at all! You can simply omit the coconut and double the red velvet cake crumbs, or choose another coating from the “Coating Creativity” section. Other popular choices include finely chopped nuts, cocoa powder, or colorful sprinkles. For another delicious treat without coconut, consider making layered cheesecake bars.
Are these truffles gluten-free or dairy-free friendly?
This recipe can easily be adapted! For gluten-free truffles, use gluten-free red velvet cake crumbs. For dairy-free, use plant-based cream cheese and vegan butter alternatives, ensuring they are firm enough for shaping. Always check ingredient labels to confirm suitability for specific dietary needs.
What Else to Make?
If you enjoyed these cream cheese truffles, you might like these other sweet options.
- For a rich chocolate dessert that complements sweet bites, check out this Moist Chocolate Bundt Cake, known for its easy release.
- If you’re in the mood for something fluffy and versatile, consider making Fluffy Diner-Style Pancakes, a great base for various toppings.
Ready to Delight? Share Your Dreamy Cream Cheese Truffle Creations!
You now have all the tools and expertise to craft your own batch of perfectly shaped, incredibly delicious Dreamy Cream Cheese Truffles. Say goodbye to sticky struggles and hello to impressive, melt-in-your-mouth perfection.
I can’t wait to see your delightful creations! Whip up a batch, snap a photo, and share your results on social media using #DreamyCreamCheeseTruffles. And of course, feel free to leave a comment below with your questions, tips, or favorite variations. Happy truffle making!
Cream Cheese Truffles
Course: DessertCuisine: AmericanDifficulty: easy4
24 truffles45
minutes550
kcal180
minutesTired of sticky, shapeless truffles? This recipe shares the secret to making perfectly firm, creamy, and delightful Dreamy Cream Cheese Truffles every time. Get ready for a dessert that’s as easy to make as it is delightful to eat.
Ingredients
8 ounces cream cheese, softened
1/2 cup unsalted butter, softened
3 cups powdered sugar, sifted
1 teaspoon vanilla extract
2 cups crumbled red velvet cake (from pre-made cake or cupcakes)
1 1/2 cups sweetened shredded coconut
Directions
- Ensure your cream cheese and butter are softened but not melted. This crucial step prevents a greasy or overly soft mixture later on.
- In a large mixing bowl, beat the softened cream cheese and butter together until the mixture is completely smooth and light.
- Gradually add the sifted powdered sugar, mixing on low speed until it’s fully incorporated and no lumps remain. Stir in the vanilla extract until just combined.
- This is a key step for firm truffles: Cover the bowl tightly with plastic wrap and refrigerate the mixture for at least 2 hours. It should be firm enough to easily scoop and roll without being too sticky.
- While the mixture chills, place your crumbled red velvet cake and sweetened shredded coconut into separate shallow dishes.
- Using a small scoop or a tablespoon, portion out the chilled cream cheese mixture. Quickly roll each portion between your palms into a smooth ball. Work efficiently to keep the mixture from warming up too much from your hands.
- For perfectly coated truffles, place the rolled balls on a parchment-lined baking sheet and refrigerate for another 30 minutes. This firms them up before coating, ensuring a neat finish.
- Gently roll half of the thoroughly chilled truffles in the red velvet cake crumbs and the other half in the shredded coconut until fully coated, pressing gently to adhere the coating.
- Arrange the coated truffles on a clean plate or in an airtight container. Refrigerate for at least 30 minutes more to allow them to fully set before serving. Store any leftovers in the refrigerator.
Notes
- Ensure proper chilling at each stage for best results to achieve firm, perfectly shaped truffles.