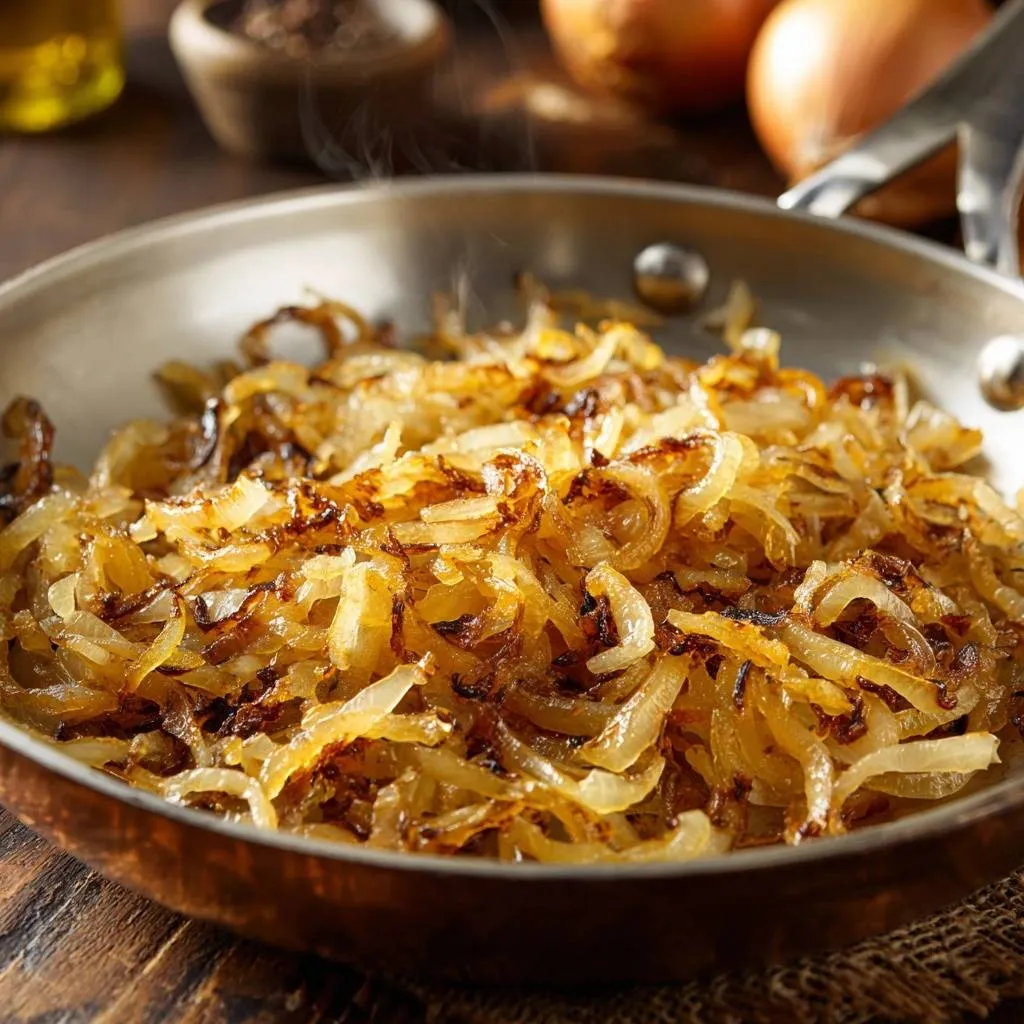
You know that frustration when onions burn at the edges but stay raw in the middle? This method fixes it every time. Steady medium-low heat and frequent stirring give you even, golden caramelization without scorch marks. You’ll get sweet, jammy perfection ready for burgers, pizzas, or salads in about 30 minutes.
Therefore, perfect caramelized onions elevate any dish with their deep sweetness. They transform sharp bites into rich flavor bombs. In addition, you control the quality, skipping store-bought versions that lack punch.
These sweet onions are essential for a truly rich onion gravy.
Here’s the expertise pro tip: heat olive oil until it shimmers, not smokes. That gentle start prevents hot spots. It guarantees perfect caramelized onions from the first batch.
Why Master Perfect Caramelized Onions
The Magic of Slow Caramelization
Sharp onions turn into sweet jam through the Maillard reaction and sugar breakdown. However, quick sautéing fails because high heat scorches before sugars release. This slow method nails perfect caramelized onions every time.
You start with pungent slices that soften and sweeten over 30 minutes. Therefore, they develop jammy texture and complex depth. No more uneven results; just reliable gold.
Versatile Uses in Everyday Meals
Top burgers with these caramelized onion toppings for juicy contrast. They pair perfectly with pizzas or salads too. In addition, pile them on sandwiches and omelets for instant upgrade.
For a side that matches that savory sweetness, check out these crispy garlic parsley bread bites.
Try a quick caramelized onion grilled cheese: layer golden onions with sharp cheddar. Or mix into green salads for sweet crunch. These uses make perfect caramelized onions a kitchen staple.
Science of Caramelized Onions Perfection
Heat Control Prevents Scorching
Medium-low heat makes oil shimmer without smoking. This avoids hot spots that burn edges. Stainless steel conducts heat evenly, unlike nonstick which hides fond.
Therefore, your perfect caramelized onions technique stays consistent. Skillets spread warmth uniformly. You get jammy results, not charred bits.
Sugar Release and Fond Formation
Onions’ fructose caramelizes around 320°F. Stirring scrapes fond, those tasty brown bits, building flavor. Early stage hits pale yellow at 10 minutes; deep golden by 25.
However, skip stirring and fond sticks, wasting sweetness. Constant motion distributes sugars perfectly. That’s how you achieve pro-level depth.
Salt and Pepper’s Role Explained
Salt draws out moisture, softening onions faster. Use 1/2 teaspoon for 4 onions to avoid mush. Pepper adds subtle warmth without overpowering.
In addition, fresh ground pepper blooms during cooking. Over-salting makes them watery. This ratio keeps perfect caramelized onions balanced.
Essential Ingredients for Caramelized Onions
Choosing Yellow Onions Wisely
Yellow onions offer balanced sweetness over sharp white or mild red. Pick 4 large ones, about 2 pounds. Slice to 1/8-inch for uniform cooking in perfect caramelized onions.
Thinner slices caramelize faster without raw centers. Therefore, they yield 12-14 cups. Fresh ones ensure best sugar release.
Olive Oil vs. Butter Debate
Olive oil’s high smoke point handles steady heat without burning. Use 2 tablespoons to coat without pooling. Butter browns too fast, risking scorch.
However, avocado oil substitutes well for neutral taste. This amount prevents sticking. It sets up flawless caramelized onion topping.
Seasoning Ratios Demystified
Stick to 1/2 teaspoon salt and 1/4 teaspoon pepper for 4 onions. Flavors evolve as moisture releases. Fresh pepper grinds sharper.
Taste midway; adjust at end. Therefore, you nail seasoning every time.
Equipment for Flawless Caramelized Onions
Stainless Steel Skillet Advantages
A 12-inch stainless steel skillet builds fond for extra flavor. It distributes heat evenly over cast iron’s hot spots or nonstick’s slip. Avoid crowding to prevent steaming.
Therefore, you get perfect caramelized onions with jammy texture. Larger size handles volume without overflow.
Slicing Tools for Uniformity
Mandoline slicer gives thin, even 1/8-inch pieces faster than knife. Hold firmly for safety; use guard. Uniformity speeds caramelization.
Knife works too; just aim steady. Store slices in bowl till ready.
Step-by-Step Caramelized Onions Guide
Prep: Precise Onion Slicing
Halve onions pole-to-pole, then slice thinly against grain. You’ll get 12-14 cups. Uniform slices prevent raw centers in perfect caramelized onions.
Therefore, they cook evenly. No thick chunks left behind.
Initial Heat and Oil Shimmer
Heat olive oil over medium-low for 2 minutes till shimmering, not smoking. Add onions, salt, pepper; stir to coat. Cook undisturbed 5 minutes as sugars release and aroma sweetens.
Look for soft, translucent edges. This starts perfect caramelized onions right. Avoid high heat to skip scorching.
Low-Heat Stirring Phase
Reduce to low if browning fast. Stir every 2-3 minutes for 20-25 total, scraping fond. Watch color shift: pale yellow, then golden brown, finally deep jammy hue.
Constant motion distributes heat. Therefore, no burnt edges. Smell intensifies to rich sweetness midway.
Finishing and Taste Test
Remove from heat; taste and add salt. Jammy onions spread easily on spoon. Total time hits 30-35 minutes.
Use warm for best flavor. Cool for storage.
Avoiding Caramelized Onions Pitfalls
Fixing Uneven Browning
Uneven browning means high heat or crowding. Add splash of water, lower heat to rescue. Prevent with stirring every 2-3 minutes.
Therefore, batches stay uniform. Small pans cause steaming too.
No More Burnt Edges Ever
Hot spots show as dark edges. Scrape stainless steel vigorously. Deglaze stuck fond with broth if needed.
This troubleshooting keeps perfect caramelized onions flawless. Monitor shimmer closely.
Raw Centers Troubleshooting
Thick slices cause raw centers. Slice thinner next time or cook longer. Check texture midway; stir well.
Smaller batches help too. Patience wins here.
Flavor Variations on Caramelized Onions
Herb-Infused Golden Onions
Add fresh thyme or rosemary at start for earthy notes. Splash balsamic at end for tang. Great on pizzas or omelets.
Therefore, you customize easily. Herbs release slowly without burning.
More Flavorful Ideas
To build on the rich flavors of caramelized onions, consider these dishes.
- For a hearty main course, explore this recipe for slow-braised beef short ribs, which benefit from the sweetness of onions.
- If you enjoy the comforting taste of French onion soup, you might like this creamy French onion chicken casserole, another great way to use caramelized onions.
Spicy or Sweet Twists
Stir in chili flakes midway for heat. Drizzle honey or brown sugar near end for extra stickiness. Add garlic after 10 minutes to avoid burn.
These variations amp perfect caramelized onions. Balance spice with sweetness.
Storage and Make-Ahead Onions
Fridge Life and Reheating
Store airtight up to 5 days. Reheat low heat with oil splash to revive jamminess. Avoid microwave; it sogs texture.
Therefore, make-ahead shines for weeknights.
Freezing Perfect Caramelized Onions
Portion into freezer bags; lasts 3 months. Thaw overnight in fridge or low stovetop. Spread flat for quick thaw without mush.
Batch double recipe. Great for stocking up.
Pairing Perfect Caramelized Onions
Burger and Pizza Toppings
Layer on beef burgers or patty melts for sweet-savory pop. On pizza, pair with goat cheese; add last to melt slightly. Use 1/4 cup per burger.
Therefore, they steal the show. Freshness beats jarred.
Salad and Sandwich Ideas
Mix into green salads for 2 tablespoons per serving. Stuff paninis with brie and golden onions. Heat presses release aromas.
Versatile every meal.
Troubleshooting Caramelized Onions FAQ
Why Are My Onions Still Crunchy?
Crunchy onions mean not enough time or heat too low. Four onions need full 30-35 minutes on medium-low with stirring. Check slices are thin; add 5-10 minutes if thick. Stir every 2 minutes to release sugars evenly.
Can I Speed Up Caramelization?
No real shortcuts; high heat burns edges. Baking at 400°F takes longer, about 45 minutes. Microwave myths don’t work; they steam, not caramelize. Stick to stovetop for perfect results.
How Much for a Crowd?
Scale to 1 onion per person. For 8, use 8 onions in two skillets. Cook batches to avoid crowding; combine at end.
Best Oil Substitutes?
Avocado or grapeseed oil match olive’s high smoke point, around 500°F. Both stay neutral. Use same 2 tablespoons; they’re vegan too.
Vegan and Low-Sodium Options?
Recipe’s already vegan. Cut salt to 1/4 teaspoon; boost umami with chopped mushrooms added early. Flavor holds without excess sodium.
How Do I Store Leftovers and Freeze?
Keep in airtight container in fridge up to 5 days. Freezes well in portions for 3 months; thaw in fridge to avoid sogginess. Reheat gently on stovetop with a touch of oil for best texture.
Why Do My Onions Burn on the Edges?
High heat or infrequent stirring causes burnt edges. Use medium-low, stir every 2-3 minutes, scrape fond. If spots form, add water splash and lower heat to recover.
Can I Substitute Yellow Onions?
White onions work but stay sharper; red add color but milder sweet. Yellow best for balanced perfect caramelized onions. Slice same thinness regardless.
Caramelized Onions
Course: Side DishCuisine: AmericanDifficulty: easy4
servings10
minutes30
minutes120
kcal40
MinutesTired of onions burning at the edges while the middle stays raw? This foolproof method uses steady medium-low heat and frequent stirring to deliver even, golden caramelization without a single scorch mark. Sweet, jammy perfection for burgers, pizzas, or salads every time.
Ingredients
4 large yellow onions, thinly sliced
2 tablespoons olive oil
1/2 teaspoon salt
1/4 teaspoon black pepper
Directions
- Heat olive oil in a large stainless steel skillet over medium-low heat until shimmering but not smoking, about 2 minutes. This gentle heat is the key, preventing hot spots that scorch onions.
- Add sliced onions, salt, and pepper. Stir to coat evenly. Cook undisturbed for 5 minutes to let natural sugars release without browning too fast.
- Reduce heat to low if needed. Stir every 2-3 minutes for even cooking, scraping any fond (brown bits) from the pan bottom. This constant motion distributes heat perfectly, guaranteeing no burnt edges. Continue 20-25 minutes until deep golden and jammy.
- Remove from heat. Taste and adjust salt. Use warm or store in fridge up to 5 days.
Notes
- Store in fridge up to 5 days. Use stainless steel skillet for best results to avoid hot spots.