
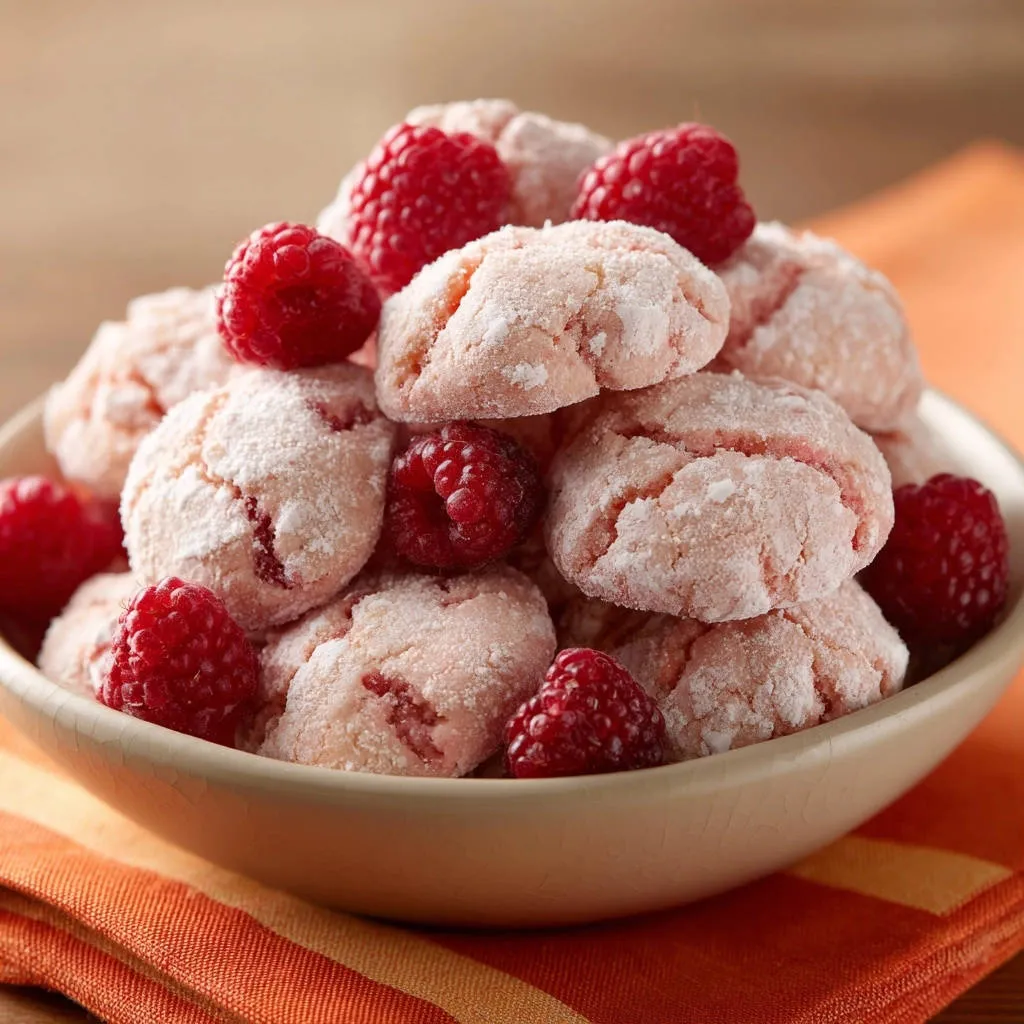
For years, I chased the elusive perfectly tender snowball cookie, often ending up with dry, crumbly results. My quest led me to crack the code, and these Raspberry Snowball Cookies are the triumphant culmination, offering an unparalleled melt-in-your-mouth texture with a vibrant burst of fruit.
This recipe transforms a classic into an extraordinary experience, delivering delicate cookies that are never tough, guaranteeing a truly unforgettable bite.
The Secret to Raspberry Snowball Cookies That Truly Melt in Your Mouth
Many bakers encounter the frustration of snowball cookies that turn out dry, crumbly, or disappointingly tough. Traditional recipes can sometimes leave you wondering where the melt-in-your-mouth magic went.
This specific recipe for Raspberry Snowball Cookies solves those common issues. We focus on techniques and ingredient roles that ensure guaranteed tenderness, a delightful melt-in-your-mouth texture, and a vibrant, authentic raspberry flavor.
You’ll discover simple yet crucial steps that prevent over-spreading and over-mixing, leading to consistently perfect, delicate fruit-infused treats every time.
Crafting Perfection: Essential Ingredients for Your Snowball Cookies
Each ingredient plays a vital role in achieving the perfect balance of flavor and the signature melt-in-your-mouth texture of these Raspberry Snowball Cookies.
Butter: The Foundation of Unrivaled Tenderness
Unsalted butter is specified to give you complete control over the salt content, ensuring a balanced flavor profile.
Crucially, the butter must be truly softened-yielding to a gentle press but not melted. This consistency is essential for incorporating air during the creaming process, which directly contributes to a light and tender crumb.
Sweetness & Structure: Powdered Sugar and All-Purpose Flour
Powdered sugar, or confectioners’ sugar, is used for its fine texture, which helps create a smoother dough and contributes to the cookie’s delicate structure.
It also forms the signature snowy coating. All-purpose flour provides the necessary structure, but its careful handling is vital to avoid developing too much gluten, which leads to tough cookies.
The Star Flavor: Fresh Raspberries & A Hint of Vanilla
Finely mashed fresh raspberries are the heart of these Raspberry Snowball Cookies, infusing them with bright, natural fruit flavor and a beautiful subtle hue.
For tender, melt-in-mouth raspberry cookies, consider learning the no-spread thumbprint cookies method.
Using fresh fruit ensures a vibrant taste without excess moisture that can alter the dough’s consistency. Vanilla extract provides an aromatic depth that perfectly complements the tart sweetness of the raspberries.
For a similar citrus twist, explore glazed orange creamsicle cookies for another delightful treat.
Your Baking Arsenal: Tools for Effortless Snowball Cookie Making
Having the right tools makes the process of creating these delicate Raspberry Snowball Cookies smooth and enjoyable.
Electric Mixer (Stand or Handheld): Essential for thoroughly creaming butter and sugar, incorporating air for that tender texture. It ensures efficiency and consistent results.
Large Mixing Bowls: You’ll need at least one large bowl for mixing the dough and another for rolling the cookies in powdered sugar.
Rubber Spatula: Perfect for scraping down the sides of the bowl during mixing and gently folding in flour.
Measuring Cups and Spoons: Accuracy is key in baking; precise measurements ensure consistent dough consistency and flavor.
Baking Sheets: Sturdy sheets that conduct heat evenly are crucial for consistent baking and preventing burnt bottoms.
Parchment Paper: Prevents sticking, ensures easy cleanup, and allows for even heat distribution on the bottom of the cookies.
Small Cookie Scoop (1-inch): Guarantees uniform cookie size, which leads to even baking and a professional presentation.
Wire Cooling Rack: Allows air circulation around the cookies, preventing sogginess and ensuring they cool completely and consistently.
Bake Like a Pro: Your Guide to Irresistible Raspberry Snowball Cookies
Follow these detailed steps to create perfectly tender Raspberry Snowball Cookies every time.
- The Creaming Magic: Butter & Sugar
In a large bowl, combine the softened butter and 1/2 cup of powdered sugar. Beat with an electric mixer until the mixture becomes light, fluffy, and noticeably pale.
This creaming process is absolutely vital; it incorporates air into the butter, creating pockets that will result in a wonderfully tender crumb. Ensure your butter is truly softened but not at all melted, as melted butter won’t trap air effectively.
- Infusing Flavor: Vanilla & Mashed Raspberries
Add the vanilla extract, salt, and finely mashed raspberries to the creamed butter mixture. Continue beating on low speed until they are just combined.
It’s completely normal for the mixture to appear slightly curdled at this stage due to the moisture from the raspberries; don’t worry, it will come together.
- Gentle Flour Integration: The Key to a Tender Crumb
Gradually add the all-purpose flour to the wet ingredients, mixing on the lowest speed possible.
Stop mixing the moment no dry streaks of flour are visible. Overmixing the flour develops gluten, which makes cookies tough and chewy, undermining the desired delicate texture of these snowball cookies.
- The Crucial Chill: Firming the Dough
Cover the cookie dough tightly and refrigerate it for at least 30 minutes, or up to an hour.
This chilling step is non-negotiable; it allows the butter to firm up and the flour to fully hydrate, which prevents the cookies from spreading excessively in the oven and helps achieve that consistent, delicate texture.
- Preheat & Prep: Oven and Baking Sheet
While the dough chills, preheat your oven to 350°F (175°C).
Line a baking sheet with parchment paper to prevent sticking and ensure even baking.
- Shaping the Snowballs: Consistent Size
Using a 1-inch cookie scoop, portion the chilled dough into uniform balls.
Place them about 1 inch apart on the prepared baking sheet. Consistent sizing ensures all cookies bake evenly.
- Baking to Golden Perfection: The “Don’t Overbake!” Rule
Bake for 10-12 minutes, or until the edges appear lightly golden and the centers are set but still look soft.
It is absolutely critical not to overbake these Raspberry Snowball Cookies. Overbaking will quickly lead to dry, crumbly cookies, so pull them out as soon as they reach this stage.
- Initial Cool-Down: On the Baking Sheet
Remove the baking sheet from the oven and allow the cookies to cool directly on the sheet for 5 minutes.
This brief cooling period allows them to firm up slightly before handling, preventing breakage.
- The First Powdered Sugar Roll: Warm & Gentle
While the cookies are still warm (but not hot), gently roll them in the remaining 1 1/2 cups of powdered sugar.
The warmth helps the first layer of sugar adhere beautifully, creating a foundational coating.
- The Double Roll & Garnish: For a Beautiful Finish
Let the cookies cool completely on a wire rack.
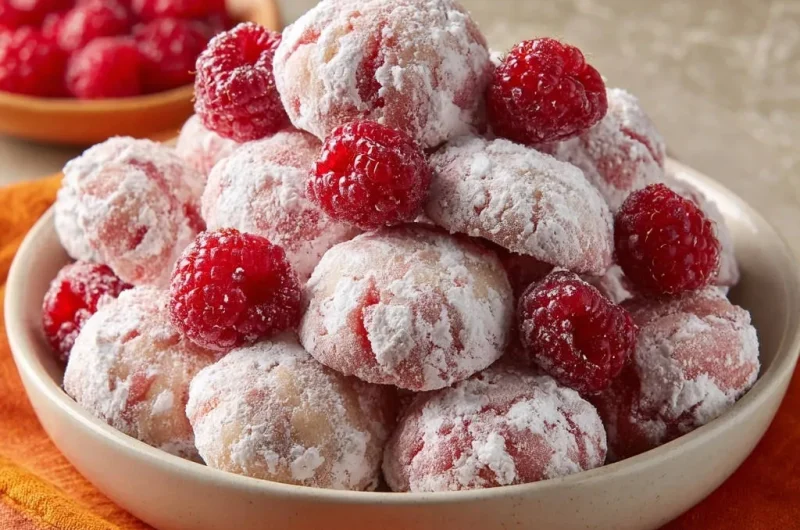
Once fully cooled, roll them in powdered sugar a second time; this ensures a thicker, more visually appealing, and truly snowy coating. Garnish with a fresh raspberry just before serving for a vibrant finish and an extra burst of fresh flavor.
More Sweet Treats to Try
If you enjoyed these raspberry snowball cookies, you might like these other baked goods.
- For a rich chocolate option, consider this Moist Chocolate Bundt Cake, perfect for a decadent dessert.
- If you’re a fan of breakfast treats, these Fluffy Diner-Style Pancakes offer a light and airy texture.
Expert Tips & Tricks for Your Best Raspberry Snowball Cookies Ever
Elevate your Raspberry Snowball Cookies from good to absolutely phenomenal with these expert insights.
The Butter Factor: Softened is Gold, Melted is a No-Go. Your butter needs to be perfectly softened, which means it indents easily but isn’t oily or melted. This precise consistency allows it to properly emulsify with sugar and trap air during creaming, directly impacting the cookie’s light and tender final texture.
Mastering the Flour: Why Less is More When Mixing. The moment you see no more dry flour streaks, stop mixing. Even a few extra seconds of mixing can over-develop the gluten in the flour, transforming delicate cookies into tough, chewy ones. Gentleness here is paramount for that melt-in-your-mouth feel.
Don’t Skip the Chill: It’s Your Dough’s Best Friend. Chilling the dough does wonders. It not only firms up the butter to prevent excessive spreading in the oven, but it also allows the flour to fully hydrate, enhancing the flavor and contributing to a more tender, consistent cookie structure. This step is critical for perfectly shaped snowball cookies.
The Art of Not Overbaking: The Secret to “Melt-in-Mouth.” Keep a close eye on your cookies during the last few minutes of baking. They should be just set and lightly golden at the edges, but still appear soft in the center. Even a minute too long can dry them out, sacrificing their signature tenderness and delicate texture.
Achieving that Perfect Powdered Sugar Cloud Coating. The double-roll technique is key for that beautiful, substantial powdered sugar finish. The first roll while warm helps a thin layer adhere, and the second roll once completely cool creates a thicker, more stable, and truly snowy cloud that won’t easily disappear.
Fresh vs. Frozen Raspberries: A Flavor & Texture Debate. While frozen raspberries can work in some recipes, fresh are highly recommended for these fruit-infused treats. Fresh berries offer a brighter, more intense flavor and introduce less excess moisture, which can otherwise affect the delicate balance of the dough’s consistency.
Common Challenges & Simple Solutions for Snowball Cookies
Even expert bakers encounter hiccups. Here are solutions to common issues you might face with Raspberry Snowball Cookies.
My Cookies Are Spreading Too Much! What Went Wrong?
This often indicates that your butter was too warm, or your dough wasn’t chilled sufficiently. Ensure butter is softened, not melted, and always chill the dough for at least 30 minutes.
Additionally, an oven that isn’t preheated to the correct temperature can cause spreading, so confirm your oven thermometer is accurate.
Why Are My Raspberry Snowball Cookies Tough or Dry?
The primary culprits here are overmixing the flour and overbaking. Mix the flour only until just combined, stopping as soon as dry streaks disappear.
Bake only until the edges are lightly golden and the centers are set, remembering that they continue to cook slightly on the hot baking sheet after removal.
The Powdered Sugar Isn’t Sticking Properly. Help!
This usually happens if your cookies are either too hot or too cold when rolled. The first roll should occur when the cookies are warm, allowing the sugar to melt slightly and adhere.
The second roll needs to happen once the cookies are completely cool, which allows for a thicker, more stable coating. Ensure your powdered sugar is fresh and lump-free.
My Dough Is Too Sticky to Roll into Balls.
If your dough is excessively sticky, it likely needs more chilling time. Extend the refrigeration period by another 30 minutes.
In rare cases, if the ambient humidity is very high, you can carefully mix in an additional tablespoon of flour, but proceed with caution to avoid toughening the dough.
Beyond the Bake: Serving, Storing, and Enjoying Your Snowball Cookies
Maximizing the enjoyment and longevity of your Raspberry Snowball Cookies is easy with these simple tips.
Serving Suggestions: Perfect Pairings for a Sweet Treat
These delicate cookies are delightful on their own, but they also pair wonderfully with a warm cup of tea or coffee, especially during the holidays or for a cozy afternoon treat.
Their elegant appearance makes them a perfect addition to a dessert platter, offering a beautiful pop of color and fruit flavor among other confections.
Proper Storage for Lasting Freshness and Flavor
Store your snowball cookies in an airtight container at room temperature for up to 5-7 days.
To prevent the powdered sugar from dissolving, ensure the cookies are completely cool before storing, and consider placing a piece of parchment paper between layers if stacking.
Make-Ahead Magic: Dough & Baked Cookies for Convenience
You can prepare the dough in advance and keep it wrapped tightly in the refrigerator for up to 2-3 days before baking.
Baked Raspberry Snowball Cookies freeze beautifully. Place fully cooled, sugar-coated cookies in an airtight container with parchment between layers and freeze for up to 2-3 months. Thaw at room temperature before serving.
Your Raspberry Snowball Cookie Questions, Answered!
Here are answers to common questions about making and enjoying these delightful Raspberry Snowball Cookies.
Can I use frozen raspberries instead of fresh?
While fresh raspberries are preferred for their vibrant flavor and minimal moisture, you can use frozen. Thaw them completely, then pat them very dry with paper towels to remove as much excess moisture as possible before mashing.
Be aware that frozen raspberries might yield a slightly less vibrant color and a marginally softer dough consistency.
Is it possible to make these Raspberry Snowball Cookies gluten-free?
Yes, you can substitute the all-purpose flour with a 1:1 gluten-free baking flour blend that contains xanthan gum. The texture might be slightly different, potentially a bit more delicate or crumbly, but the flavor will remain wonderful.
Can I add other flavors, nuts, or extracts to the recipe?
Absolutely! For a twist, you could try adding finely chopped pecans or almonds to the dough, or experimenting with a hint of almond extract alongside the vanilla.
Just be mindful that nuts will change the texture, and other extracts should be used sparingly to avoid overpowering the delicate raspberry flavor.
Why do these cookies need two rolls in powdered sugar?
The first roll, while the cookies are warm, allows a foundational layer of sugar to melt slightly and adhere firmly. The second roll, once the cookies are completely cool, builds upon this base, creating a thick, even, and truly snowy coating that is visually stunning and lasts longer.
How long do Raspberry Snowball Cookies typically last?
When stored properly in an airtight container at room temperature, these cookies will maintain their best quality for about 5 to 7 days. The flavor actually deepens slightly after the first day.
Ready to Create Your Own Raspberry Snowball Cookie Masterpiece?
Armed with these expert tips and a meticulously crafted recipe, you’re ready to create the most tender, flavorful Raspberry Snowball Cookies you’ve ever tasted.
Embrace the simple techniques, trust the process, and soon you’ll be enjoying these delicate, fruit-infused treats that truly melt in your mouth.
Go ahead, bake a batch, and share the joy of perfectly tender snowball cookies!
Raspberry Snowball Cookies
Course: DessertCuisine: AmericanDifficulty: easy4
3 dozen cookies25
minutes12
minutes370
kcal37
minutesDiscover the secret to perfectly tender, melt-in-your-mouth raspberry cookies that practically dissolve on your tongue. This recipe cracks the code, ensuring delicate texture and delightful flavor with every bite. Simple steps lead to beautiful, sweet raspberry beauties.
Ingredients
1 cup (2 sticks) unsalted butter, softened
1/2 cup powdered sugar, plus 1 1/2 cups for rolling
1 teaspoon vanilla extract
1/4 teaspoon salt
2 cups all purpose flour
1/4 cup finely mashed fresh raspberries (about 6-8 medium raspberries)
Fresh raspberries for garnish
Directions
- In a large bowl, cream together the softened butter and 1/2 cup powdered sugar using an electric mixer until light and fluffy. This creaming step is crucial for incorporating air and achieving that tender texture. Ensure your butter is truly soft but not melted.
- Beat in the vanilla extract, salt, and finely mashed raspberries until just combined. The mixture might look a little curdled, which is perfectly fine.
- Gradually add the all purpose flour, mixing on low speed until just combined. Stop mixing as soon as no dry streaks of flour remain. Overmixing the flour will develop gluten and make your cookies tough, so be gentle!
- Cover the dough and chill in the refrigerator for at least 30 minutes. This helps the dough firm up, preventing the cookies from spreading too much and ensuring a consistent, delicate texture.
- Preheat your oven to 350F (175C). Line a baking sheet with parchment paper.
- Scoop dough into 1-inch balls and place them about 1 inch apart on the prepared baking sheet.
- Bake for 10-12 minutes, or until the edges are lightly golden and the cookies are set but still soft in the center. Do not overbake! This is another key to keeping them wonderfully tender.
- Let the cookies cool on the baking sheet for 5 minutes before carefully transferring them to a wire rack.
- While the cookies are still warm, gently roll them in the remaining 1 1/2 cups powdered sugar. Let cool completely, then roll them in powdered sugar again for a thicker, prettier coating.
- Garnish with fresh raspberries just before serving for a burst of fresh flavor.
Notes
- Do not overbake to ensure tender texture. Chilling the dough for 30 minutes is crucial for preventing spread and ensuring delicate texture.