Cracked red velvet cake rolls ruin the show every time you slice them open. You unroll, fill, and reroll, only to watch those ugly splits form. But this red velvet swiss roll changes everything with the warm-roll technique. You roll it hot right out of the oven in a powdered sugar-dusted towel, locking in that perfect spiral.
Why does this no-crack red velvet cake roll work so well? Most recipes let the cake cool flat, making it brittle and prone to breaks. However, rolling it warm keeps the cake flexible, so it holds the shape without fighting back. In addition, the creamy cheesecake filling and festive toppings make every slice stunning.
Here’s the expertise booster: dust that towel generously with powdered sugar before rolling. It absorbs moisture and stops sticking, so your red velvet cake roll releases perfectly later. Oh man, those first flawless slices will have you craving more.
Why Red Velvet Cake Rolls Crack (And How to Stop It)
Red velvet cake roll cracks happen when you overbake the cake, drying it out completely. The edges turn brittle, and without enough moisture, it snaps during rolling. However, this recipe keeps things elastic with oil and buttermilk.
Cooling the cake flat is another big culprit. It loses flexibility as it sets, so any bend causes tears. Therefore, our hot-roll method trains the warm cake to hold the curve. You’ll get smooth, stunning slices every time.
Buttermilk plays a key role too. It tenderizes the gluten, adding pliability that milk just can’t match. In addition, the oil ensures the cake stays supple. No more red velvet cake roll cracks ruining your dessert.
Role of Buttermilk in Cake Flexibility
Buttermilk tenderizes the gluten in the flour, making the cake pliable for rolling. Regular milk lacks that acidity, so the batter gets tougher. Therefore, stick with buttermilk to prevent red velvet cake roll cracks and ensure easy shaping.
Hot Rolling: The Physics of Perfect Shape
Hot rolling uses thermal memory. The warm cake’s proteins set in the rolled form, so it remembers the shape without cracking. Dust the towel with powdered sugar first; it prevents sticking as the cake cools.
Roll tightly from the short end while it’s still hot. Cool it seam-side down for 1-2 hours. This red velvet cake roll technique guarantees a flawless spiral every time.
Essential Ingredients for Flawless Red Velvet Cake Roll
You’ll need 1 cup all-purpose flour, 1/4 cup unsweetened cocoa powder, and 1 teaspoon baking powder for the cake base. The cocoa gives that signature red velvet taste without overpowering. In addition, 4 large eggs beaten to ribbon stage trap air for lightness.
Don’t skip the 2 tablespoons vegetable oil and 1/4 cup buttermilk; they keep the cake moist and flexible. Use 1 tablespoon red food coloring for vibrant hue. The filling stars 8 ounces softened cream cheese folded with whipped heavy cream for fluffiness.
Frosting comes together with 2 cups powdered sugar, 1/4 cup softened butter, and more cream cheese. Adjust with 2-3 tablespoons milk for spreadable texture. These red velvet cake roll ingredients yield 12 perfect slices.
Cake Base: Cocoa and Food Coloring Balance
Unsweetened cocoa balances the sugar and enhances the red hue from food coloring. Natural cocoa works best here; Dutch-process can mute the color. This exact ratio prevents bitterness in your red velvet cake roll.
Creamy Filling: Whipped Cream Integration
Fold stiffly whipped heavy cream into smooth cream cheese for airy texture. Powdered sugar stabilizes it, preventing deflation. You’ll get a cheesecake-like filling that holds up in the roll.
For more red velvet goodness, check out these red velvet cheesecake stuffed cookies.
Frosting: Achieving Spreadable Consistency
Beat softened butter and cream cheese with powdered sugar first. Add milk gradually until it’s fluffy and pipeable. This emulsion stays smooth on your red velvet cake roll.
For more ideas on achieving a smooth texture, check out creamy pumpkin swirl cheesecake.
Equipment That Ensures Red Velvet Cake Roll Success
Grab a 15×10-inch jelly roll pan; it’s the exact size for even thickness. Line it with parchment, grease twice, and dust with cocoa. An electric mixer whips eggs to pale ribbons in 5 minutes.
A clean kitchen towel dusted with powdered sugar is essential for rolling. However, skip flour dusting; cocoa prevents sticking better. Budget mixers work fine if they hit high speed.
Jelly Roll Pan Dimensions Explained
The 15×10 size gives ideal 1/4-inch batter thickness. Smaller pans make edges too thin and crack-prone. This ensures your red velvet cake roll rolls without breaks.
Mixer Speeds for Egg Volume Peak
Beat eggs and sugar on high for 5 minutes until pale and thick. Air incorporation creates volume for a light cake. Test by lifting beaters; batter should ribbon back.
Step-by-Step: Baking the Red Velvet Cake Roll Base
Preheat to 350°F. Grease the jelly roll pan, line with parchment, grease again, and dust with cocoa. Whisk dry ingredients: flour, cocoa, baking powder, salt.
Beat eggs and sugar 5 minutes until thick. Mix in oil, red coloring, vanilla, buttermilk. Fold in dry mix gently to keep air in. Spread evenly; bake 12 minutes till springy.
Watch for spring-back when touched; don’t overbake. Ovens vary, so check at 10 minutes. This sets up your crack-proof base perfectly.
Pan Prep and Batter Mixing Precision
Double grease and cocoa dust stops sticking better than flour. Fold batter with a spatula in thirds; preserve leavening bubbles. You’ll smell chocolatey sweetness as it bakes.
Baking Time and Doneness Test
Bake at 350°F for 12 minutes; touch center for spring-back, not toothpick doneness. Adjust for hot spots by rotating. Edges stay soft for rolling.
Mastering the Crack-Proof Roll for Red Velvet Cake Roll
Right from the oven, invert hot cake onto powdered sugar-dusted towel. Peel parchment gently. Roll tightly from short end with towel; cool 1-2 hours rolled up.
The warmth sets the shape, mimicking muscle memory. Unroll only when fully cooled. This red velvet cake roll rolling method delivers pro results.
Towel Dusting and Initial Roll Tightness
Generous powdered sugar absorbs steam and prevents tears. Roll seam-down to hold tight. Cool completely; rushing causes cracks.
Gentle Unrolling After Cooling
Unroll at room temp for max flexibility. Spread filling to 1/2-inch border. Reroll snug without towel for clean spiral.
Assembling the Cheesecake Filling in Red Velvet Cake Roll
Beat softened cream cheese, powdered sugar, vanilla smooth. Whip heavy cream to stiff peaks, then fold in gently. Spread evenly, leaving a border to avoid leaks.
Reroll tightly and wrap in plastic. Chill 2 hours to firm the cheesecake filling. It holds the shape for slicing.
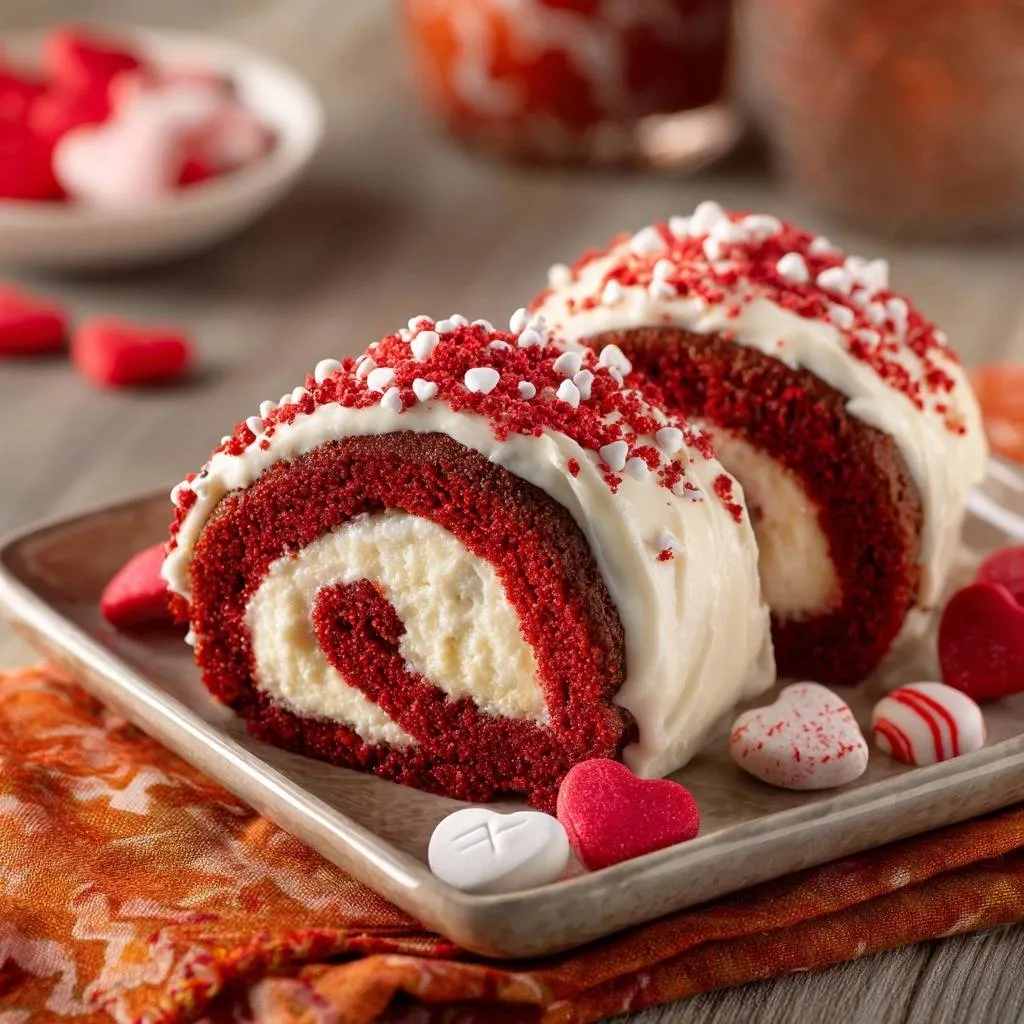
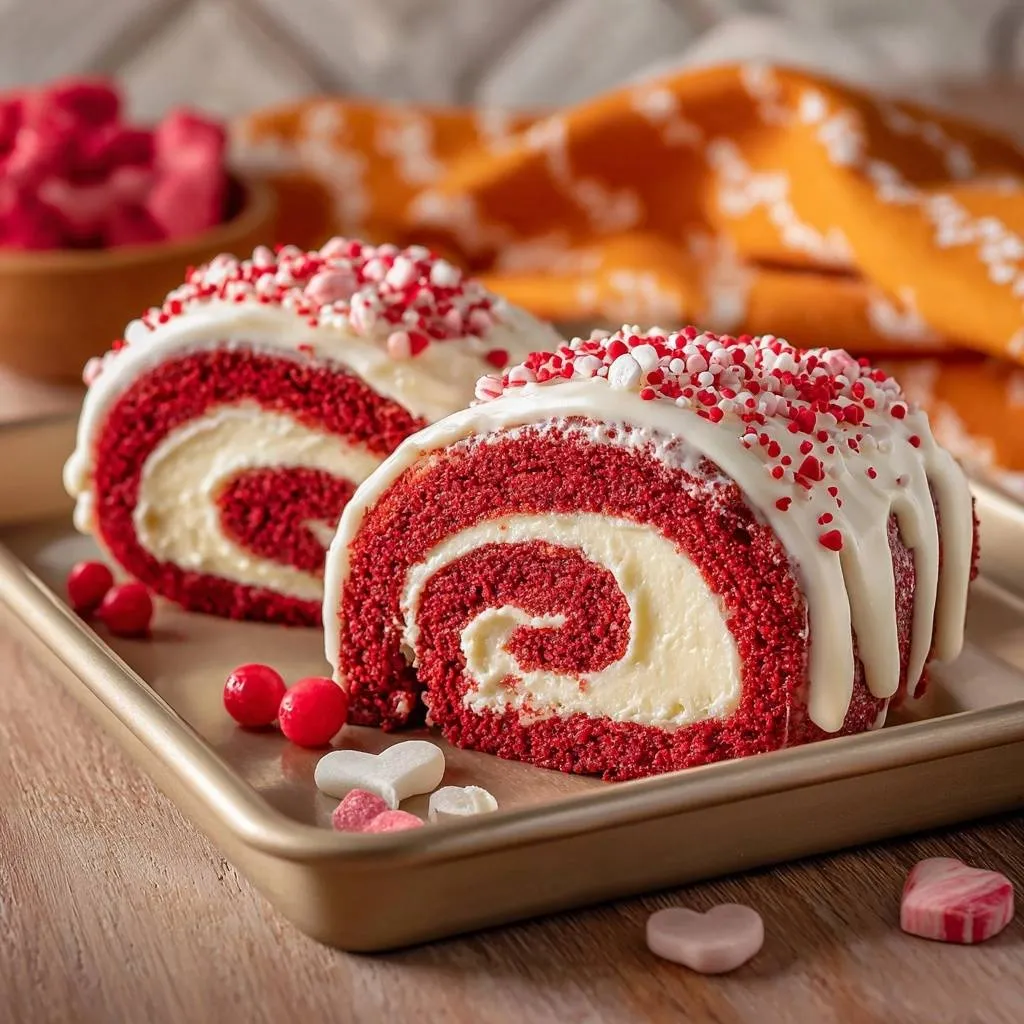
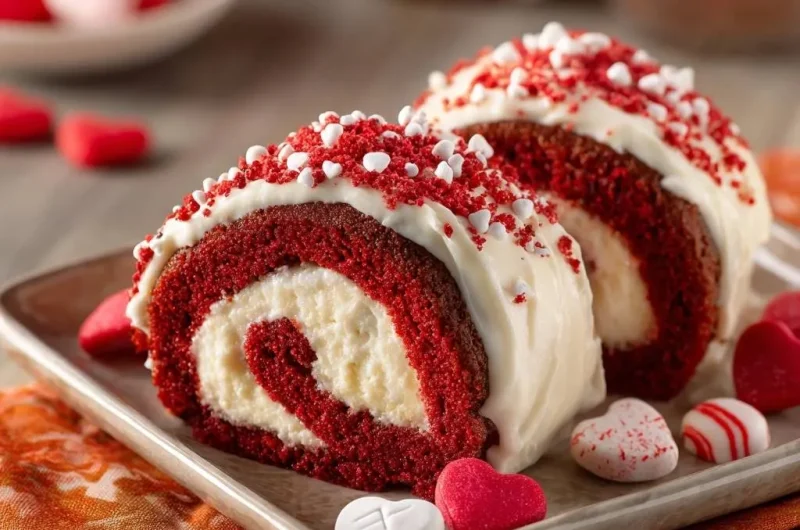
Crowning with Frosting and Festive Toppings
Beat frosting ingredients to fluffy peaks. Slather generously over the chilled roll. Sprinkle red and white sprinkles, add candy hearts for pop.
Chill before slicing for clean cuts. The frosting sets creamy, contrasting the moist cake inside.
Avoiding Pitfalls in Red Velvet Cake Roll Perfection
Delayed rolling causes cracks; act fast while hot. Overfolding batter deflates air, making it dense. Cold cream cheese leads to lumpy filling.
Loose rerolls let filling ooze. Frosting separates if ingredients aren’t room temp. Pro tip: warm edges with syrup brush if slightly dry before rolling.
Overbaking Signs and Recovery
Dry edges? Brush simple syrup before rolling. It adds moisture without sogginess. Prevents cracks effectively.
Filling Spread and Re-Roll Errors
Too-thick filling bursts seams; spread thin. Chill fully between steps. Avoid interruptions for tight roll.
Storage and Make-Ahead for Red Velvet Cake Roll
Wrap tightly and fridge for 3-5 days. Slices stay moist. For make-ahead, bake and roll day before, fill and frost same day.
Freeze sliced pieces up to 1 month; thaw overnight. Serve at room temp max 2 hours. Perfect for holidays.
Pairing Sides with Red Velvet Cake Roll Slices
Hot coffee cuts the creaminess beautifully. Fresh berries balance sweetness with tartness. Nutty shortbread echoes the cocoa.
Plate with mint leaves for holidays. Skip heavy desserts; keep it light.
What to Pair with Your Red Velvet Cake Roll
Enjoying a slice of this red velvet cake roll is a treat. Complement your dessert with these other sweet and savory ideas.
- For a cool beverage to go with your red velvet creation, try this Creamy Copycat Iced Coffee, perfect for balancing the richness of the cake.
- If you’re looking for a savory option to start your meal, consider this Cheesy Artichoke and Ham Casserole which offers a delightful contrast in flavors and textures.
Red Velvet Cake Roll FAQ
Can I Make Red Velvet Cake Roll Gluten-Free?
Swap with 1:1 gluten-free flour blend plus 1/2 teaspoon xanthan gum. Mix batter gently; it holds together well for rolling. Test bake time, as it may need 1 extra minute.
Why Use Red Food Coloring Here?
Gel coloring gives vivid red hue without watering down batter like liquid does. Use 1 tablespoon for intense color that pops in slices. It doesn’t alter taste at all.
How to Fix a Cracked Red Velvet Cake Roll?
Patch cracks with extra filling or frosting before final chill. For major splits, steam gently 10 seconds to soften, then reroll. Frosting hides minor flaws perfectly.
Freezing Tips for Red Velvet Cake Roll?
Slice and wrap individuals in plastic, then foil; freeze up to 1 month. Thaw in fridge overnight. Frost after thawing to avoid sogginess.
Dairy-Free Red Velvet Cake Roll Options?
Use coconut cream for filling and vegan cream cheese. Swap butter with coconut oil in frosting. Whip chilled coconut cream stiff; it mimics dairy texture closely.
How Long Does Red Velvet Cake Roll Last in the Fridge?
Store wrapped airtight for 3-5 days. Cream cheese filling keeps it fresh; cover cut ends well. Beyond that, texture softens too much.
Why Did My Red Velvet Cake Roll Crack?
Common issue: cooling flat or overbaking dries it. Roll hot immediately, bake just till springy. Buttermilk and oil prevent this; follow timing exactly.
Red Velvet Cake Roll
Course: DessertCuisine: AmericanDifficulty: medium12
servings30
minutes12
minutes350
kcal180
MinutesTired of red velvet cake rolls that crack and crumble? This foolproof recipe uses a warm-roll technique: roll the cake immediately in a powdered sugar-dusted towel while hot to lock in the perfect spiral shape every time. No cracks, just stunning slices filled with creamy cheesecake goodness and topped with festive sprinkles.
Ingredients
Cake:
1 cup all-purpose flour
1/4 cup unsweetened cocoa powder
1 teaspoon baking powder
1/4 teaspoon salt
4 large eggs
1 cup granulated sugar
2 tablespoons vegetable oil
1 tablespoon red food coloring
1 teaspoon vanilla extract
1/4 cup buttermilk
Filling:
8 ounces cream cheese, softened
1/4 cup powdered sugar
1 teaspoon vanilla extract
1 cup heavy whipping cream, whipped
Frosting and Topping:
2 cups powdered sugar
1/4 cup butter, softened
4 ounces cream cheese, softened
1 teaspoon vanilla extract
2-3 tablespoons milk
Red and white sprinkles
Candy hearts
Directions
- Preheat oven to 350 degrees F. Grease a 15×10-inch jelly roll pan, line with parchment paper, and grease again. Dust lightly with cocoa powder.
- Whisk flour, cocoa, baking powder, and salt in a bowl. Set aside.
- Beat eggs and sugar with electric mixer on high for 5 minutes until thick and pale. Mix in oil, food coloring, vanilla, and buttermilk. Fold in dry ingredients gently until just combined.
- Spread batter evenly in prepared pan. Bake 12 minutes until springy to touch.
- While hot, immediately turn cake onto a clean kitchen towel dusted generously with powdered sugar. Peel off parchment. Starting at short end, roll cake and towel together tightly. Cool completely rolled up (this is the crack-proof secret: the warmth sets the shape without breaking).
- For filling, beat cream cheese, powdered sugar, and vanilla until smooth. Fold in whipped cream.
- Unroll cooled cake gently. Spread filling evenly, leaving 1/2-inch border. Re-roll tightly without towel. Wrap in plastic and chill 2 hours.
- For frosting, beat powdered sugar, butter, cream cheese, vanilla, and milk until spreadable. Frost roll generously.
- Sprinkle with red and white sprinkles and top with candy hearts. Slice and serve chilled.
Notes
- The key to crack-free rolls is rolling the cake while hot in a powdered sugar-dusted towel to set the shape. Chill well before slicing for clean cuts.