The Secret to a Perfectly Smooth Dreamy Chocolate Peanut Butter Cheesecake Top
Achieving a pristine cheesecake surface is often the holy grail for home bakers, and this `Dreamy Chocolate Peanut Butter Cheesecake` recipe guarantees that flawless result. The key lies in understanding and controlling temperature fluctuations, which are the primary culprits behind those dreaded cracks. Our method uniquely addresses this with a crucial two-part cooling process and the indispensable water bath technique. These steps work in harmony to create an incredibly moist, even baking environment and prevent the sudden thermal shock that causes the delicate custard structure to pull apart. You’ll never struggle with a fissured top again, only perfect, creamy slices awaiting your enjoyment.Gathering Your Essentials: Tools for Dreamy Chocolate Peanut Butter Cheesecake Success
The Indispensable Springform Pan
A 9-inch springform pan is non-negotiable for cheesecakes. Its removable sides allow for effortless release, ensuring your `Dreamy Chocolate Peanut Butter Cheesecake` maintains its pristine shape and impressive presentation.
Your Water Bath Setup: Roasting Pan & Foil
Heavy-duty aluminum foil is essential for wrapping the springform pan tightly, creating a leak-proof barrier. A larger roasting pan is needed to hold the springform, forming the water bath that insulates the cheesecake and promotes moist, even baking without cracks.
The Electric Mixer: For Ultimate Creaminess
An electric mixer, either stand or hand-held, is crucial for achieving smooth, lump-free cheesecake batter. It thoroughly incorporates ingredients, creating the silky, velvety texture vital for a perfect `Dreamy Chocolate Peanut Butter Cheesecake`.
For another take on smooth baking, explore creamy pumpkin swirl cheesecake.
Crafting Each Layer: The Ingredients Behind This Dreamy Chocolate Peanut Butter Cheesecake
For the Irresistible Chocolate Cookie Crust
Chocolate cookie crumbs form the foundation, offering a deep cocoa flavor and delightful crunch. Using about 24 sandwich cookies with their centers removed ensures the right balance of chocolate. Melted unsalted butter acts as the binder, cementing the crumbs into a firm, flavorful crust, while a touch of granulated sugar enhances the sweetness and texture.
The Velvety Vanilla Cheesecake Layer
Full-fat cream cheese, softened to room temperature, is paramount for a truly smooth and luscious texture. Granulated sugar provides the necessary sweetness and structure. Room temperature large eggs incorporate more evenly, preventing lumps and promoting a consistent bake. Pure vanilla extract adds a classic, aromatic depth, and a generous quarter cup of room temperature sour cream contributes a subtle tanginess and an incredibly tender crumb, balancing the richness beautifully.
Rich & Creamy Peanut Butter Cheesecake Layer
Creamy peanut butter is the star here, chosen for its smooth consistency which integrates seamlessly into the batter. This ensures a luxurious, melt-in-your-mouth peanut butter flavor in every bite. Softened cream cheese again forms the creamy base, alongside granulated sugar for sweetness. A single room temperature large egg and a touch of vanilla extract bind the layer and enhance its distinct, comforting flavor profile.
Decadent Chocolate Drizzle and Topping
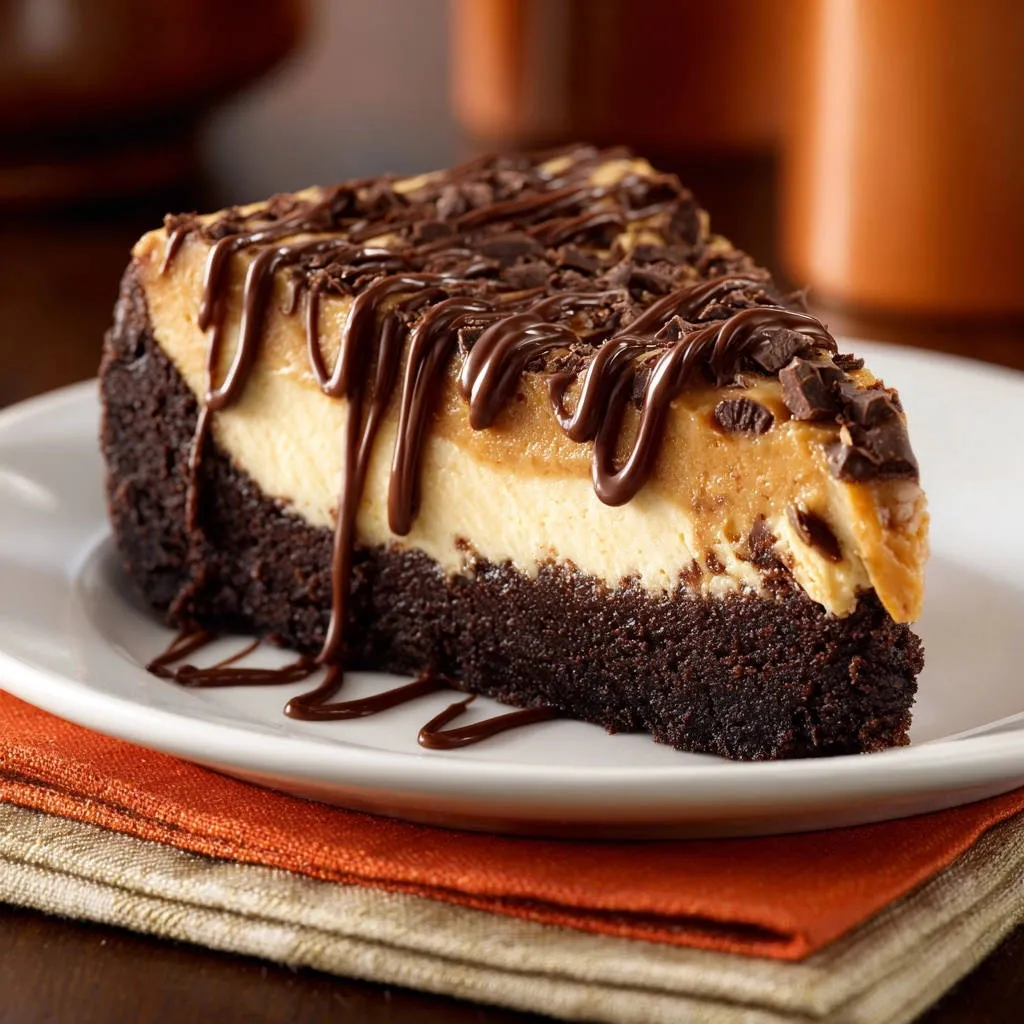
Good quality chocolate chips are melted with a tiny bit of vegetable oil to create a smooth, glossy drizzle that sets beautifully without becoming brittle. This adds both visual appeal and an extra layer of chocolatey indulgence. Finally, chocolate shavings or mini chocolate chips provide an elegant garnish, making this `Dreamy Chocolate Peanut Butter Cheesecake` truly irresistible.
Your Step-by-Step Journey to Dreamy Chocolate Peanut Butter Cheesecake Perfection
Prepare Your Pan and Oven for Success
Begin by preheating your oven to 325 degrees F (160 degrees C). Lightly grease a 9-inch springform pan to ensure easy release. Crucially, wrap the bottom and sides of the springform pan tightly with heavy-duty aluminum foil.
This aluminum foil creates a secure barrier, preventing any water from seeping in during the water bath technique. It also aids in creating a slightly moister baking environment, which is vital for a smooth cheesecake.
Constructing the Perfect Chocolate Crust
In a medium bowl, combine the chocolate cookie crumbs, melted unsalted butter, and 1/4 cup granulated sugar. Mix until the crumbs are evenly moistened and resemble wet sand. Press this mixture firmly and evenly into the bottom of your prepared springform pan.
Bake the crust for 8 minutes to set it, then remove it from the oven and allow it to cool slightly while you prepare the cheesecake fillings. This pre-baking step creates a sturdy foundation for your `Dreamy Chocolate Peanut Butter Cheesecake`.
Crafting the Silky Vanilla Cheesecake Batter
In a large bowl, use an electric mixer to beat the softened cream cheese and 3/4 cup granulated sugar on medium speed. Continue until the mixture is beautifully smooth and creamy, which typically takes 2-3 minutes. Remember, avoid overbeating the cream cheese mixture, as incorporating too much air can contribute to cracks later.
For similar cheesecake creaminess in a handheld treat, check out the red velvet cheesecake cookies.
Gently beat in the eggs one at a time, mixing just until combined after each addition. Finally, stir in the vanilla extract and room temperature sour cream until they are fully incorporated, yielding a smooth, cohesive batter. Carefully pour this luscious vanilla mixture over your cooled chocolate crust.
Mixing the Rich Peanut Butter Cheesecake Layer
In a separate bowl, combine the softened cream cheese, creamy peanut butter, and 1/2 cup granulated sugar. Beat with your electric mixer until the mixture is completely smooth and well-combined. Then, beat in the single large egg, followed by the vanilla extract, mixing just until everything is incorporated.
Using a spoon, carefully dollop the thick peanut butter mixture over the vanilla cheesecake layer. For an attractive marbled effect, you can gently swirl the two layers together using a butter knife or a skewer. This creates beautiful visual appeal for your `Dreamy Chocolate Peanut Butter Cheesecake`.
The Critical Water Bath Technique
Place your foil-wrapped springform pan inside a larger roasting pan. Very carefully, pour about 1 inch of hot water into the roasting pan, ensuring it surrounds the springform pan without touching the cheesecake itself. This water bath technique is the ultimate secret to preventing cracks.
The gentle, moist heat from the water bath allows the cheesecake to bake evenly and slowly, preventing the edges from cooking too quickly and creating a perfectly uniform, creamy texture throughout. This is a non-negotiable step for a flawless finish.
Baking to Perfection: Look for the Jiggle
Carefully transfer the roasting pan with the water bath and cheesecake into your preheated oven. Bake for 60-70 minutes, or until you observe the edges of the cheesecake are set. The center should still jiggle slightly when you gently shake the pan.
This slight jiggle is the crucial visual cue for doneness; an overbaked cheesecake will lose its creamy texture and is much more prone to cracking. Trust the jiggle for perfect results.
The “No-Crack” Cooling Method Revealed
Once your cheesecake is perfectly baked, immediately turn off the oven, but resist the urge to open the oven door. Allow the `Dreamy Chocolate Peanut Butter Cheesecake` to sit undisturbed in the hot oven with the door closed for a full 30 minutes. This begins the gradual cooling process.
After 30 minutes, crack the oven door open slightly, creating a small gap, and let the cheesecake continue to cool gradually inside the oven for another 1 hour. This slow, controlled decrease in temperature is paramount, as it prevents the sudden thermal shock that commonly causes cheesecakes to crack.
Final Cooling and Refrigeration Steps
Once the gradual cooling in the oven is complete, carefully remove the cheesecake from the oven and lift it out of the water bath. Gently unwrap the aluminum foil from around the springform pan. Transfer the cheesecake to a wire rack and let it cool completely to room temperature, which will take at least 2 hours.
After it has reached room temperature, loosely cover the `Dreamy Chocolate Peanut Butter Cheesecake` with plastic wrap. Transfer it to the refrigerator and chill for at least 4 hours, or ideally, overnight. This crucial chilling period allows the cheesecake to fully set, firm up, and develop its optimal creamy texture and flavor.
Adding the Decadent Chocolate Drizzle and Topping
For the glorious chocolate drizzle, combine the chocolate chips with the vegetable oil in a microwave-safe bowl. Microwave in 30-second intervals, stirring well after each, until the chocolate is completely smooth and melted. Once chilled and set, remove your `Dreamy Chocolate Peanut Butter Cheesecake` from the springform pan.
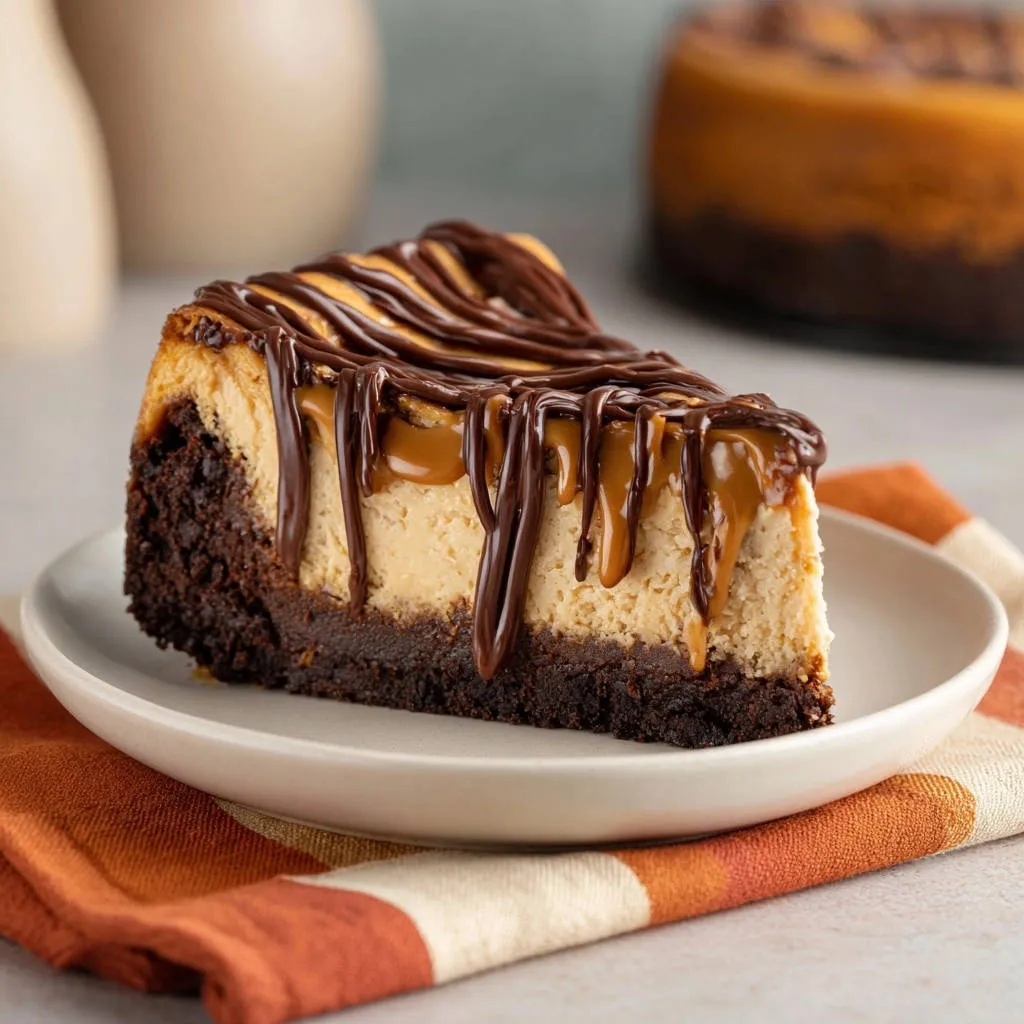
Generously drizzle the warm, melted chocolate over the top of the cheesecake. Finish by sprinkling with chocolate shavings or mini chocolate chips for an extra touch of indulgence and visual appeal. Your masterpiece is now ready to serve!
Complementary Bites
To round out your dessert experience, consider these sweet additions that share delightful flavors.
- For a sweet and salty crunch, you might enjoy these Salted Peanut Butter Pretzel Clusters, featuring the same nutty goodness.
- If you’re in the mood for more chocolate, try a slice of this Moist Chocolate Bundt Cake for a rich cocoa finish.
Mastering Your Dreamy Chocolate Peanut Butter Cheesecake: Expert Tips and Secrets
Achieving That Flawless No-Crack Finish, Every Time
Always use room temperature ingredients, especially cream cheese and eggs. This ensures a smooth, lump-free batter that bakes evenly. Overmixing incorporates too much air, which can cause cracking, so mix only until just combined.
Strictly adhering to the water bath technique is vital for moist, even baking. Most importantly, follow the unique two-stage gradual cooling method in the oven; it’s the ultimate secret to preventing sudden temperature changes that lead to cracks.
Flavor Enhancements and Customization Ideas
To deepen the chocolate flavor, consider adding a pinch of espresso powder to either the crust or the chocolate cheesecake layer; it subtly amplifies the cocoa notes without making it taste like coffee. For an extra textural element in the crust, or even sprinkled on top, try adding finely chopped roasted peanuts.
Beyond the classic chocolate drizzle, you could opt for a contrasting white chocolate drizzle, or even a homemade caramel sauce for an added layer of flavor. Don’t be afraid to experiment with your favorite toppings to personalize this `Dreamy Chocolate Peanut Butter Cheesecake`.
Streamlining Your Cheesecake Preparation
Efficient kitchen workflow makes baking more enjoyable. Start by taking out all your cold ingredients (cream cheese, eggs, sour cream) at least an hour or two before you plan to start mixing, ensuring they reach room temperature. While the oven preheats, prepare your crust, allowing it to cool as you measure out other ingredients.
Having all your ingredients pre-measured and ready before you begin mixing each layer prevents last-minute scrambling and helps maintain the correct mixing times, especially important for preventing overbeating.
Decoding Cheesecake Dilemmas: Common Issues & Quick Fixes
Why Did My Cheesecake Crack?
Cheesecakes often crack due to sudden temperature changes, which cause the delicate custard to contract too quickly. Overbaking is another common culprit, as it dries out the cheesecake, making it brittle. Overmixing the batter, which incorporates too much air, can also lead to a fragile structure prone to fissures.
This `Dreamy Chocolate Peanut Butter Cheesecake` recipe directly combats these issues with its precise water bath and controlled, gradual cooling method, designed specifically to prevent these common baking mishaps.
My Cheesecake is Too Soft or Runny
If your cheesecake is too soft, it’s typically a sign of underbaking. Always rely on the slight jiggle in the center as your indicator of doneness, rather than just relying on the clock. Insufficient chilling time is another common cause; the cheesecake needs ample time in the refrigerator (at least 4 hours, preferably overnight) to fully set and firm up.
Ensuring correct ingredient ratios, particularly of cream cheese and eggs, is also important for the right texture and set.
The Crust Crumbled or is Soggy
A crust that crumbles often indicates insufficient melted butter to bind the cookie crumbs adequately. Conversely, a soggy crust might occur if the heavy-duty aluminum foil wasn’t wrapped tightly enough, allowing water from the water bath to seep into the springform pan.
To prevent this, ensure your foil wrap is secure and watertight. Over-baking the crust can also make it too hard and crumbly, so stick to the recommended bake time.
Serving and Savoring Your Dreamy Chocolate Peanut Butter Cheesecake
Presentation Tips for an Eye-Catching Slice
For pristine, clean slices of your `Dreamy Chocolate Peanut Butter Cheesecake`, use a long, sharp knife dipped in hot water and wiped clean between each cut. This creates smooth, professional-looking edges. Beyond the chocolate drizzle, consider a dollop of fresh whipped cream, a few extra chocolate cookie crumbs, or even a sprinkle of flaky sea salt to really make the flavors pop and add visual interest.
Optimal Storage for Freshness
To maintain its exquisite texture and flavor, your `Dreamy Chocolate Peanut Butter Cheesecake` should always be stored in the refrigerator. Cover it loosely with plastic wrap or place it in an airtight container to prevent it from drying out or absorbing other food odors. Properly stored, it will remain fresh and delicious for up to 3-4 days.
Can I Make This Cheesecake Ahead of Time?
Absolutely, this `Dreamy Chocolate Peanut Butter Cheesecake` is an ideal make-ahead dessert! You can bake it up to 2-3 days in advance, storing it well-covered in the refrigerator. Cheesecake also freezes exceptionally well.
To freeze, wrap the entire chilled cheesecake (or individual slices) tightly in plastic wrap, then again in aluminum foil. It can be frozen for up to 1 month. Thaw overnight in the refrigerator before serving, ensuring it retains its creamy texture.
Your Top Questions Answered: Dreamy Chocolate Peanut Butter Cheesecake FAQs
Can I use different types of cookies for the crust?
Yes, you absolutely can! While chocolate cookie crumbs provide a classic base for this `Dreamy Chocolate Peanut Butter Cheesecake`, feel free to experiment. Graham cracker crumbs, vanilla wafers, or even crushed pretzel for a sweet-and-salty twist would work beautifully. Just ensure you use the same quantity by volume.
What if I don’t have a springform pan?
While a springform pan is highly recommended for easy release and a pristine presentation, you can use a regular 9-inch round cake pan. Line it with parchment paper, leaving an overhang on two sides to create “slings” for easy lifting. Be aware that cutting and serving directly from the pan will be necessary, and the presentation won’t be as clean.
Is there a way to make this recipe gluten-free?
Making this `Dreamy Chocolate Peanut Butter Cheesecake` gluten-free is quite simple. The main substitution you’ll need is for the crust. Use your favorite gluten-free chocolate sandwich cookies, crushed to make the crumbs. The rest of the ingredients (cream cheese, sugar, eggs, peanut butter, vanilla, sour cream, chocolate chips) are naturally gluten-free, but always double-check labels to be certain.
How can I tell when my cheesecake is perfectly baked?
The “slight jiggle” test is the most reliable indicator for a perfectly baked cheesecake. Gently nudge the pan; the outer 2-3 inches of the cheesecake should appear set and firm, while the very center (about a 3-inch circle) should still have a noticeable, custardy wobble. This means it will continue to cook slightly as it cools, resulting in that ideal creamy texture.
Can I omit the water bath?
While technically possible, I strongly advise against omitting the water bath for this `Dreamy Chocolate Peanut Butter Cheesecake`. The water bath is fundamental to achieving a crack-free surface and an incredibly creamy, moist interior. Without it, your cheesecake is significantly more likely to crack, dry out, and develop a less desirable texture. It truly is worth the extra step for a superior result.
Ready to Create Your Own Dreamy Chocolate Peanut Butter Cheesecake Masterpiece?
Now that you’re armed with all the expert tips and a foolproof method, there’s nothing stopping you from creating this show-stopping `Dreamy Chocolate Peanut Butter Cheesecake`. Imagine the delight on your friends and family’s faces when they see and taste this decadent creation, perfectly smooth and utterly irresistible. It’s a guaranteed crowd-pleaser for any occasion, from celebratory dinners to a simple indulgence. Don’t let the fear of cracks deter you any longer! Give this recipe a try, and you’ll discover the joy of baking a truly perfect cheesecake every single time. And if you’re a chocolate lover seeking more indulgence, be sure to explore our collection of decadent chocolate brownies, or perhaps whip up some amazing no-bake peanut butter bars for another creamy, nutty treat. Happy baking!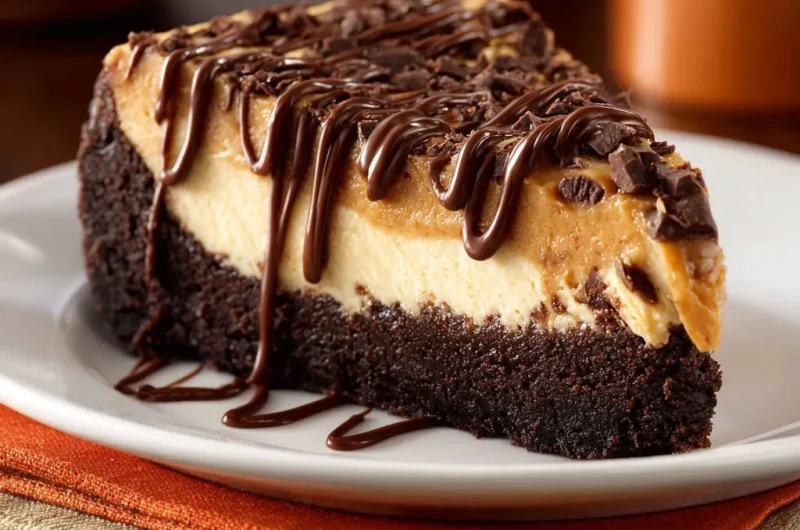
Chocolate Peanut Butter Cheesecake
Course: DessertCuisine: AmericanDifficulty: medium10
servings30
minutes1
hour15
minutes450
kcal105
minutesAchieve a perfectly smooth, crack-free Dreamy Chocolate Peanut Butter Cheesecake every time with this foolproof recipe. Featuring a rich chocolate crust, creamy vanilla, and luscious peanut butter layers, this dessert is finished with a chocolate drizzle and shavings. The secret lies in a simple, crucial cooling step after baking.
Ingredients
For the Chocolate Crust:
2 cups chocolate cookie crumbs (about 24 sandwich cookies, centers removed)
1/2 cup unsalted butter, melted
1/4 cup granulated sugar
For the Vanilla Cheesecake Layer:
2 (8-ounce) blocks cream cheese, softened
3/4 cup granulated sugar
2 large eggs, room temperature
1 teaspoon vanilla extract
1/4 cup sour cream, room temperature
For the Peanut Butter Cheesecake Layer:
1 (8-ounce) block cream cheese, softened
1/2 cup creamy peanut butter
1/2 cup granulated sugar
1 large egg, room temperature
1/2 teaspoon vanilla extract
For the Chocolate Drizzle and Topping:
1/2 cup chocolate chips
1 teaspoon vegetable oil
1/4 cup chocolate shavings or mini chocolate chips
Directions
- Preheat your oven to 325 degrees F (160 degrees C). Lightly grease a 9-inch springform pan. To prevent potential leaks and create a slightly moister baking environment, wrap the bottom and sides of the springform pan tightly with heavy-duty aluminum foil.
- For the chocolate crust, combine the cookie crumbs, melted butter, and 1/4 cup granulated sugar in a medium bowl. Press the mixture evenly into the bottom of the prepared springform pan. Bake for 8 minutes, then remove from oven and let cool slightly while you prepare the filling.
- For the vanilla cheesecake layer, in a large bowl, beat the softened cream cheese and 3/4 cup granulated sugar with an electric mixer on medium speed until smooth and creamy, about 2-3 minutes. Make sure not to overbeat, as too much air can cause cracks. Beat in the eggs one at a time, mixing just until combined after each addition. Stir in the vanilla extract and sour cream until fully incorporated. Pour this mixture over the cooled chocolate crust.
- For the peanut butter cheesecake layer, in a separate bowl, beat the softened cream cheese, creamy peanut butter, and 1/2 cup granulated sugar until smooth. Beat in the egg, then the vanilla extract, mixing just until combined. Spoon dollops of the peanut butter mixture over the vanilla layer. Use a butter knife or skewer to gently swirl the two layers together for a marbled effect, if desired.
- Place the foil-wrapped springform pan inside a larger roasting pan. Carefully pour about 1 inch of hot water into the roasting pan, around the springform pan. This water bath technique is key to preventing cracks by providing a moist, even baking environment.
- Bake for 60-70 minutes, or until the edges are set and the center jiggles only slightly when gently shaken. This is the critical moment for preventing cracks!
- The No-Crack Cooling Method: Once baked, turn off the oven, but do not open the oven door immediately. Let the cheesecake sit in the hot oven with the door closed for 30 minutes. After 30 minutes, crack the oven door open slightly and allow the cheesecake to cool gradually inside the oven for another 1 hour. This slow, controlled cooling prevents the sudden temperature change that often causes cracks.
- Remove the cheesecake from the oven and water bath. Carefully unwrap the foil. Let it cool completely on a wire rack at room temperature for at least 2 hours.
- Once completely cooled, cover the cheesecake loosely with plastic wrap and refrigerate for at least 4 hours, or preferably overnight, to allow it to fully set.
- For the chocolate drizzle, melt the chocolate chips with the vegetable oil in a microwave-safe bowl in 30-second intervals, stirring until smooth. Remove the cheesecake from the springform pan. Drizzle the melted chocolate over the top and sprinkle with chocolate shavings or mini chocolate chips before serving.
Notes
- The slow, controlled cooling method (in the oven and at room temperature) is crucial for preventing cracks and achieving a perfectly smooth top.