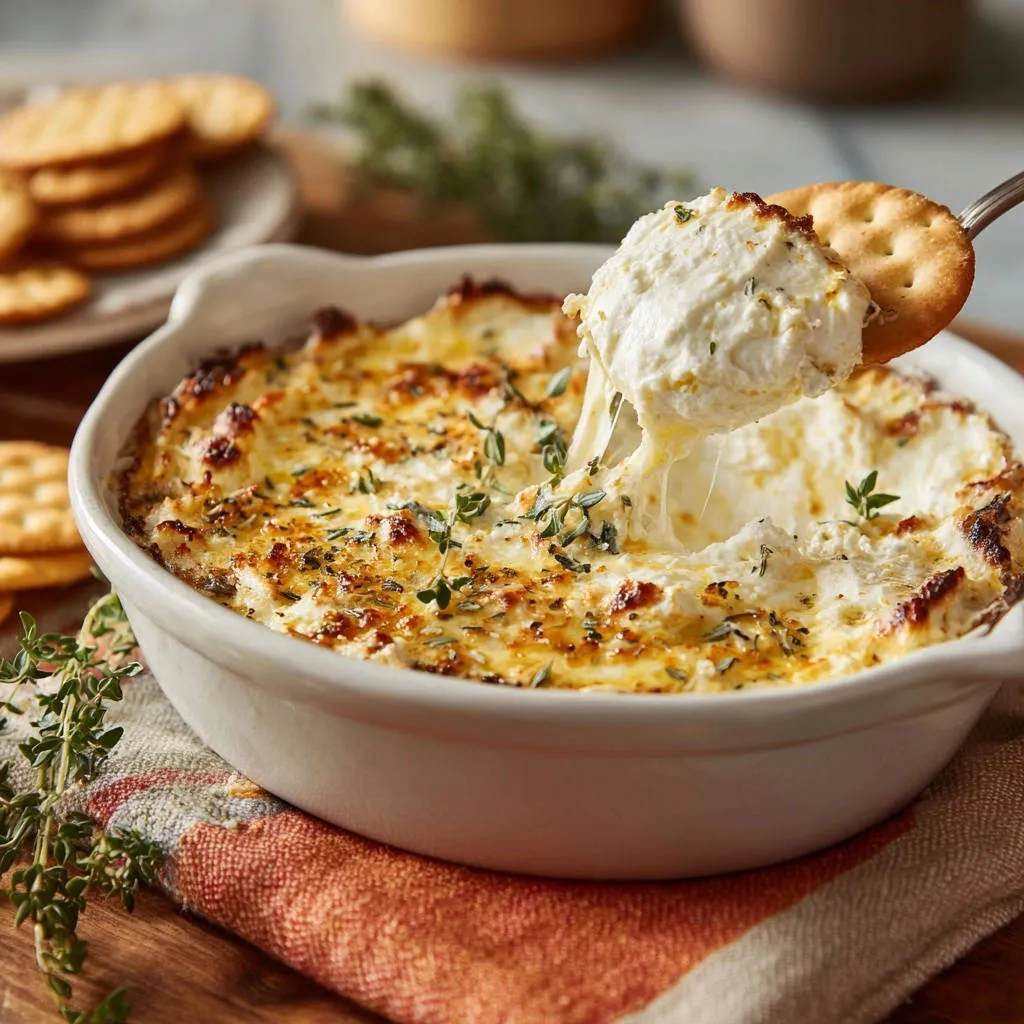
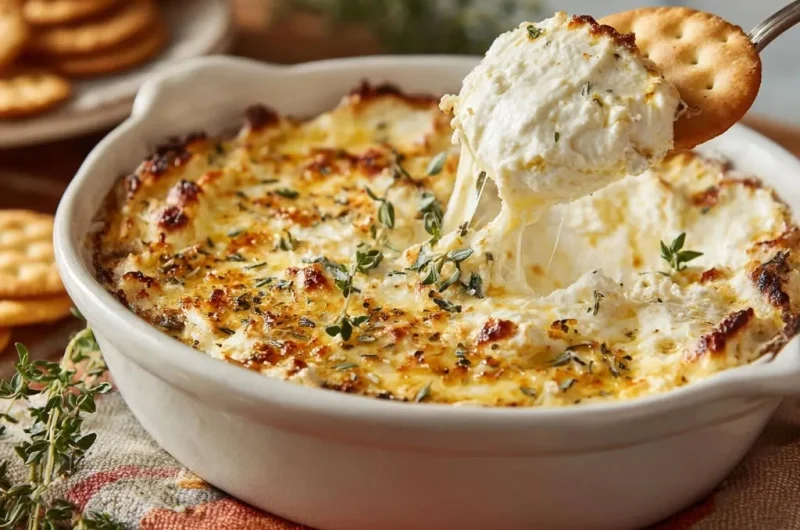
For years, I’ve chased the dream of the ultimate baked dip – one that’s not just warm and flavorful, but truly, irresistibly gooey, without ever turning stiff or rubbery. This Herby Garlic Baked Dip is the culmination of that quest, proving that a single, simple technique can elevate your appetizer game to legendary status, delivering that perfect, stretchy melt every single time.
Why This Herby Garlic Baked Dip Is Your New Go-To Appetizer
Effortless Elegance: Impress Without the Stress
This Herby Garlic Baked Dip recipe redefines easy entertaining. It requires minimal prep time and straightforward steps, making it an ideal choice for last-minute guests or a cozy night in. Despite its simplicity, the rich, aromatic flavors and beautiful golden crust give it an air of impressive sophistication.
The Unbeatable Gooey Texture: A Promise Delivered
Many baked dips promise gooeyness but fall short, often becoming dry or clumpy. My secret lies in a specific mixing technique that ensures this Herby Garlic Baked Dip remains luxuriously creamy and incredibly stretchy. You’ll achieve that coveted, pull-apart cheese experience that truly sets it apart.
Customizable Comfort: Make It Yours
Beyond its perfected texture, this warm garlic dip offers incredible versatility. Its comforting, savory profile is a fantastic canvas for your personal preferences. Easily adapt it with different cheeses, herbs, or a touch of heat, making it a truly bespoke treat for any occasion.
For another take on a rich baked appetizer, explore this baked blue cheese dip with its satisfyingly golden top.
The Essential Ingredients for Your Gooey Herby Garlic Baked Dip
Crafting the perfect cheesy baked dip starts with understanding the role of each ingredient. Quality matters, as does knowing how to best utilize what’s in your pantry.
Dairy Delights: The Cheese & Cream Dream Team
The combination of cheeses in this recipe is key to its legendary texture and flavor. Each contributes a unique characteristic that no single cheese could achieve alone.
Cream Cheese (softened): This forms the velvety, tangy base of our dip. Ensuring it’s truly softened is crucial for a smooth, lump-free mixture.
Shredded Mozzarella Cheese: Mozzarella brings the unparalleled stretch and melt. Opt for a good quality, low-moisture mozzarella for the best results.
Grated Parmesan Cheese: Parmesan adds a deeply savory, nutty, and salty punch, giving the dip an extra layer of gourmet flavor. Freshly grated is always superior.
Milk or Light Cream: This is our secret weapon for gooeyness. It adds just enough moisture to prevent the dip from setting too stiff, promoting that irresistible stretch.
Aromatic Anchors: Fresh vs. Dried Herbs & Garlic
The herbs and garlic are the heart of the “herby garlic” in our Herby Garlic Baked Dip, providing its distinctive aroma and taste.
Dried Thyme: Earthy and slightly peppery, dried thyme infuses the dip with classic savory notes. If using fresh thyme, use triple the amount for a brighter, more vibrant flavor.
Garlic Powder: Offers a smooth, consistent garlic flavor that disperses evenly throughout the dip. For a more pungent, sharper garlic kick, finely minced fresh garlic (about 1 clove) is an excellent substitute.
Pantry Staples: Salt, Pepper, and Other Flavor Enhancers
These essential seasonings ensure the flavors are balanced and bright, truly making the Herby Garlic Baked Dip shine.
Salt & Black Pepper: These aren’t just for seasoning; they enhance all the other flavors. Adjust to your taste, remembering that Parmesan cheese also contributes saltiness.
For a similar savory experience, explore cheesy garlic swirls with a crispy base.
Optional Additions: Consider a pinch of red pepper flakes for a subtle warmth, or a dash of onion powder for added savory depth.
Essential Tools for Your Herby Garlic Baked Dip Adventure
Having the right kitchen tools makes preparing this easy appetizer recipe a breeze. Here’s what you’ll need for perfect results.
Mixing Bowls & Spatulas: Your Prep Arsenal
You’ll need a medium-sized mixing bowl, ideally stainless steel or glass, to comfortably combine your ingredients. A sturdy spatula is perfect for scraping down the sides and gently folding in the last additions.
A hand mixer can be beneficial for thoroughly blending the softened cream cheese initially, ensuring a super smooth base without overworking the other ingredients later on.
The Perfect Baking Dish: Size Matters
A small, oven-safe baking dish with approximately a 1-quart capacity is ideal for this creamy party dip. This size ensures the dip bakes evenly, allowing it to become perfectly bubbly and golden without drying out.
Too large a dish could lead to a thin, dry dip, while too small might cause it to overflow.
Measuring Up: Precision for Perfect Results
Accurate measuring spoons and cups are critical for consistency in both flavor and texture. This ensures that the delicate balance of cheeses, liquids, and seasonings is just right every time you make your Herby Garlic Baked Dip.
Mastering the Herby Garlic Baked Dip: A Step-by-Step Guide
Setting the Stage: Preheat & Prepare Your Dish
Begin by preheating your oven to 375 degrees Fahrenheit (190 degrees Celsius). This ensures the oven is at the correct temperature for even baking from the moment your dip goes in.
Lightly grease a small oven-safe baking dish, roughly 1-quart capacity. A quick spray or a thin swipe of butter prevents sticking and makes serving this melted cheese dip effortless.
The Creamy Foundation: Blending Your Cheeses
In a medium mixing bowl, combine your softened cream cheese, shredded mozzarella, and grated Parmesan. Softened cream cheese is non-negotiable here; it’s the secret to a smooth, lump-free base.
Use a spatula or a hand mixer to blend these cheeses thoroughly until the mixture is smooth and evenly combined. This initial blend ensures a consistent texture throughout your Herby Garlic Baked Dip.
The Critical Gooey Secret: Incorporating Milk and Seasonings
This is the critical step for that perfect gooey texture you’re craving! Add the milk or light cream, dried thyme, garlic powder, salt, and black pepper to your cheese mixture.
Gently mix these ingredients until they are just combined and smooth. It’s vital not to overmix here. The milk needs to be fully incorporated to prevent the dip from drying out during baking and to encourage that signature stretch and luscious gooeyness.
Into the Dish: Spreading Evenly for Consistent Bake
Carefully spoon the prepared Herby Garlic Baked Dip mixture into your greased baking dish. Spread it evenly from edge to edge.
An even layer promotes uniform baking, ensuring every bite of your warm garlic dip is perfectly cooked and melted.
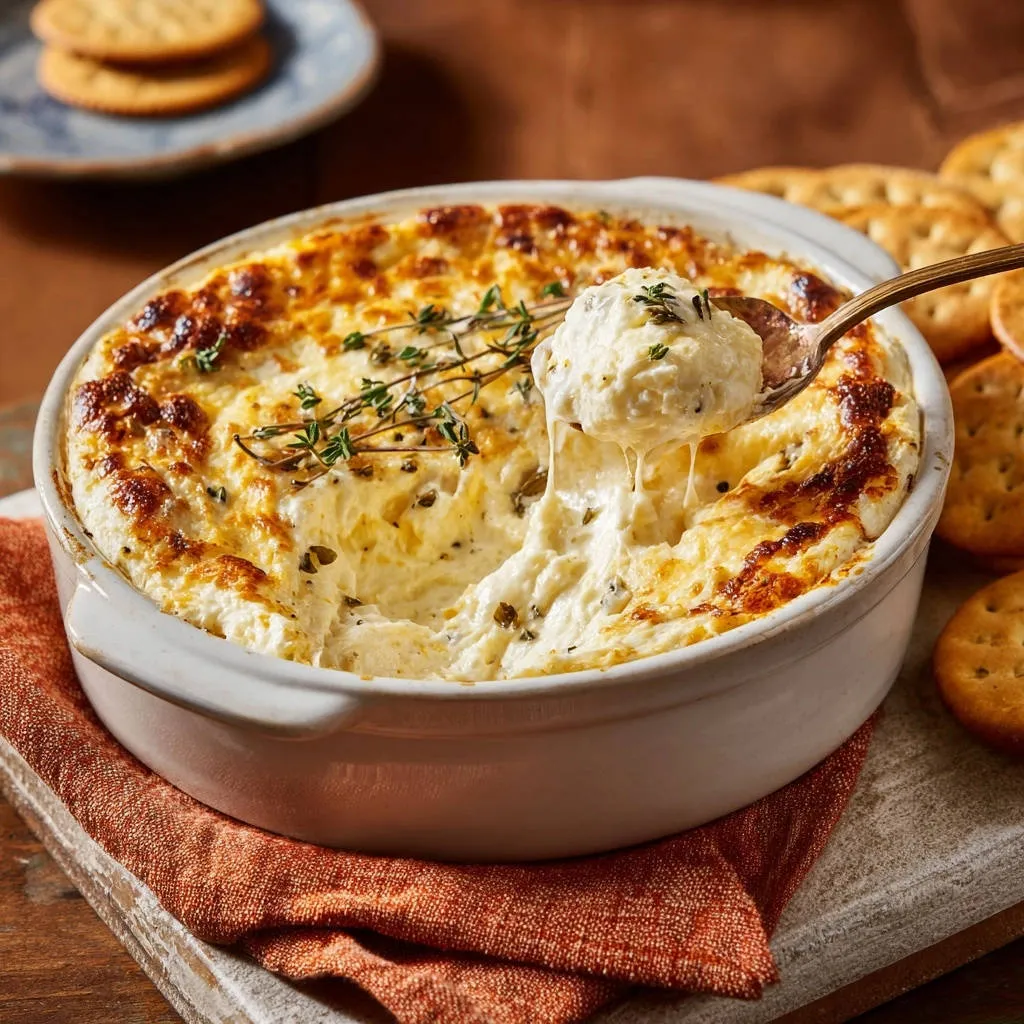
Baking to Golden Perfection: When to Watch, When to Broil
Bake the dip for 20 to 25 minutes, or until you see it bubbling around the edges and it’s lightly golden brown on top. Keep a close eye on it, as overbaking can make the dip less gooey.
If you prefer a deeper golden crust, you can carefully broil for 1 to 2 minutes at the very end. Watch it constantly under the broiler; cheese can go from perfect to burned in a flash.
Serving Up the Warm Goodness: Immediate Enjoyment
Remove the Herby Garlic Baked Dip from the oven and serve it immediately. This ensures you catch it at its peak gooey, melty perfection.
Serve with your favorite sturdy crackers, baguette slices, or fresh vegetables for a truly delightful experience.
Chef’s Secrets: Elevate Your Herby Garlic Baked Dip Experience
Unlock the full potential of your creamy party dip with these expert insights, ensuring every batch is a masterpiece.
For more hearty vegetarian options, consider this flavorful spinach mushroom walnut lasagna.
The Art of Not Overmixing: Preserving Gooeyness
Overmixing, especially after the milk is added, can develop the proteins in the cheese too much, leading to a tougher, less gooey texture. Mix just until everything is combined and smooth.
Stop as soon as you no longer see streaks of individual ingredients, preserving that delightful stretch.
Temperature Triumphs: Softened Cream Cheese is Key
Truly softened cream cheese is the foundation of a smooth dip. If it’s too cold, you’ll end up with lumps that won’t fully melt, compromising the overall texture.
Take it out of the fridge at least 30-60 minutes before you start, or gently warm it in the microwave for 15-20 seconds.
Amping Up the Aromatics: Fresh Herbs vs. Dried
While dried thyme works beautifully, substituting with fresh thyme offers a brighter, more vibrant flavor. Use about 1 tablespoon of fresh thyme leaves for every 1 teaspoon of dried.
Finely minced fresh garlic, approximately one clove, can replace garlic powder for a bolder, sharper aromatic punch in your Herby Garlic Baked Dip.
Golden Brown Perfection: Broiling for Visual Appeal
Broiling is a fantastic trick for achieving a beautiful golden-brown top. Place your Herby Garlic Baked Dip on a top rack, keeping it under the broiler for just 1-2 minutes.
Do not walk away! Cheese can burn very quickly, so constant vigilance is essential for that perfect, appetizing crust.
Beyond Crackers: Creative Ways to Enjoy Your Baked Dip
While crackers are a classic, don’t limit your Herby Garlic Baked Dip experience. This versatile warm garlic dip can be enjoyed in many delightful ways.
Classic Dippers: Crisps, Breads, and Veggies
Sturdy crackers like pita crisps, water biscuits, or even a classic Ritz are perfect. Sliced baguette, toasted or fresh, provides a hearty base for scooping.
For a lighter option, carrot sticks, celery, bell pepper strips, or cucumber slices offer a refreshing crunch that balances the richness of the dip.
Unexpected Pairings: Fruit, Pretzels, and More!
Consider the delightful contrast of crisp apple slices with the savory dip, or the salty crunch of pretzel crisps. These unexpected pairings add an exciting dimension to your party dip spread.
Even sturdy tortilla chips or a light, airy focaccia bread can be excellent accompaniments.
Making it a Meal: Dip as a Sauce or Topping
Transform your leftover Herby Garlic Baked Dip into a flavorful sauce for pasta or grilled chicken. Warm it gently and thin with a splash of milk if needed.
It also makes an incredible topping for baked potatoes, a gourmet spread for quesadillas, or a rich layer in a grilled cheese sandwich, elevating simple dishes to new heights.
Planning Ahead: Make-Ahead & Storage Tips for Your Dip
Maximize convenience and minimize stress by prepping your Herby Garlic Baked Dip in advance. It’s perfect for parties or just having on hand.
Can You Make It Ahead? Prepping for Parties
Yes, you can absolutely prepare the dip mixture up to 24 hours in advance. Simply combine all the ingredients as per the recipe, then transfer the mixture to your greased baking dish.
Cover the dish tightly with plastic wrap and refrigerate. When ready to bake, remove it from the fridge while your oven preheats, then bake as directed, potentially adding a few extra minutes to the baking time.
Leftovers? Storing and Reheating for Later Enjoyment
Store any leftover Herby Garlic Baked Dip in an airtight container in the refrigerator for up to 3-4 days. While it’s best fresh, reheating is possible.
To reheat, spoon individual portions into an oven-safe dish or microwave-safe bowl. Reheat in the oven at 300°F (150°C) until warm and bubbly, or in the microwave in 30-second intervals, stirring in between, until heated through and gooey again.
Troubleshooting Your Herby Garlic Baked Dip: Common Issues Solved
Even experienced cooks face challenges. Here’s how to quickly resolve common issues with your cheesy baked dip.
“My Dip Isn’t Gooey Enough!”
This often happens if the dip was overbaked, causing the cheeses to seize up, or if the mixture was overmixed, leading to a less pliable texture. Ensure you follow the baking times closely and do not overmix, especially after adding the milk.
Another reason could be insufficient liquid. Verify your milk/cream measurement, as it’s crucial for the signature gooeyness of this Herby Garlic Baked Dip.
“My Dip is Too Oily!”
Excess oil can sometimes occur if you use a cheese with a very high fat content or if the baking temperature is too high. Ensure your oven isn’t running hot by checking it with an oven thermometer.
If you notice a little oil pooling on top, you can gently blot it with a paper towel before serving, without sacrificing flavor.
“It’s Bland! Where’s the Flavor?”
If your Herby Garlic Baked Dip tastes a bit flat, it likely needs more seasoning. Taste before baking and adjust the salt and pepper as needed.
Consider boosting the garlic and herb flavors by adding a little more fresh minced garlic or a pinch more dried thyme. A tiny squeeze of lemon juice can also brighten the overall flavor profile.
Your Herby Garlic Baked Dip Questions Answered
What kind of cheeses work best?
While the recipe uses mozzarella, Parmesan, and cream cheese for a balanced flavor and melt, you can experiment. Gruyere adds nuttiness, fontina provides excellent melt, and a touch of white cheddar offers sharpness. Always aim for a mix of good melting cheeses and flavorful hard cheeses.
Can I make this dairy-free?
Yes, absolutely! There are many excellent dairy-free alternatives available. Look for plant-based cream cheese, shredded mozzarella, and Parmesan substitutes. Ensure your chosen milk alternative is unsweetened and unflavored, such as plain almond or oat milk.
How long does the dip last in the fridge?
Baked Herby Garlic Baked Dip can be safely stored in an airtight container in the refrigerator for 3 to 4 days. Always trust your senses; if it looks or smells off, it’s best to discard it.
Can I freeze baked dip?
Freezing baked dip is generally not recommended as the texture of dairy, especially cream cheese, can change upon thawing and reheating, often becoming grainy or separating. It’s best enjoyed fresh or from refrigeration within a few days.
What other herbs can I use?
Beyond thyme, many herbs complement garlic and cheese beautifully. Fresh or dried chives add a mild oniony note, fresh parsley brightens the flavor, and a tiny hint of fresh rosemary or oregano can add an earthy depth. Experiment to find your favorite combination!
Share the Gooey Love: Your Herby Garlic Baked Dip Awaits!
You now hold the secret to the perfect, effortlessly gooey Herby Garlic Baked Dip. This recipe promises not just an easy appetizer, but a truly delightful experience that will have everyone asking for your secret.
Explore More Delicious Dishes
Since you’re enjoying this herby garlic baked dip, consider these chicken recipes that complement its flavors beautifully.
- For a similar cheesy, baked delight, try this Perfect Cheesy Baked Chicken, offering a juicy main that pairs well with dips.
- If you enjoy garlic and cheese, this Crispy Garlic Parmesan Stuffed Chicken provides a satisfying main dish with familiar, appealing tastes.
Don’t just take my word for it; dive in and create this warm garlic dip for your next gathering or a simple cozy evening. I encourage you to whip up this exceptional cheesy baked dip and share your beautifully gooey creations! Enjoy every irresistible bite.
Baked Dip
Course: AppetizerCuisine: AmericanDifficulty: easy6
servings15
minutes20
minutes240
kcal40
minutesDiscover the secret to a perfectly gooey and rich herby cheese dip every time. This warm, bubbling baked dip combines cream cheese, mozzarella, and Parmesan with a touch of thyme and garlic, ensuring an irresistibly melty and stretchy texture that’s perfect for sharing.
Ingredients
8 ounces cream cheese, softened
1 cup shredded mozzarella cheese
1/2 cup grated Parmesan cheese
2 tablespoons milk or light cream
1 teaspoon dried thyme (or 1 tablespoon fresh thyme leaves)
1/2 teaspoon garlic powder (or 1 clove fresh garlic, minced very fine)
1/4 teaspoon salt
1/8 teaspoon black pepper
Crackers, for serving
Directions
- Preheat your oven to 375 degrees Fahrenheit (190 degrees Celsius). Lightly grease a small oven-safe baking dish (about 1-quart capacity).
- In a medium mixing bowl, combine the softened cream cheese, shredded mozzarella cheese, and grated Parmesan cheese. Use a spatula or hand mixer to blend thoroughly until smooth.
- Add the milk or light cream, dried thyme, garlic powder, salt, and black pepper to the cheese mixture. This is the critical step for that perfect gooey texture: gently mix until just combined and smooth. Do not overmix, but ensure the milk is fully incorporated to prevent the dip from drying out during baking and to encourage that signature stretch.
- Spoon the prepared cheese mixture into your greased baking dish, spreading it evenly.
- Bake for 20 to 25 minutes, or until the dip is bubbly around the edges and lightly golden brown on top. Keep a close eye on it to prevent overbaking, which can lead to a less gooey texture. If you desire more browning on top, you can carefully broil for 1 to 2 minutes at the very end, watching constantly to avoid burning.
- Remove from the oven and serve immediately with crackers, while it’s still warm and wonderfully gooey.
Notes
- Do not overmix the cheese mixture after adding milk to ensure a perfectly gooey texture.